

Creating a new project
To launch Unreal Engine, you can either click on the Launch button in the top-right corner of the Epic Games Launcher and choose your desired version or double-click on the Unreal Engine icon which will likely be created on your desktop, which is linked to a specific version. The launcher is more flexible and provides more options. Once the engine has been launched, you will be presented with a window that contains multiple options. The left-hand side of the window displays five sections, each representing different fields of usage, such as game development, architecture visualization, and virtual production. Each section contains several templates, but don’t be intimidated by these choices – you can always import content and activate plugins from other templates later on.
For architectural visualization, it’s best to start from the Architecture section and choose either the Blank or Archvis template. For demonstration purposes, I will start with the Blank template:

Figure 1.3: Creating a new project
Next, you will need to choose the default location and name of your project. It’s highly recommended that you name your project properly from the beginning to avoid any future issues when packaging it. The naming convention in Unreal Engine, which is based on C++, is CamelCase, meaning a name is formed by multiple words joined together as a single word with the first letter of each word capitalized. An example is TheCliffHouse.
Once we’ve opened our newly created project, we’ll be greeted by Unreal’s sometimes intimidating interface. Don’t let it scare you – it can be overwhelming at first glance, but with a little bit of understanding, it becomes quite intuitive:
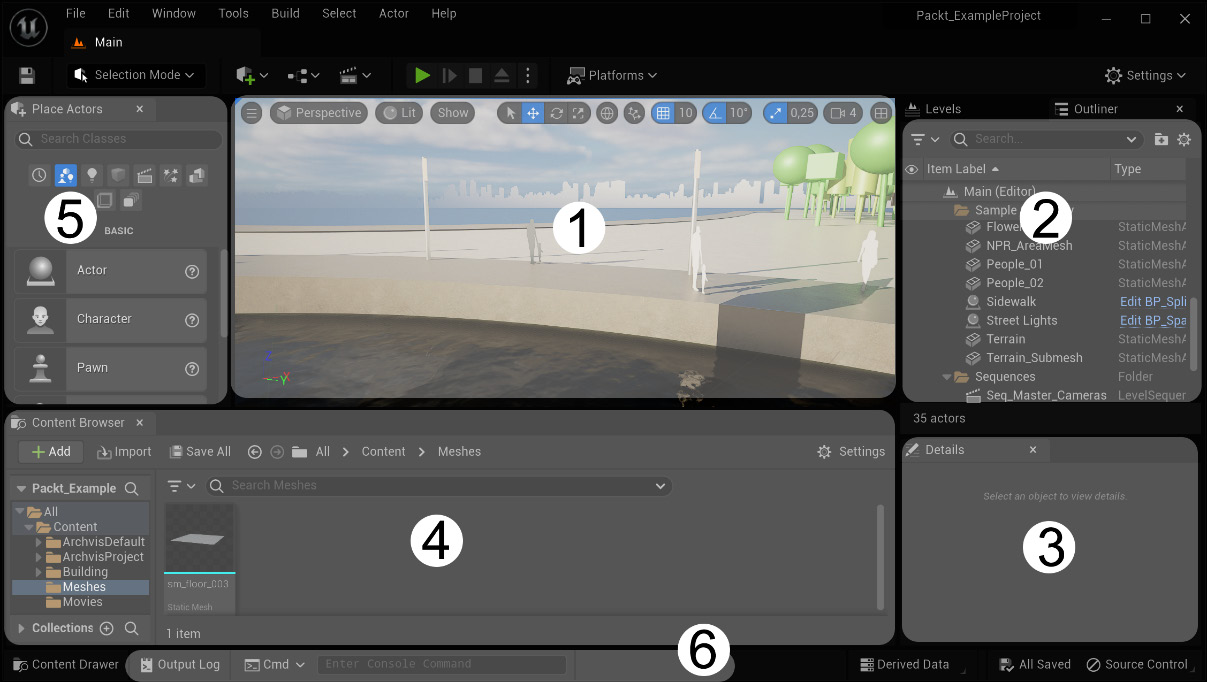
Figure 1.4: Unreal’s default interface
The interface is divided into several main areas, each with its own purpose: in the center of the screen, you can see a 3D viewport (1) depicting your scene. Several panels provide access to different tools and settings. Some of the most used panels include the scene outliner (2), which shows a hierarchical view of all the objects in the scene, and the Details panel (3), which allows you to edit the properties of an object. From the Window tab, you can add other panels and dock them anywhere within the interface.
Unreal Editor is also where you will find the Content Browser (4). This is where you can access all the assets that you have imported into your project, such as textures, models, and audio files. Last, but not least, you have the Place Actors tabs (5) from which you can insert into the scene all the main types of actors. With a little bit of practice and experimentation, you will soon become comfortable using Unreal Engine’s interface. The short command line at the bottom of the interface is the console tab (6) and is where you can type and give instructions through console commands. This part is vital and can be expanded via the Output Log button next to it.
In short, to organize your scene and assets, there are three main things you must focus on:
- Content Browser: This is where you keep everything and is arguably the most important panel.
- The outliner: This displays all the objects in the scene and allows you to organize them into folders and groups.
- The Level panel: By default, it is hidden, but it can be called by going to the menu bar, choosing Windows, then Level, and docking it on the interface. Levels, which are also known as Maps in Unreal, are scenes containing actors and can serve multiple purposes. The Level panel might resemble a layer manager, but that would be incorrect since levels are much more powerful; each is a standalone scene that can be programmed with specific instructions.
Besides these, there are some more useful functions for organizing assets, such as collections and layers, but we’ll discuss them briefly later when we cover asset management. It’s important to organize things from the start, including preparing the interface, to ensure a smooth workflow and prevent a simple scene from becoming a cluttered and disorganized monster. We’ll revisit this topic in future chapters.
Now that we’ve had our first look at Unreal from within, let’s learn how to organize our interface and project.