Reader small image

You're reading from  Corona SDK Mobile Game Development: Beginner's Guide

Product typeBook
Published inMar 2015
Publisher
ISBN-139781783559343
Edition1st Edition
Tools
Right arrow
Author (1)
Michelle M Fernandez
Right arrow

Chapter 10. Optimizing, Testing, and Shipping Your Games

Developing a game to the point of completion is a great accomplishment. It's one step closer to sharing it with the rest of the world, so that other people can play your new game. The benefit of creating your game with Corona SDK is that you have the option to build for iOS and/or Android. You want to ensure that your application is ready for submission so that it can be distributed in the mobile platform you're developing in. We'll go over the process of what it takes to prepare your game for its release.

Note

The application interface used here is frequently updated; however, you will be able to perform all the steps irrespective of the interface you're using.

In this chapter, we will cover the following topics:

  • Improve the performance of your application

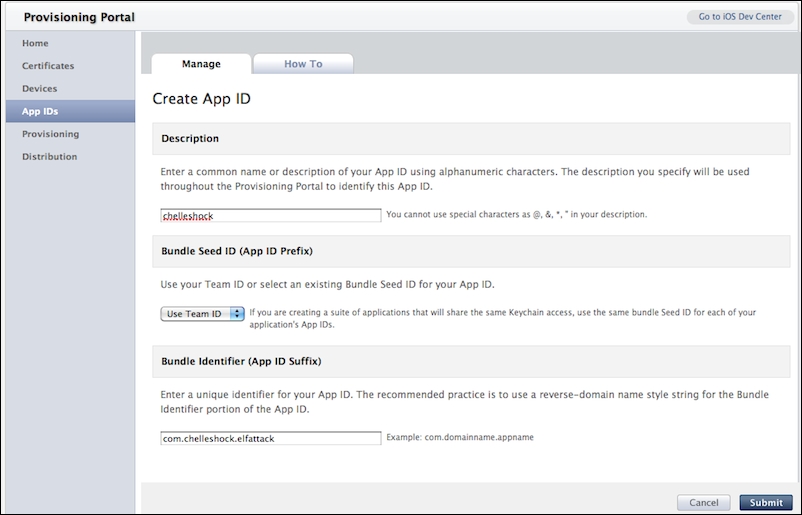
  • Set up a distribution provisioning profile for the App Store

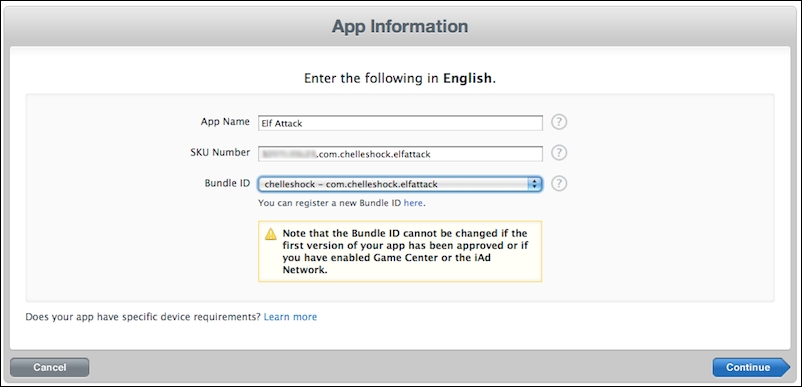
  • Manage application information in iTunes Connect

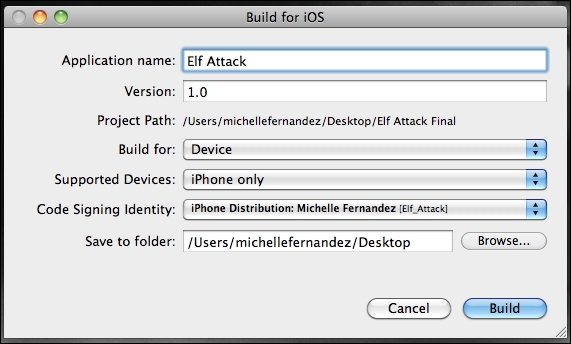
  • Learn how to submit an application to the Application Loader for the App...

Understanding memory efficiency


As you develop your application, you should always consider how your design choices affect the performance of your application. The device memory still has its constraints even though there are improvements in the computing power and memory. Performance and optimization within the device will not only achieve faster response times, but also help minimize memory usage and maximize battery life. A link to an example on how to check memory usage can be found at https://gist.github.com/JesterXL/5615023.

Memory is an important resource on mobile devices. When too much memory is being consumed, devices may be forced to quit your application when you least expect it. Here are some things to be aware of while developing:

  • Eliminate memory leaks: Allowing leaks to exist means having extra used memory in your application that takes up valuable space. Even though Lua does automatic memory management, memory leaks can still occur in your code. For example, when you introduce...

Distributing iOS applications


Once your game is finally debugged and completed, what's next? Assuming you're already registered in the iOS Developer Program, there are some guidelines that have to be followed before an application can be submitted to the App Store.

Prepping your app icons

There are various image sizes and naming conventions required for your app icon, depending on which iOS devices your application is developed for. You can find the latest information under the App Icon subsection of the Icon and Image Design section of the iOS Human Interface Guidelines, on the Apple Developer website at https://developer.apple.com/library/ios/documentation/UserExperience/Conceptual/MobileHIG/AppIcons.html#//apple_ref/doc/uid/TP40006556-CH19-SW1.

The following are the app icon requirements, which also need to be in a noninterlaced .png format:

  • iTunesArtwork@2x: This is a 1024 x 1024 px image. The .png extension needs to be removed for this image.

  • Icon-60@2x.png: This is a 120 x 120 px image...

Time for action – setting up your distribution certificate and provisioning profile for the App Store


We have focused on creating development certificates and provisioning profiles to test and debug our apps on a device. Now, we have to create a distribution version of them in order to submit an iOS application. Be aware that Apple can change the design of their website at any time. So, don't get frustrated if the steps and screenshots do not match up:

  1. Log in to your Apple Developer account and go to Certificates, Identifiers, & Profiles. Click on App IDs. Create a new App ID by selecting the + icon in the upper-right corner and create a description that pertains to your application so that you can identify it. If you have an existing App ID that you have been using during development, you can disregard this step.

  2. Click on Distribution under Provisioning Profile. Select the + button and select App Store under the Distribution section. Press Continue.

  3. Select the App ID you want to associate...

iTunes Connect


iTunes Connect is a suite of web-based tools that allows you to submit and manage your applications for distribution on the App Store. In iTunes Connect, you will be able to check the status of your contracts; set up your tax and banking information; obtain sales and finance reports; request promotional codes; and manage users, applications, metadata, and your In-App Purchase catalog.

Contracts, tax, and banking

If you plan on selling your app, you need to have a paid commercial agreement in place so that it can be posted to the App Store. You will have to request a contract pertaining to iOS Paid Applications. All this is done through iTunes Connect under the Contracts, Tax, and Banking links.

When requesting contracts, beware of potential issues that can occur, such as delays when Apple processes your information for the first time and/or issues when changing your current contact information in iTunes Connect (that is, change of address if you have moved to a different location...

Time for action – managing your application in iTunes Connect


We will now go over how to set up our application information in iTunes Connect. Any other information pertaining to user accounts, contracts, and banking that you would like to set up can be found at https://developer.apple.com/app-store/review/.

  1. Log in to iTunes Connect at http://itunesconnect.apple.com/. Your login information is the same as your iOS Developer account. Once logged in, select Manage Your Applications. Click on the Add New App button. App Name is the name of your application. SKU Number is a unique alphanumeric identifier for the app. Bundle ID is the one you created in the iOS Provisioning Portal. Fill in the information and click on Continue:

  2. The next step is to select the date on which you want your application to be live in the App Store and Price Tier that you want to charge. There is an optional checkbox for Discount for Educational Institutions. This is only if you want your app to be discounted for educational...

Building an iOS application for distribution in Corona


We have come to the homestretch in getting your iOS application submitted to the App Store. Assuming that you have already tested your application and debugged it with your development provisioning profile, you're ready to create a distribution build that will create a binary ZIP file of your app.

Time for action – building your application and uploading it to the Application Loader


Time to create the final game build for iOS distribution and upload it to the Application Loader for review under Apple's board.

  1. Launch the Corona simulator, navigate to the application project folder, and run it. Go to the Corona simulator menu bar and then to File | Build | iOS. Fill in all your application details. Make sure that your Application Name and Version fields match what is displayed in your iTunes Connect account. Choose Device to build an app bundle. Next, select the target device (iPhone or iPad) your app is created for from the Supported Devices drop-down menu. Under the Code Signing Identity drop-down menu, choose the Distribution Provisioning Profile option you created in the iOS Provisioning Portal. In the Save to folder section, click on Browse and choose where you would like your application to be saved. Click on the Build button when done:

  2. When the build has been compiled, you will...

The Google Play Store


The Google Play Store is a publishing platform that helps you publicize, sell, and distribute your Android applications to users around the world.

To register as a Google Play Developer and get started with publishing, visit the Google Play Android Developer Console publisher site. You can sign up for an account at https://play.google.com/apps/publish/.

Creating launcher icons

A launcher icon is a graphic that represents your application. Launcher icons are used by applications and appear on the user's home screen. They can also be used to represent shortcuts in your application. These are similar to the icons created for iOS applications. The following are the launcher icon requirements, which also need to be in a 32-bit .png format:

  • Icon-ldpi.png: This is a 36 x 36 px image at 120 dpi, which is used for low-density screen

  • Icon-mdpi.png: This is a 48 x 48 px image at 160 dpi, which is used for medium-density screen

  • Icon-hdpi.png: This is a 72 x 72 px image at 240 dpi...

Time for action – signing your app for the Google Play Store


The Android system requires all the installed applications to be digitally signed with a certificate whose private key is held by the application's developer. The Android system uses the certificate as a means of identifying the author of an application and establishing a relationship of trust between applications. The certificate is not used to control which applications the user can install. The certificate does not need to be signed by a certificate authority; it can be self-signed. Certificates can be signed on either Mac or Windows systems.

  1. On the Mac, go to Applications | Utilities | Terminal. On Windows, go to Start Menu | All Programs | Accessories | Command Prompt. Using the keytool command, add in the following lines and press Enter:

    keytool -genkey -v -keystore my-release-key.keystore -alias aliasname -keyalg RSA -validity 999999
    

    Note

    Replace my-release-key with the name of your application and aliasname with a similar...

Time for action – submitting an app to the Google Play Store


We'll use the Developer Console. This is where your developer profile will be created to publish to the Google Play Store.

  1. Once you're logged in to the Developer Console, click on the Android icon and select the button that says Add new application. You will be greeted with a pop-up window that will allow you to upload your build. Select your default language from the drop-down menu and enter the name of your app under Title. Click on the Upload APK button to proceed to the next page.

  2. Click on Upload your first APK to Production and then on Browse files to locate the .apk file of your application. Select the Open button to upload your file.

  3. After your .apk file is uploaded, select the Store Listing tab. Fill out the information with the details of your app, including Title, Short description, and Full description:

  4. In the Graphic Assets section, add in your app screenshots. At least two screenshots are required to submit your app. Other...

Summary


We have accomplished a huge milestone with this chapter. We know how to submit not only to one but two major app markets! Publishing your applications to the App Store and Google Play Store is not scary, after all.

We have covered the following topics:

  • The importance of memory efficiency

  • Creating provision profiles for distribution to the App Store

  • Managing iTunes Connect

  • Submitting a binary to the Application Loader

  • Signing a release build for Android applications

  • Submitting .apk files to the Google Play Store

In the next chapter, we'll take a look at In-App Purchases in the Apple iTunes Store for the iOS platform.

lock icon
The rest of the chapter is locked
You have been reading a chapter from
Corona SDK Mobile Game Development: Beginner's Guide
Published in: Mar 2015Publisher: ISBN-13: 9781783559343
Register for a free Packt account to unlock a world of extra content!
A free Packt account unlocks extra newsletters, articles, discounted offers, and much more. Start advancing your knowledge today.
undefined
Unlock this book and the full library FREE for 7 days
Get unlimited access to 7000+ expert-authored eBooks and videos courses covering every tech area you can think of
Renews at $15.99/month. Cancel anytime

Author (1)