Reader small image

You're reading from  Corona SDK Mobile Game Development: Beginner's Guide

Product typeBook
Published inMar 2015
Publisher
ISBN-139781783559343
Edition1st Edition
Tools
Right arrow
Author (1)
Michelle M Fernandez
Right arrow

Chapter 5. Animating Our Game

We're off to a great start in our mobile game development journey. We have already gone through a great deal of programming, from game logic to displaying objects on screen. One of the most powerful things about the Corona SDK is that any display object can be animated. This is a testament to the flexible graphics model that Corona offers.

Animation adds a lot of character to the user experience in a game. This is accomplished by generating a sequence of frames that evolve smoothly from frame to frame. We'll be learning this skill and applying it to the new game that we're going to create.

In this chapter, we will:

  • Work with motion and transitions

  • Animate with image sheets

  • Create a game loop for display objects

  • Build our next game framework

Let's animate!

Panda Star Catcher


This section involves creating our second game called Panda Star Catcher. The main character is a panda named Ling Ling, who needs to be launched toward the skies and catch as many stars as possible before the timer runs out. The panda will be animated and have separate movements for every course of action that is applied, such as during the setup before launch and while it's in the air. The slingshot mechanics will also be applied to launch Ling Ling into the air. You might have seen similar features in games such as Angry Birds and Crush the Castle.

Let's get everything moving


We have introduced transitions in Chapter 3, Building Our First Game – Breakout, and briefly touched base with it. Let's go into more detail.

Transitions

The transition library allows you to create animations with only a single line of code by allowing you to tween one or more properties of a display object. We have discussed the basics of transitions back in Chapter 3, Building Our First Game – Breakout.

This can be done through the transition.to method, which takes a display object and a table that contains the control parameters. The control parameters specify the duration of the animation and the final values of properties for the display object. The intermediate values for a property are determined by an optional easing function, which is also specified as a control parameter.

The transition.to() method animates a display object's properties over time, using the "easing" algorithm.

The syntax is handle = transition.to( target, params ).

The return function is an...

The value of timed functions


Using a function that can be called at a later time can be helpful when organizing the timing of your game objects' appearance in an application. The timer library will allow us to handle our functions in a timely manner.

Timers

The timer function enables you to trigger events at a specific delay (in milliseconds) of your choosing.

  • timer.performWithDelay(delay, listener [, iterations]): This invokes the listener after a delay in milliseconds and returns a handle to an object that you can pass to timer.cancel() in order to cancel the timer before it invokes the listener. For example:

    local function myEvent()
      print( "myEvent called" )
    end
    timer.performWithDelay( 1000, myEvent )
  • timer.cancel(timerId): This cancels a timer operation initiated with timer.performWithDelay(). The parameter is as follows:

    • timerId: This is an object handle returned by the call to timer.performWithDelay(). For example:

      local count = 0
      
      local function myEvent()
        count = count + 1
        print...

What are image sheets?


Corona SDK includes an image sheet feature to construct animated sprites (also known as sprite sheets).

Note

For more information on image sheets, refer to the following link at http://docs.coronalabs.com/guide/media/imageSheets/index.html.

Image sheets are an efficient way to save texture memory. They are recommended for complex character animation or when numerous types of animations are involved.

Image sheets require more coding and have more of an advanced setup. They require the construction of a large sheet of animation frames.

It's sprite mania!


Image sheets are 2D animations that compile multiple frames into a single texture image. This is an efficient way to save on texture memory. It is beneficial for mobile devices and minimizes the loading time.

Image sheet API

The graphics.newImageSheet function creates a new image sheet. Refer to the following code:

graphics.newImageSheet( filename, [baseDir, ] options )

For example, the number of frames in the image sheet is assumed to be floor(imageWidth/frameWidth) * floor(imageHeight/frameHeight). The first frame is placed at the top-left position and reads left to right and follows the next row, if applicable. The following image sheet has five frames that are 128 x 128 pixels each. The image sheet image is 384 pixels x 256 pixels altogether. If it were to be integrated in Corona, a sample method would be displayed like this:

local options =
{
  width = 128,
  height = 128,
  numFrames = 5,
  sheetContentWidth=384, 
  sheetContentHeight=256
}
local sheet = graphics.newImageSheet...

Game time!


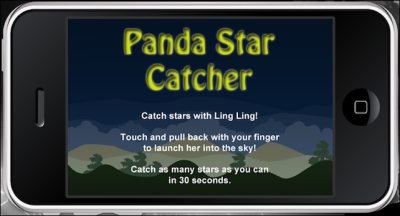
Now that we have learned how to set up image sheets, let's try to incorporate them into Panda Star Catcher! You can download the project files that accompany this book from the Packt Publishing website. There is a project folder called Panda Star Catcher in the Chapter 5 folder. It already has the config.lua and build.settings files set up for you. The art assets are included in the folder as well. From Chapters 3, Building our First Game – Breakout and Chapter 4, Game Controls, you might have noticed that the build and runtime configuration has a similar setup. This tutorial is compatible for both iOS and Android devices. The graphics included in the project folder have been designed to display properly on both platforms. The welcome screen of the game will look like the following:

Time for action – setting up the variables


Let's start off with introducing all the variables needed to run the game:

  1. Create a brand new main.lua file and add it in the Panda Star Catcher project folder.

  2. Let's hide the status bar from the devices and set all the variables needed in game:

    display.setStatusBar( display.HiddenStatusBar ) -- Hides the status bar in iOS only
    
    -- Display groups
    local hudGroup = display.newGroup() -- Displays the HUD
    local gameGroup = display.newGroup()
    local levelGroup = display.newGroup()
    local stars = display.newGroup() -- Displays the stars
    
    -- Modules
    local physics = require ("physics")
    
    local mCeil = math.ceil
    local mAtan2 = math.atan2
    local mPi = math.pi
    local mSqrt = math.sqrt
    
    -- Game Objects
    local background
    local ground
    local powerShot
    local arrow
    local panda
    local poof
    local starGone
    local scoreText
    local gameOverDisplay
    
    -- Variables
    local gameIsActive = false
    local waitingForNewRound
    local restartTimer
    local counter
    local timerInfo 
    local numSeconds...

Let's start the round


We'll need to load the panda to the game screen before it can launch. The panda will transition from the bottom of the screen and move upward on the screen before any touch event can occur.

Time for action – starting the game


Right now, we need to set the offscreen position for the panda and have it transition to its starting launch location, so the user can interact with it.

  1. After adding the variables, create a new local function called startNewRound() and add an if statement to initiate the panda object into the scene:

    local startNewRound = function()
      if panda then
  2. Add a new local function called activateRound() within startNewRound(). Set the starting position of the panda display object on screen and add ground:toFront(), so that the ground appears in front of the panda character:

      local activateRound = function()
    
        waitingForNewRound = false
    
        if restartTimer then
          timer.cancel( restartTimer )
        end
    
        ground:toFront()
        panda.x = 240
        panda.y = 300
        panda.rotation = 0
        panda.isVisible = true
  3. Create another local function called pandaLoaded(). Set gameIsActive to true and set the panda object's air and hit properties to false. Add panda:toFront...

Poof! Be gone!


The panda needs to disappear from the stage after a turn has been made. Instead of having it disappear into thin air, we'll be adding a "poof" effect when it collides with any object on the screen.

Time for action – reloading the panda on the stage


When the panda has been in the air for a certain amount of time or has hit any out-of-bounds areas off the screen, it will turn into a cloud of smoke. The panda will be replaced with a "poof" image when a collision event occurs with the edge of the screen or the ground. The visible properties of the panda have to be turned off for the "poof" effect to work. When the collision has been made, the panda needs to be reloaded back onto the screen while the game is still activated.

  1. Create a local function called callNewRound(). Include a local variable called isGameOver and set it to false:

    local callNewRound = function()
      local isGameOver = false
  2. Within the current function, create a new local function called pandaGone(). Add in the new properties for the panda, so it no longer displays on the game stage:

      local pandaGone = function()
    
        panda:setLinearVelocity( 0, 0 )
        panda.bodyType = "static"
        panda.isVisible = false
        panda.rotation...

Earning some points


Points are earned when the panda catches any stars in the sky. The game is run on a timer, so it is the player's job to catch as many stars as they can, before the time runs out. Let's rack up some points!

Time for action – tracking the score


The score updates through a parameter called scoreNum and displays it during the game play. The score number is received through gameScore.

  1. The next function that will be created is called setScore with a parameter called scoreNum:

    local setScore = function( scoreNum )
  2. Use a local variable called newScore and set it as scoreNum. Set the gameScore = newScore. Provide an if statement for gameScore, so that the score during game play is set to 0:

      local newScore = scoreNum
      gameScore = newScore
    
      if gameScore < 0 then gameScore = 0; end
  3. Add the scoreText display object and make it equal to gameScore. Close the function:

      scoreText.text = gameScore
      scoreText.xScale = 0.5; scoreText.yScale = 0.5
      scoreText.x = (480 - (scoreText.contentWidth * 0.5)) - 15
      scoreText.y = 20
    end

What just happened?

For setScore = function(scoreNum), we set a parameter called scoreNum. The scoreNum parameter will update the game score continuously through local newScore. newScore...

When the game ends


There are no losers in this game. Everyone wins! You'll still keep your adrenaline pumping by trying to catch as many stars as you can before the timer runs out. When it's all over, we still need to be notified that the time is up.

Time for action – displaying the game over screen


We need to set up the game over screen and have it display the final score that the player has achieved at the end of the round:

  1. Create a new local function called callGameOver():

    local callGameOver = function()
  2. Set gameIsActive as false and pause the physics engine. Remove the panda and stars objects from the stage:

      gameIsActive = false
      physics.pause()
    
      panda:removeSelf()
      panda = nil
      stars:removeSelf()
      stars = nil
  3. Display the game over objects and insert them into the hudGroup group. Use the transition.to method to display the game over objects on the screen:

      local shade = display.newRect( 0, 0, 480, 320 )
      shade:setFillColor( 0, 0, 0, 0.5)
      shade.x = display.contentCenterX
      shade.y = display.contentCenterY
    
      gameOverDisplay = display.newImage( "gameOverScreen.png")
      gameOverDisplay.x = 240; gameOverDisplay.y = 160
      gameOverDisplay.alpha = 0
    
      hudGroup:insert( shade )
      hudGroup:insert( gameOverDisplay )
    
      transition.to(...

Background display


The panda needs a general setting of where it's located in the game. Let's set the background and ground objects.

Time for action – adding the background elements


  1. Add in the background and ground display objects to the drawBackground() function. Insert the objects in the group called gameGroup:

    local drawBackground = function()
    
      background = display.newImage( "background.png" )
      background.x = 240; background.y = 160
    
      gameGroup:insert( background )
    
      ground = display.newImage( "ground.png" )
      ground.x = 240; ground.y = 300
    
      local groundShape = { -240,-18, 240,-18, 240,18, -240,18 }
      physics.addBody( ground, "static", { density=1.0, bounce=0, friction=0.5, shape=groundShape } )
    
      gameGroup:insert( ground )
    
    end

What just happened?

The background and ground display objects are placed in the function called drawBackground(). The ground object has a customized physical shape that is not the same size as the original display object. So if the panda happens to hit the ground, it will collide with it but not fall through.

Heads up!


Before the game can be played, we need a general idea of how to operate the controls of the game. Luckily, we'll be adding a help screen that explains how to play. The heads-up display (HUD) needs to be displayed as well, so that the player can be updated on the time left on the clock and see how many points they have accumulated.

Time for action – displaying the timer and score


Let's set up the help screen and HUD elements that need to be displayed during the game:

  1. Create a new local function called hud():

    local hud = function()
  2. Display helpText at the start of the game for 10 seconds. Have it transition by sliding it to the left and turning visibility to false. Add helpText to the hudGroup group:

      local helpText = display.newImage("help.png")
      helpText.x = 240; helpText.y = 160
      helpText.isVisible = true
      hudGroup:insert( helpText )
    
      timer.performWithDelay( 10000, function() helpText.isVisible = false; end, 1 )
    
      transition.to( helpText, { delay=9000, time=1000, x=-320, transition=easing.inOutExpo })
  3. Display counter and scoreText near the top of the screen. Add scoreText to the hudGroup group as well. Close the function with end:

      counter = display.newText( "Time: " .. tostring(numSeconds), 0, 0, "Helvetica-Bold", counterSize )
      counter:setFillColor( 1, 1, 1 )
      counter.xScale = 0.5; counter.yScale = 0.5
      counter...

Time after time


This game has a timer that the player has to work against, in order to catch as many stars as possible before it runs out. We're going to start the countdown as soon as the help text leaves the stage.

Time for action – setting up the timer


We'll need to create a couple of functions that activate the countdown and also stop at 0 seconds when the game is over:

  1. Set up the timer countdown for the game with a local function called myTimer():

    local myTimer = function()
  2. Increment the seconds for the timer countdown by 1. With the counter text object, display the time using numSeconds. Print out numSeconds to see the countdown in the terminal window:

      numSeconds = numSeconds - 1
      counter.text = "Time: " .. tostring( numSeconds )
      print(numSeconds)
  3. Create an if statement for when the timer runs out or if all the stars are gone. Within the block, cancel the timer and call callGameOver() to end the round. Close the myTimer() function with end:

      if numSeconds < 1 or stars.numChildren <= 0 then
        timer.cancel(timerInfo)
        panda:pause()
        restartTimer = timer.performWithDelay( 300, function() callGameOver(); end, 1 )
      end
    
    end
  4. Initiate the myTimer() function with a new local function called...

It's so glowy


The panda needs another element that will display how much force is required to launch it into the sky. We're going to add a subtle glow-like display object that will represent this.

Time for action – making the power shot


We need to create a separate function for powerShot, so that it can be called when the panda is set for launch:

  1. Display the powerShot object through a new local function called createPowerShot(). Insert it in the gameGroup group:

    local createPowerShot = function()
      powerShot = display.newImage( "glow.png" )
      powerShot.xScale = 1.0; powerShot.yScale = 1.0
      powerShot.isVisible = false
    
      gameGroup:insert( powerShot )
    end

What just happened?

The powerShot object is created through the createPowerShot() function and is called when the panda is setting up for launch.

Pandas!


It will be exciting to see something animated on the screen. Our main character will have designated animations for every action applied during the game play.

Time for action – creating the panda character


We need to set up the panda collision event and animate it accordingly, using the image sheet:

  1. We need to create a local function that will introduce the collision and touch events for the panda. We shall call it createPanda():

    local createPanda = function()
  2. When the panda collides with the stars, use onPandaCollision() with the parameters self and event. Reload panda every time a collision occurs with the stars or the edge of the screen, by using callNewRound():

      local onPandaCollision = function( self, event )
        if event.phase == "began" then
    
          if panda.isHit == false then
    
            panda.isHit = true
    
            if event.other.myName == "star" then
              callNewRound( true, "yes" )
            else
              callNewRound( true, "no" )
            end
    
            if event.other.myName == "wall" then
              callNewRound( true, "yes" )
            else
              callNewRound( true, "no" )
            end
    
            elseif panda.isHit then
              return...

Starry skies


The stars play a big part in the game. They are the main obstacle that the panda has to get past in order to achieve points before the clock runs out.

Time for action – creating star collisions


Star collisions need to be made and removed from the stage so that points can be accumulated for the player.

  1. Create a function for the star collision called onStarCollision() and have a self and event parameter:

    local onStarCollision = function( self, event )
  2. Add the if statements that remove the stars children from the game screen when a collision is made. Increment the score by 500 for each star removed from the screen. Close the function with end:

      if event.phase == "began" and self.isHit == false then
    
        self.isHit = true
        print( "star destroyed!")
        self.isVisible = false
    
        stars.numChildren = stars.numChildren - 1
    
        if stars.numChildren < 0 then
          stars.numChildren = 0
        end
    
        self.parent:remove( self )
        self = nil
    
        local newScore = gameScore + 500
        setScore( newScore )
      end
    end

What just happened?

The star collision occurs on first contact with if event.phase == "began" and self.isHit == false, assuming the...

Screen touches


The panda will have to get across the playing field to reach the stars by creating a launch mechanic similar to a slingshot. Force will play a big role in pushing the panda upward.

Time for action – launching the panda


Let's add a touch event for the panda so that it flings toward the stars. The powerShot object will play a role in helping the player visualize how much power needs to be applied to the panda, before it launches into the air.

  1. Implement touch events for the panda. Create a local function called onScreenTouch() with an event parameter:

    local onScreenTouch = function( event )
  2. With gameIsActive initiated, add in an if statement for when the touch event starts, by using event.phase == "began". During this event, use the "crouch" animation set to prepare panda for launch:

      if gameIsActive then
        if event.phase == "began" and panda.inAir == false then
    
          panda.y = 225
          panda.isReady = true
          powerShot.isVisible = true
          powerShot.alpha = 0.75
          powerShot.x = panda.x; powerShot.y = panda.y
          powerShot.xScale = 0.1; powerShot.yScale = 0.1
    
          arrow.isVisible = true
    
          panda:setSequence("crouch")
          panda:play()
  3. Add an elseif statement...

Organizing display objects


When the round has been set, the display hierarchy of the game objects needs to be rearranged. The most important objects are displayed towards the front of the screen.

Time for action – reordering layers


  1. A new local function reorderLayers() needs to be created to organize the display hierarchy of objects on screen during game play:

    local reorderLayers = function()
    
      gameGroup:insert( levelGroup )
      ground:toFront()
      panda:toFront()
      poof:toFront()
      hudGroup:toFront()
    
    end

What just happened?

The gameGroup, hudGroup, and other display objects are reorganized in the display hierarchy of the game screen. The most significant object is set to the front, while the least important one is towards the back.

Creating stars


The sky background needs to be filled with stars, so that the panda can catch as many stars as possible.

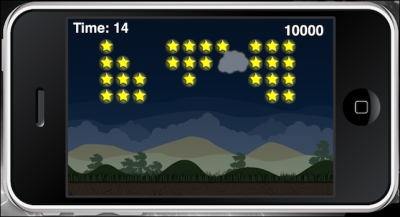
Time for action – creating stars in the level


We need to add the layout of the stars in the game and have them moving so as to add a little effect to show that they're active. A collision event will need to be applied, which would remove them when the panda collides with them.

  1. Create a new function called createStars() and lay out the star objects in a for loop. Add in the "collision" event that will be called by onStarCollision() to remove the stars when they are hit by the panda. Rotate the stars forward and backward at 10 seconds and 1,080 and -1,080 degrees each. This will allow the stars to rotate three full intervals backward and forward. Create the walls for the left and right sides of the screen:

    local createStars = function()
    
      local numOfRows = 4
      local numOfColumns = 12
      local starPlacement = {x = (display.contentWidth  * 0.5) - (starWidth * numOfColumns ) / 2  + 10, y = 50}
    
      for row = 0, numOfRows - 1 do
        for column = 0, numOfColumns - 1 do
    
          -- Create a star
        ...

Starting the game


The game starts when the clock starts counting down and the panda is loaded on the screen. Once the panda is set on screen, the player needs to aim and launch it quickly so that reloading of the panda can occur immediately.

Time for action – initializing the game


The physics and the remaining game functions need to be initialized to run the game. All game actions need to be delayed until the help screen has left the stage.

  1. Start the game by creating a new function called gameInit(), which will hold the physics properties and activate the display objects on the stage:

    local gameInit = function()
      physics.start( true )
      physics.setGravity( 0, 9.8 )
    
      drawBackground()
      createPowerShot()
      createPanda()
      createStars()
      hud()
  2. Add in a Runtime event listener, using "touch" for onScreenTouch():

      Runtime:addEventListener( "touch", onScreenTouch )
  3. Have the level and timer start 10 seconds later so that the user has time to read through the help text. Close the function and start the game with gameInit():

      local roundTimer = timer.performWithDelay( 10000, function() startNewRound(); end, 1 )
      local gameTimer = timer.performWithDelay( 10000, function() startTimer(); end, 1 )
    end
    
    gameInit()

All the code is completed...

Summary


Our second game, Panda Star Catcher, is finally complete! We're now getting a great grasp on writing more functions and different types of game logic, and we also have animation under our belt! Way to go!

In this chapter, we did the following:

  • Took a more in-depth look at transitions and applied easing techniques

  • Understood image sheets and sprite animation

  • Created a game loop for display objects that have to be reloaded continuously on screen

  • Applied force to a display object that propels it to a designated direction

  • Added a collision event that switches from one display object to another

We have pushed through making another game in one whole chapter! Working in Corona SDK is so simple and fast to learn. It doesn't even require thousands of lines of code to create a simple game.

In the next chapter, we'll be learning another vital element to create games, sound effects, and music! You're in for a treat.

lock icon
The rest of the chapter is locked
You have been reading a chapter from
Corona SDK Mobile Game Development: Beginner's Guide
Published in: Mar 2015Publisher: ISBN-13: 9781783559343
Register for a free Packt account to unlock a world of extra content!
A free Packt account unlocks extra newsletters, articles, discounted offers, and much more. Start advancing your knowledge today.
undefined
Unlock this book and the full library FREE for 7 days
Get unlimited access to 7000+ expert-authored eBooks and videos courses covering every tech area you can think of
Renews at $15.99/month. Cancel anytime

Author (1)