

This first recipe shows how to import a skeletal animation from a 3D package. It assumes that you have an animation already prepared. We are going to bring the file to Unity and show where you can adjust the import settings. We will not jump into too much detail for now to make the import process as quick as possible. We will cover all the settings in further recipes.
Most animations are created in external 3D packages such as Maya, 3ds Max, Motion Builder, or Blender 3D. Make sure you have prepared a 3D model with a skeleton, the model is skinned, and you have created at least one animation. You can also download the provided example; open the project in Unity and go to this folder: Chapter 01 Working with animations\Recipe 01 Importing skeletal animations\Sheep Model. You will find an imported FBX file called Sheep.fbx there.
To import a skeletal animation, you need to follow these steps:
- Export a skinned model and its skeleton (called rig in Unity) to FBX format.
Note
If you are using Blender, you don't have to manually export the file to FBX format. Simply drag and drop the file to your Assets folder. Unity will use Blender FBX exporter in the background. Additionally, you will be able to open the file by double-clicking on it in Unity. After you edit and save it, Unity will reimport it again. It is a very convenient way of editing animations as you don't have to go through the export-import process each time you make a change.
- Drag and drop the exported file into any subfolder in the
Assetsfolder in your project or go toAssets|Import new assetand choose your FBX file.
- Select the imported file and navigate to the
Inspectortab. Click on theRigbutton:
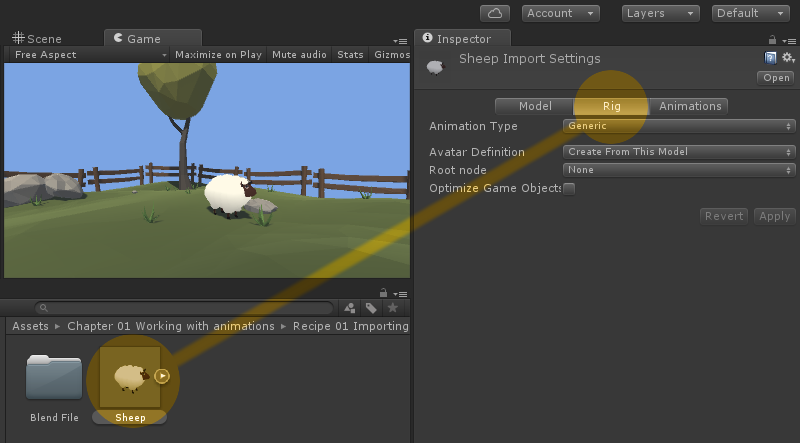
- Here you can specify the type of the rig to use. For bipedal characters, use the
Humanoidoption, for all the rest chooseGeneric. We use a sheep model in this example, so we need to choose theGenericrig. Differences between those options are described in the How it works section. - Leave all the other inputs as defaults.
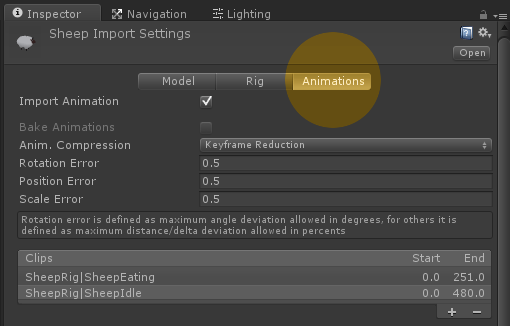
- Click on the
Animationsbutton. If anUnapplied import settingswindow appears, click onApply.
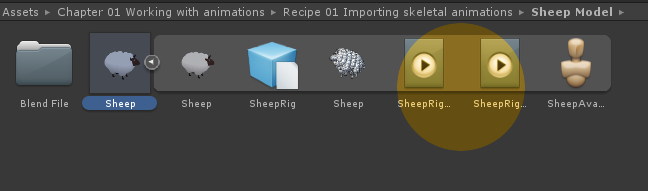
- You should be able to see all imported animation clips as child assets of your imported FBX file.
Unity uses four different rig configurations:
Genericrig: This one is used for quadrupeds, spiders, and other non-humanoid characters. It uses Unity's Mecanim system for controlling animation flow. It can use root motion if you provide aRoot node—a bone responsible for character movement.Humanoidrig: This one is used for humanoid characters only. It also uses Mecanim system for controlling animation. If you are usingHumanoidrigs, you have more options for importing animations. The biggest advantage is automatic animation retargeting—you can use the same animation clip on various types of humanoid characters (for example, a dwarf and a troll).Legacy: This option is used mostly for backward compatibility with previous versions of Unity. It is similar to theGenericrig but uses scripts instead of Mecanim for controlling animation flow. I recommend usingGenericrig instead.None: This last option turns off the rig and disables animation import.
We will discuss differences between Generic and Humanoid rigs further in the next recipe.
- Imported animation clips are also listed in the
Clipssection of theAnimationstab.
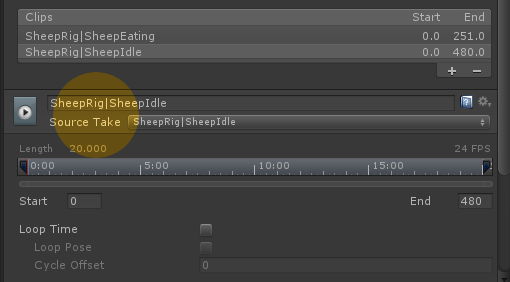
- You can add new clips by clicking on the plus button below the
Clipssection. You can also remove clips by clicking on the minus button. - You can rename each clip by using the input field above the
Source Takedrop-down menu. - You can choose the source take (the animation stored in your FBX file) for each animation clip with the
Source Takedrop-down menu. - You can also trim the animation clip by editing the
StartandEndinput fields.
Note
If you are using Blender, make sure to rotate the rig -90 degrees in the X axis, apply the rotation in Blender and then rotate it again, +90 degrees in the X axis. The rotation of the rig in Blender should be: 90 X, 0 Y, and 0 Z. Your model should be facing the -Y axis in Blender (when you change the view to FRONT, you should see the face of your character). Blender and Unity use different axes alignment: in Blender, Z is up and Y is back; in Unity Z, is front and Y is up. This little trick solves the problem. Your model after import should have 0 rotation and should be facing the Z axis. It is important for moving objects (such as characters) and rig configuration. If you don't do this, your model will have -90 X rotation after the import.