Reader small image

You're reading from  Unity 5.x Animation Cookbook

Product typeBook
Published inMay 2016
Reading LevelExpert
PublisherPackt
ISBN-139781785883910
Edition1st Edition
Languages
Tools
Right arrow
Author (1)
Maciej Szczesnik
Maciej Szczesnik
author image
Maciej Szczesnik

Not interested. Too busy with current game project. Source: Linkedin.
Read more about Maciej Szczesnik

Right arrow

Chapter 9. Physics and Animations

This chapter presents Unity's 5 physics engine and what can be achieved with it. It covers the following recipes:

  • Using cloth
  • Using rigid body joints
  • Destructible objects
  • Creating a humanoid ragdoll with the ragdoll wizard
  • Creating a generic ragdoll with character joints
  • Applying force to a ragdoll
  • Dismemberment
  • Getting up from a ragdoll

Introduction


Unity's physics engine can be used to create interesting effects as well as gameplay mechanics. Previously we were using rigid bodies to move our character and to detect collisions. In this chapter, we will focus on more visually appealing aspects of rigid bodies and physics.

Using cloth


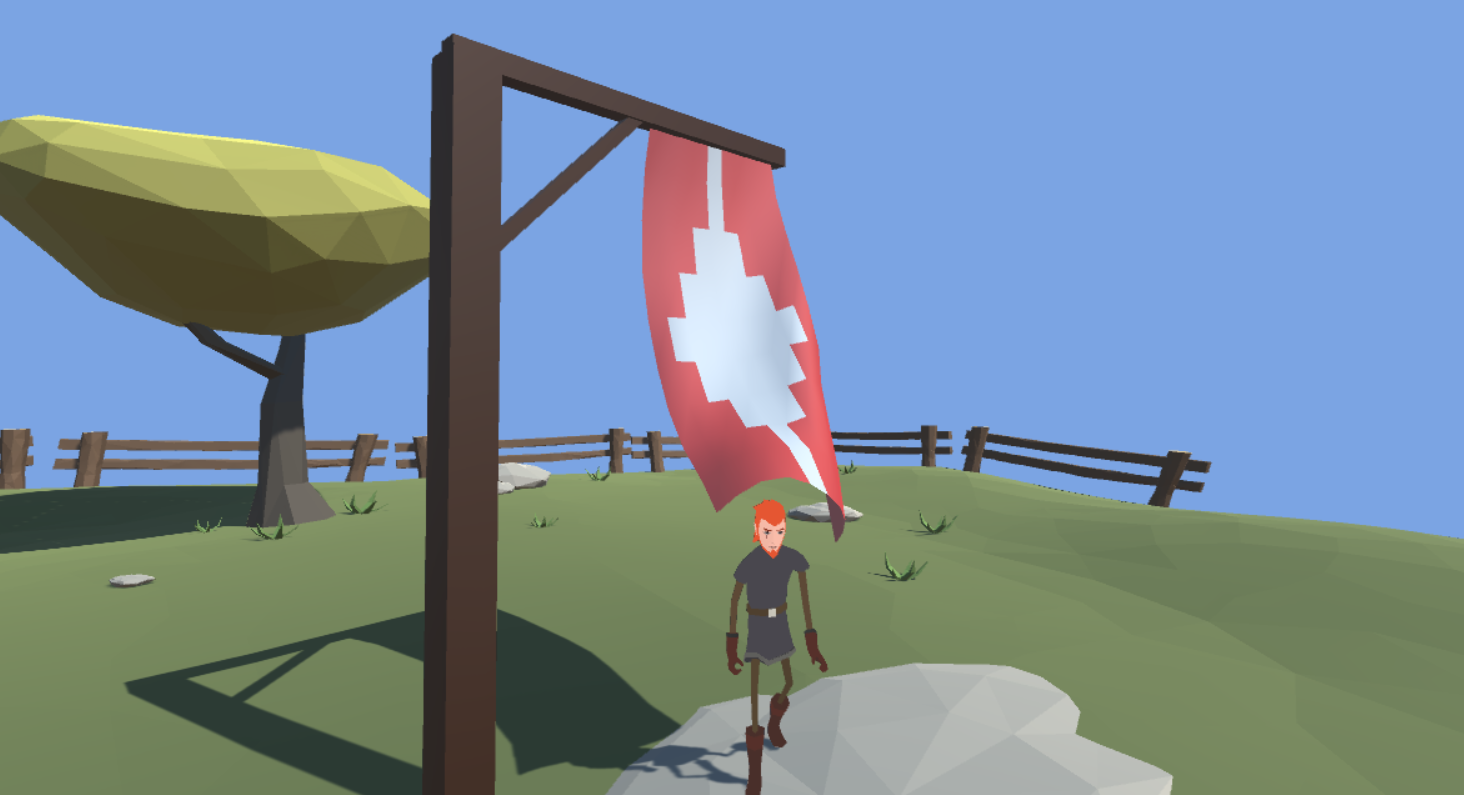
In this recipe, we will create a simple cloth simulation:

Cloth simulation used to create a flag

Getting ready

For this recipe, we need a model of the cloth. It should be a plane divided several times to have enough vertices for the cloth simulation to work. In our example, we use one additional model: the flag pole. You can go to the Chapter 09 Physics and animations\Recipe 01 Using cloth directory. You will find a FlagPole game object in the Example.unity scene there. This object contains the Flag and the FlagPole objects as children. The Flag game object uses the cloth simulation.

How to do it...

To use cloth simulation, follow these steps:

  1. Place the Flag game object in the scene.
  2. Add the Cloth component to the Flag game object (go to ComponentPhysicsCloth).
  1. Notice that a Skinned Mesh Renderer component is automatically added. You may remove the Mesh Renderer component from the object.
  2. Find the mesh of the Flag and drag it to the Mesh field in the Skinned Mesh Renderer component...

Using rigid body joints


In this recipe, we will create two objects with physics simulation: a rope and doors. We will use rigid body joints to constrain the movement and rotation of those objects.

Getting ready

For this recipe, we need four models: a RopePole (similar to the one from the previous recipe), a skinned Rope with a RopeRig containing around 10 bones,  a Frame and two doors, DoorLeft and DoorRight (resembling those swing doors from a saloon). We also need a character with a rigid body to collide with our objects. You can go to the Chapter 09 Physics and animations\Recipe 02 Using rigid body joints directory. You will find all these objects in the Example.unity scene. When you play the game, try to walk with our character and collide with the rope and doors to see the effect.

Rope and swing doors

How to do it...

To use rigid body joints, follow these steps:

  1. Import our swing doors to Unity. The model should contain three objects: FrameDoorLeft, and DoorRight.
  2. Place the objects in the...

Destructible objects


In this recipe, we are going to create a simple destructible object.

Getting ready

To follow this recipe, you will need an object with two states: normal and shattered. The shattered object is a cut-to-pieces version of the normal one. Each piece of the fractured object should be a separate game object. See the following screenshot (we are using Blender fracture tools to fracture a simple sphere):

Normal ball and a fractured one: each fractured element is a separate game object

You can also download the provided example Unity project and go to the Chapter 09 Physics and animations\Recipe 03 Destructible objects directory. You can find the Example.unity scene there. If you play the game, you will see a ball falling down. When it hits the ground, it will be fractured into pieces.

How to do it...

To create a destructible object, follow these steps:

  1. Import the normal and shattered objects to Unity. In our example, we have an object called Ball and the other one is called BallFractured...

Creating a humanoid ragdoll with the ragdoll wizard


In this recipe, we will turn our character into a ragdoll and learn how to enable the ragdoll and disable it. We will use Unity's built-in Ragdoll Wizard, which is useful for creating humanoid ragdolls:

A character with the ragdoll effect applied

Getting ready

For this recipe, we need an animated character. We can use the one we were using before (for instance, the one from the Chapter 4Character Movement). You can also go to the Chapter 09 Physics and animations\Recipe 04 Creating a humanoid ragdoll with ragdoll wizard directory. You can find the Example.unity scene there. If you play the game and press the space bar, the character will turn into a ragdoll. You can press the space bar again to turn the ragdoll off.

How to do it...

To create a humanoid ragdoll, follow these steps:

  1. Place your character in the scene.
  2. Go to Game Object3d ObjectRagdoll to open the Create Ragdoll window.
  3. Drag and drop the bones from your character rig to the...

Creating a generic ragdoll with character joints


This time we will create a ragdoll for a non-humanoid character. We cannot use the Ragdoll Wizard in this case, but instead we will make the ragdoll manually.

A generic character ragdoll in action

Getting ready

For this recipe, we need a nonhumanoid character. We use our old fellow Spider as an example. The character needs to be rigged. You can also open the example Unity project and go to the Chapter 09 Physics and animations\Recipe 05 Creating a generic ragdoll with character joints directory. If you open the Example.unity scene there and play the game, you will see a falling spider with the ragdoll already turned on. You can find the Spider in the Rigs directory.

How to do it...

To create a generic ragdoll, follow these steps:

  1. Import the character to Unity and place it in the scene.
  2. Select all the bones of the character's rig that will be used in the ragdoll simulation. In our example, we skipped the fangs.
  3. Add Capsule ColliderRigidbody, and...

Applying force to a ragdoll


In this recipe, we are going to apply some additional force to a ragdoll when we turn it on. Normally, when you turn the ragdoll on, it starts from idle; no initial movement is introduced. It looks stiff and unnatural. Applying force to a body part will help to avoid that.

Getting ready

We are going to use the same character as in the Creating a humanoid ragdoll with the ragdoll wizard recipe. We will also use the HandleRagdoll.cs script from the same recipe to turn the ragdoll on. You can also open the example Unity project and go to the Chapter 09 Physics and animations\Recipe 06 Applying force to a ragdoll directory. If you open the Example.unity scene there and play the game, you will be able to click on any body part of the character. That will turn the ragdoll on and apply force to this body part, which will make the character look like it was hit or shot in that particular limb:

Force applied directly to the head of the character

How to do it...

To apply force...

Dismemberment


This recipe shows how to create a dismemberment effect for a rigged character. We are going to create a decapitation as an example. This effect is often used in various combat games (both shooters and melee combat games):

Decapitation—an example of the dismemberment effect

Getting ready

We are going to use the same character as in the Creating a humanoid ragdoll with the ragdoll wizard recipe. We will also use the HandleRagdoll.cs script from the same recipe to turn the ragdoll on. On top of that, we will need to have two additional meshes: the Head model and the Neck model. See the following screenshot for reference:

Neck and head models

You can also open the example Unity project and go to the Chapter 09 Physics and animations\Recipe 07 Dismemberment directory. If you open the Example.unity scene there, play the game and press the space bar so that the poor character will be decapitated. You can find all the additional models in the Models directory.

How to do it...

To create a...

Getting up from a ragdoll


This recipe is slightly more advanced but fun to implement. It makes our character use three different rigs: the original animated rig, the rig our character's mesh is skinned with, and a ragdoll. By using these three rigs, we can smoothly blend between ragdoll and animation any time.

Getting ready

Again, we are going to use the same character as in the Creating a humanoid ragdoll with the ragdoll wizard recipe. We will need two getting up animations: one from face facing down and one from face facing up positions. Name them StandUpFaceUp and StandUpFaceDown. We also need at least a looped Idle animation.

You can also open the example Unity project and go to the Chapter 09 Physics and animations\Recipe 08 Getting up from a ragdoll directory. If you open the Example.unity scene there, play the game and press the space bar; the character will fall down using ragdoll. If you press the space bar again, it will blend from a ragdoll to a getting up animation and will be...

lock icon
The rest of the chapter is locked
You have been reading a chapter from
Unity 5.x Animation Cookbook
Published in: May 2016Publisher: PacktISBN-13: 9781785883910
Register for a free Packt account to unlock a world of extra content!
A free Packt account unlocks extra newsletters, articles, discounted offers, and much more. Start advancing your knowledge today.
undefined
Unlock this book and the full library FREE for 7 days
Get unlimited access to 7000+ expert-authored eBooks and videos courses covering every tech area you can think of
Renews at $15.99/month. Cancel anytime

Author (1)

author image
Maciej Szczesnik

Not interested. Too busy with current game project. Source: Linkedin.
Read more about Maciej Szczesnik