Reader small image

You're reading from  Virtual Filmmaking with Unreal Engine 5

Product typeBook
Published inFeb 2024
PublisherPackt
ISBN-139781801813808
Edition1st Edition
Tools
Concepts
Right arrow
Author (1)
Hussin Khan
Hussin Khan
author image
Hussin Khan

Hussin Khan is an authorized Unreal Engine Instructor (UAI) with a decade of experience as an educator. As a former head of education at an Academy Award-winning studio, Rhythm & Hues, he was involved in the production of movies such as Life of Pi (2012), 2036 Origin Unknown (2018), and, more recently, Rift, an animated movie made entirely using Unreal Engine by HaZimation. Currently, Hussin runs EFXCO Academy, a creative-based training academy in Malaysia, which offers professional training and certification in graphics and motion design, game development, virtual reality, and visual effects. He is also a certified instructor for Nuke and Unity. Hussin holds a firm conviction that real-time production stands poised as the next major breakthrough in the media and entertainment industry.
Read more about Hussin Khan

Right arrow

Creating Material IDs Using Blender

As an Unreal Engine artist, you also need to hone some 3D software skills, especially when augmenting 3D models downloaded from sites such as Sketchfab (https://sketchfab.com/) or CGTrader (https://www.cgtrader.com/) – my go-to sites for 3D models.

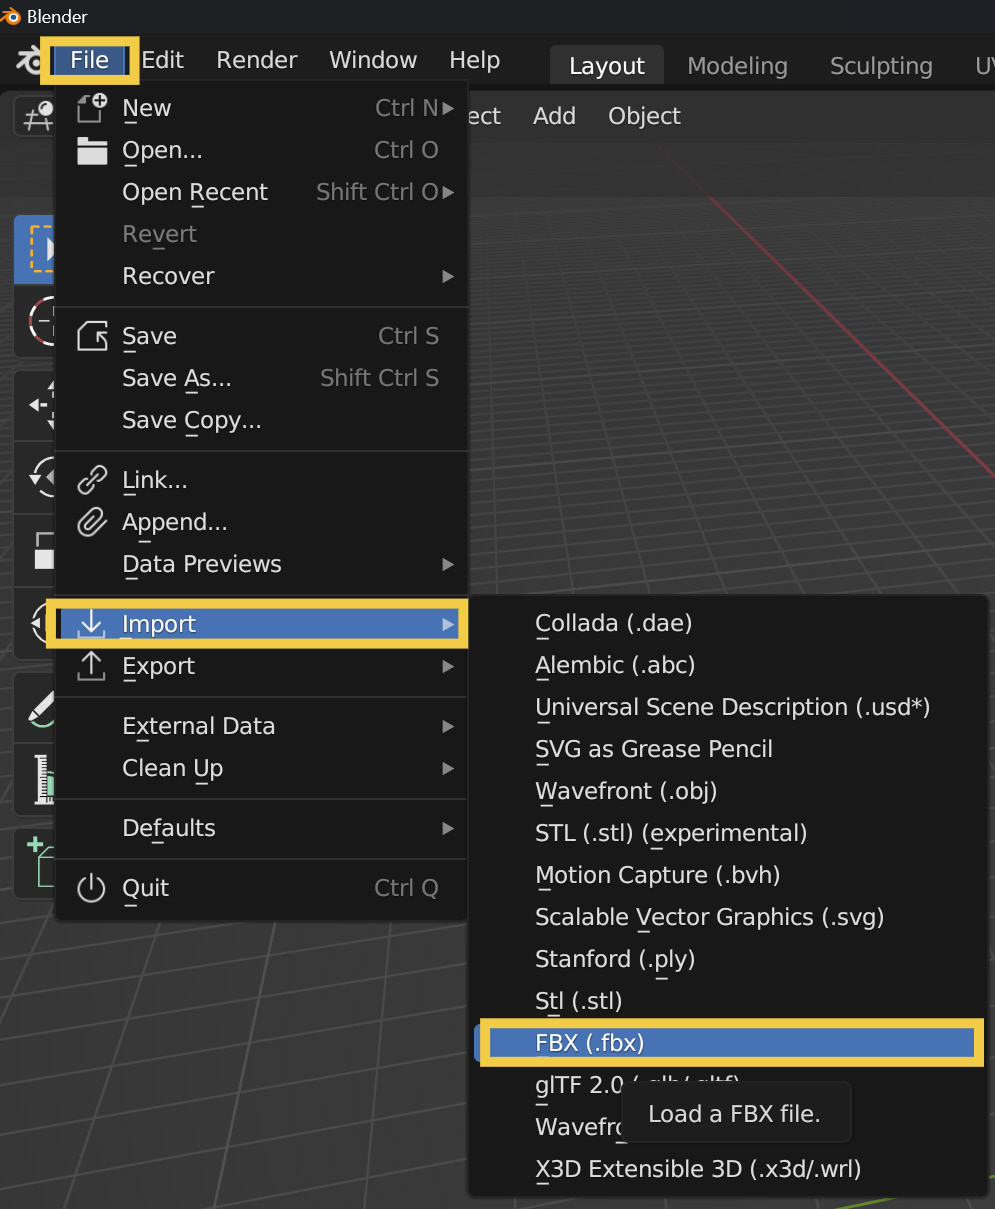
Often, you’ll find that the downloaded 3D models either aren’t compatible with Unreal Engine or are in a format that is not suitable to be imported straight into Unreal Engine. As such, you’ll have to edit them in a Digital Content Creator (DCC) such as Maya, 3ds Max, or Blender. In our case, we will utilize the open source application Blender. Blender is free to download and use. Over the years, the software has found its place in the mainstream 3D industry and, in my opinion, is on a par with most industry-standard applications.

In this appendix, you will learn how to quickly create Material IDs in Blender.

We will cover the following topics:

  • Understanding...

Technical requirements

To follow along with this appendix, you will need to have Blender downloaded and installed on your computer. You can find Blender using this link: https://www.blender.org/download/. I’m using Blender 3.5.1, but this workflow will work with any future versions of Blender.

Note

If you would like to understand more about Blender, there is a very well-written Blender 3.5 manual at https://docs.blender.org/manual/en/latest/interface/index.html.

Understanding Material IDs

In the context of 3D computer graphics, a material ID (also known as a material identifier or material index) is an attribute assigned to different parts or surfaces of a 3D model. It is used to define and differentiate between various materials or shaders applied to different portions of the model.

Let’s say you have a 3D model of a car consisting of separate objects, such as the body, windows, wheels, and headlights. To apply different materials to each component, you would assign a unique material ID to each part, as follows:

  • Body: Material ID 1 (assigned color: red)
  • Windows: Material ID 2 (assigned color: transparent)
  • Wheels: Material ID 3 (assigned color: black)
  • Headlights: Material ID 4 (assigned color: yellow)

Material IDs are particularly useful when you want to apply complex materials or textures to specific regions of a 3D model, as they provide a convenient way to differentiate between different material assignments...

Getting to know the Blender interface

When you open Blender, you will see this interface:

Appendix Figure 1: Blender 3.5.1 interface

Appendix Figure 1: Blender 3.5.1 interface

Blender has some similarities to Unreal Engine in terms of the UI. Here is a breakdown of the areas we will be using in this section:

  • Menu: Akin to any other software, this is where you access all the functionality of Blender.
  • Object/Edit Mode: You will be using this function quite often as it toggles from Object Mode to Edit Mode. The keyboard shortcut is the Tab key. This is very useful to remember.
  • Toolbar: The toolbar contains buttons for the various tools.
  • 3D Viewport: Like Unreal Engine, Blender has a 3D Viewport too.
  • Outliner: The same as in Unreal Engine, all 3D objects that exist in the 3D Viewport will be listed here.
  • Properties: This is similar to the Details panel in Unreal Engine.

The Blender UI is not that much different from Unreal Engine. You’ll find it easy to navigate...

Importing the cryo-pod 3D object

Before we begin, let’s figure out what we’re trying to achieve. In Chapter 4, we added a cryo-pod 3D object to the scene. When I downloaded the object, I felt that there were not enough surfaces we could assign materials to. As such, we will load the object into Blender and assign Material IDs to various surfaces to make it suit our scene better.

In this section, we will import the downloaded cryo-pod object and start assigning the surfaces with Material IDs.

To add a Material ID, do the following:

  1. Open Blender 3.5.1. Once you see the splash screen, click once in the Viewport to make it go away.
  2. In the Outliner, select the camera, cube, and light and press Delete (we won’t be needing them).
  3. Go to File | Import | FBX (.fbx). Using the Blender File View window, browse to the downloaded project files, open the scifi-cryogenic-sleep folder, and choose chamber.fbx.
Appendix Figure 2: Importing the cryo-chamber FBX file

Appendix Figure...

Defining surfaces for Material ID application

In this section, we will identify surfaces we would like to assign the materials to. In Blender, this is a very straightforward task. I have identified a few, as shown in Appendix Figure 4:

Appendix Figure 4: Material ID parts for the cryo-chamber

Appendix Figure 4: Material ID parts for the cryo-chamber

There are nine parts of the cryo-pod that you will need to create Material IDs for. Although I do not recommend applying this many materials to an object due to draw calls, we will use this as a practice-makes-perfect scenario. The more practice you get, the better you will remember how to do it.

Let’s continue with the process:

  1. With the 3D object still open and selected in Blender (it should have an orange outline), in the Outliner, select the Bed object. In the Properties panel, click the Material Properties icon (beach ball icon), then rename lambert1 to Bed:
Appendix Figure 5: Renaming materials for all objects

Appendix Figure 5: Renaming materials for all objects

...

Exporting to FBX

To import the cryo-chamber into Unreal Engine, it needs to be saved as a .fbx file. Let’s do that now:

  1. Once you’ve completely assigned all the materials, press the Tab key to go back to Object Mode. Then select File | Export | FBX.
  2. In the Blender File View panel, name the file Cryo-Pod_UE.fbx and save it in the same folder as before.
  3. You can now close Blender and enter Unreal Engine!

Following these exercises allows you to effortlessly allocate Material IDs to 3D objects obtained from external sources that may lack sufficient surfaces for material assignment.

lock icon
The rest of the chapter is locked
You have been reading a chapter from
Virtual Filmmaking with Unreal Engine 5
Published in: Feb 2024Publisher: PacktISBN-13: 9781801813808
Register for a free Packt account to unlock a world of extra content!
A free Packt account unlocks extra newsletters, articles, discounted offers, and much more. Start advancing your knowledge today.
undefined
Unlock this book and the full library FREE for 7 days
Get unlimited access to 7000+ expert-authored eBooks and videos courses covering every tech area you can think of
Renews at $15.99/month. Cancel anytime

Author (1)

author image
Hussin Khan

Hussin Khan is an authorized Unreal Engine Instructor (UAI) with a decade of experience as an educator. As a former head of education at an Academy Award-winning studio, Rhythm & Hues, he was involved in the production of movies such as Life of Pi (2012), 2036 Origin Unknown (2018), and, more recently, Rift, an animated movie made entirely using Unreal Engine by HaZimation. Currently, Hussin runs EFXCO Academy, a creative-based training academy in Malaysia, which offers professional training and certification in graphics and motion design, game development, virtual reality, and visual effects. He is also a certified instructor for Nuke and Unity. Hussin holds a firm conviction that real-time production stands poised as the next major breakthrough in the media and entertainment industry.
Read more about Hussin Khan