Search icon
Arrow left icon
All Products
Best Sellers
New Releases
Books
Videos
Audiobooks
Learning Hub
Newsletters
Free Learning
Arrow right icon
Joomla! 3 Beginner's Guide Second Edition

You're reading from  Joomla! 3 Beginner's Guide Second Edition

Product type Book
Published in Jul 2014
Publisher
ISBN-13 9781783981502
Pages 476 pages
Edition 1st Edition
Languages
Concepts
Author (1):
Eric Tiggeler Eric Tiggeler
Profile icon Eric Tiggeler

Table of Contents (22) Chapters

Joomla! 3 Beginner's Guide Second Edition
Credits
About the Author
About the Reviewers
www.PacktPub.com
Preface
1. A New and Easy Way to Build Websites 2. Getting Joomla! Up and Running 3. First Steps – Getting to Know Joomla! 4. Web Building Basics – Creating a Site in an Hour 5. Small Sites, Big Sites – Organizing Your Content Effectively 6. Creating Killer Content – Adding and Editing Articles 7. Welcoming Your Visitors – Creating Attractive Home Pages and Overview Pages 8. Helping Your Visitors Find What They Want – Managing Menus 9. Opening Up the Site – Enabling Users to Log in and Contribute 10. Getting the Most out of Your Site – Extending Joomla! 11. Creating an Attractive Design – Working with Templates 12. Attracting Search Engine Traffic – SEO Tips and Techniques Keeping the Site Secure Creating a Multilingual Site Pop Quiz Answers Index

Chapter 4. Web Building Basics – Creating a Site in an Hour

In the previous chapter, you acquainted yourself with the Joomla interface, explored the example site, and tried out Joomla's administration interface.

You know your way around, you've got a good grasp of how things work, so now it's high time you start building a website! In this chapter, you'll build a complete site in just one hour. Imagine you've just got a call from your first client. They have founded a club that is about to get some media attention, but they still don't have a website they can refer to. They need a website and they need it fast. Can you help them out?

That's a perfect opportunity to put your new web building toolkit to the test. And, well, being new to Joomla, maybe you'll need a little bit more than just one hour. However, if you start now, you're certain to meet tomorrow's deadline, and you will also have time left to have dinner, take a hot bath, and grab a movie too.

In this chapter, you'll learn how...

What you will be making


In the following screenshot, you see what you will be building throughout this chapter. Although it still uses the basic layout of Joomla's sample site, it's perfectly tailored to meet the client's specifications.

Meet your client

Allow me to introduce you to your first client! It's a club that's proudly calls itself Collectors Of Really Bad Art (CORBA). They just love horrible amateur paintings and other forms of ugly art that mostly end up in the trash heap or turn up in charity shops. According to the CORBA philosophy, ugly art is worth collecting for its own ugly sake. Now that a big newspaper is about to write an article about CORBA, the collectors' club needs a website to broadcast its message and tell the public what the club is all about. You may not be into art, but you are into the art of building websites, so you're just the one the CORBA people need.

CORBA's wish list is as follows:

  • The look and feel of the site should fit with the logo and colors found on...

Removing the sample data


In Chapter 2, Getting Joomla! Up and Running, you installed Joomla with the example site data. You'll only do this once—when you're new to Joomla and want to explore the kind of pages, menus, module blocks, and other features Joomla has to offer. In the previous chapters, you worked with the sample content. Now that you will start building your own site, you don't need all that content. Unfortunately, there is no Uninstall Sample Data button. You can install Joomla again without sample data; in fact, this is what you will probably do once you're an experienced Joomla user. However, in this case, we'll just clean up the sample site.

Admittedly, cleaning up Joomla may seem about as exciting as wiping clean a wall-to-wall classroom blackboard before the lesson starts. However, it's a good way of preparing yourself for your very first Joomla site. You'll find that stripping Joomla's example site will give you some useful insight in the way it's constructed. Bit by bit...

Time for action – deleting articles and categories


To remove content, you always start with the actual articles. This is because you cannot remove containers (categories) as long as they're not empty.

  1. Navigate to Content | Article Manager.

  2. Above the article listing, on the right-hand side, you'll notice two drop-down boxes: Title ascending and 20. The number 20 indicates the number of articles listed on this page. Click on the 20 button and change the value to All, as shown in the following screenshot:

    Now, the full list of example articles is displayed on the page.

  3. Select the checkbox at the top of the list (just to the left-hand side of the Status heading). This way all of the items in the column are selected, as shown in the following screenshot:

  4. Click on the Trash button in the toolbar. Joomla shows a message that confirms that the articles have been trashed.

  5. When articles are in Trash, they're still in Joomla's database should you wish to restore them. If this were your own articles, you...

Time for action – deleting menus


As many of the example menus are not needed for our goal, we'll delete them. Don't worry, you can always create new menus! We'll just delete the specific instances of the menus that were used in the example site.

  1. Go to Menus | Menu Manager. Select three example menus you won't need any more: About Joomla, Australian Parks, and Fruit Shop. Do not select Main Menu, Top, or User Menu. We'll keep these three generic menus because we can reuse them in our new site.

  2. Click on the Delete button. A warning message appears; click on OK to confirm you want to delete the menus and their content and the associated menu modules. You'll see a confirmation message and you will be left with just three menus in the Menu Manager screen, as shown in the following screenshot:

    Although we'll keep Main Menu, we don't need the links it contains (links to the content that has just been deleted). The only link we need to keep is the Home link, as it's necessary for any Joomla site to...

Building your new site in three steps


You've now got a blank canvas. The site is empty, there's no content, and there are just a few basic layout elements. It's time to start building something new, cool, and attractive! In the rest of this chapter, you'll add new content to replace the content that you've just deleted while deconstructing the example site.

We'll do this in three steps:

  1. Customize the basic layout: Tweak the layout to fit your needs.

  2. Add content: Design a structure for your content (using categories) and add articles that fit the content framework.

  3. Add extras: Add further functionalities to your site, such as a contact form or a little content block, drawing attention to a specific topic.

Step one – customizing the layout

In the previous chapter, you saw that the overall site layout (columns, colors, typography, and so on) is set in the site's template files. Joomla allows you to edit the current template using Template Manager. In this case, we'll replace the Joomla logo with...

Time for action – creating a copy of the current template


First, let's make a copy of the current template. This is the best approach to take if you want to modify the current template—you avoid the risk that any changes to the code will be overwritten if the original template should ever be updated. Joomla allows you to easily create a copy of all of the template's files in a new folder.

  1. To create a template copy, go to Extensions | Template Manager. Click on Templates in the menu on the left-hand side.

  2. In the Template Manager: Templates screen, click on the Protostar Details and Files link. You will be taken to the Template Manager: Customize Template screen. Click on the Copy template button. Enter a name for the template copy, for example, Protostar_copy. You can use only letters, numbers, dashes, and the underscore sign. Click on Copy template in the pop-up screen. The pop up closes. Now, click on Close to return to the Templates screen.

  3. Finally, switch to the Template Manager: Styles...

Time for action – preparing a new logo image


Let's first create a new logo image.

  1. Open up your image editing tool. In this example, we'll use Adobe Photoshop, but you can use any image editor.

    Tip

    Living without Photoshop—free alternatives

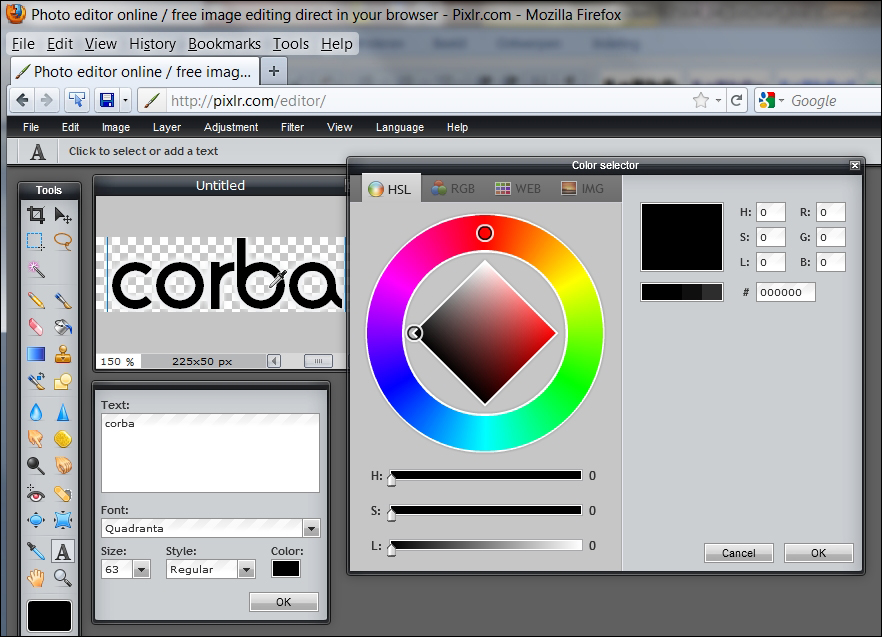
    Photoshop may be a fine graphic editing tool, but it's not exactly cheap. The standard Windows graphics editor Paint can do the job, but its capabilities are very, very basic. Fortunately, there are many excellent and free Photoshop alternatives. You can even have essential Photoshopping capabilities on your computer without installing a thing. Just go to www.pixlr.com, click on Open Photo editor, and start creating and editing!

    Tip

    If you're looking for free graphic editing software programs, perform a web search for Paint.NET or GNU Image Manipulation Program (GIMP). Both are very capable programs; Paint.NET is beginner friendly and at the same time quite powerful. GIMP is arguably the most popular free Photoshop contender. It's an open source program that...

Time for action – tweaking the design details


Maybe you're happy with the template as it is now that you've personalized the logo and tagline text. However, in many cases, you may want to customize the design even more. To do this, you have to edit the CSS files of the template. Cascading Style Sheets (CSS) define the design of the site—the HTML code provides the basic structure of the page. It is used to customize the layout, color, and typography. We'll come back to the principles of CSS soon, but the best way to find out how it works is to play around with it a little. As an example, we'll change the style of the tagline text. Right now, it's pretty small and inconspicuous, so let's make it bigger and bolder.

  1. Go to Extensions | Template Manager and click on the Templates menu link on the left-hand side. Click on Protostar_copy Details and Files to edit the copied template. This will take you to the screen that shows the (editable) files of the current template. In the file tree on the...

Time for action – creating a news category


Your client, CORBA, wants to publish a range of articles on the current club activities on their site; that's what they're all about. How can we categorize these articles the Joomla way? Let's first add a category as a container for these news articles.

  1. Navigate to Content | Category Manager. Click on the New button. (Alternatively, you can click on the Add New Category fly-out menu item under Content | Category Manager.)

  2. The Category Manager: Add A New Articles Category screen opens. In the Title field, type in News, as shown in the following screenshot. Don't worry about the other fields; you can leave them empty for now.

  3. Click on Save & Close. A message is displayed (Category successfully saved) and you're taken to the Category Manager screen. You'll see the results; apart from Uncategorised, there's one other category now, News, as shown in the following screenshot:

What just happened?

In Joomla, you create content groups (categories) before...

Time for action – creating an article


First, let's create an article in the News category:

  1. Navigate to Content | Article Manager | Add New Article. The Article Manager: Add New Article screen opens.

  2. In the Title box, type in the title of the article (in this example, Bad Photography Exhibition).

  3. In the Category drop-down box, select News. Now you see why you needed to create a category before adding articles. Without categories, you cannot assign any new article to the appropriate containers within your overall site structure.

  4. On the editor screen, write the article. In this example, we'll just use dummy text. It's easy to copy and paste any amount of fake text from www.lipsum.com.

  5. To divide the article text into an introduction text and the main article text, position the cursor at the beginning of the first line of the second paragraph. Click on the Read more button at the bottom of the editor screen. A red dotted line appears, which indicates the separation between the introduction text and...

Time for action – adding a menu link


Let's finish the three steps of content creation and add a link to your article.

  1. Navigate to Menus | Main Menu | Add New Menu Item. The Menu Manager: New Menu Item screen opens.

  2. Next to the Menu Item Type box, click on the Select button and go to Articles | Category Blog. This menu link type tells Joomla to display a page that contains introduction text and Read more hyperlinks to all the content from a specific category. You'll see what this looks like in a minute.

  3. In the Choose a category drop-down box, select News.

  4. In the Menu Title field, type in News. Click on Save.

What just happened?

Creating just one link to the News category changes a lot on the frontend. The site now looks as follows:

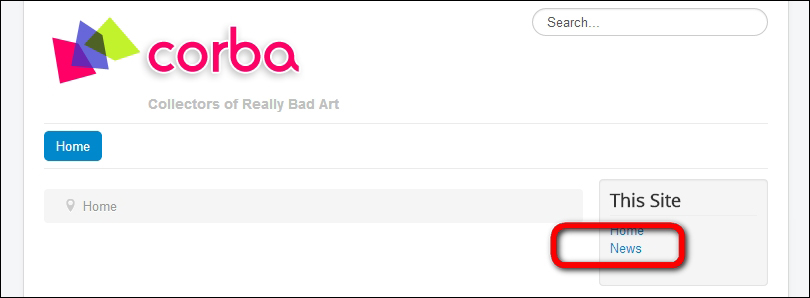
The home page is still empty, but the menu does contain the new link, News, as shown in the following screenshot:

When visitors click on the News link, they are shown a category blog page. This is an overview page of all contents of the News category. The overview consists...

Time for action – adding uncategorized articles


Let's create a Mission Statement page by adding an uncategorized article.

  1. Navigate to Content | Article Manager. Click on New.

  2. In the Title box, enter Mission Statement. In the Category drop-down box, make sure Uncategorised is selected.

  3. In the text editor area, add the Mission Statement text and add an image, if you like. For this example, we've entered the following text:

    We all know the works of great art throughout the centuries. But what about bad art? Much of the creative output of really lousy artists has been discarded, thrown away because of its lack of artistic value. Let's not let that happen anymore!

    The beauty in ugliness

    Collectors Of Really Bad Art is a club for bad art lovers. We seek to find and promote the beauty that's hidden behind superficial ugliness. Tour our website to discover that beauty too!

  4. Click on Save & Close. The uncategorized article is finished—we just need a menu link to make it visible.

  5. Navigate to Menus...

Time for action – assigning articles to the home page


Let's add a couple of articles to the home page through Article Manager:

  1. Navigate to Content | Article Manager.

  2. In the Status column, click on the white star next to four articles: Hideous Still Lifes, Ugly Art Lecture, The Art of Bob Ross, and This Year's Meeting. The white star turns orange. The results are shown in the following screenshot and the four articles are set to show on the home page:

  3. Click on View Site. You've got a home page filled with content! Four articles are displayed on the home page as intro texts with Read more links:

What just happened?

By clicking on the icon in the Featured column in Article Manager, you have added four articles to the home page. On the frontend, these four articles are now shown in the default Joomla home page layout; the first intro text is displayed in the full main body width, and the other intro texts below that are presented in three columns. We'll leave this for now, but rest assured, you...

Time for action – creating a contact


Let's add a contact, that is, someone whose (mail) address and other contact details can be displayed on the form page and someone who will receive the form data in their mailbox.

  1. Navigate to Components | Contacts. Contact Manager opens. Click on New.

  2. In the Contact Manager: Contact screen, enter the details for the contact. In the Name box, enter CORBA Staff.

  3. In the Category drop-down list, select Uncategorised. There's no need for different types of contact categories on our site.

  4. In the New Contact screen, enter the contact information details you want to display. In this case, it's okay to just fill out the Email text field and the Telephone field. It is important to specify a valid e-mail address because this is where the form data will be sent. In the Position field, enter something such as Staff Bureau or General Enquiries—this is the text that will be displayed above the telephone number.

  5. Click on the Display tab to specify whether you want to show...

Time for action – creating a Contact Form menu link


Now that a contact exists, you can add a link to a contact form to the main menu:

  1. Navigate to Menus | Top. We'll add the new link to the horizontal top menu.

  2. Click on New.

  3. In the Menu Item Type list, go to Contacts | Single Contact.

  4. Click on the Select button next to the Select a Contact textbox to select the appropriate contact, CORBA Staff.

  5. Enter Menu Title for the menu item (for example, Contact Us). Make sure Menu Location is set to the Top menu.

  6. Click on the Contact Display Options tab, choose Display format: Plain. Otherwise, the contact form will be displayed in separate (sliding or tabbed) panels—which is not what we want.

  7. Click on Save & Close. The site now has a Contact Us menu link that displays a contact form:

What just happened?

You used the Contacts component to create a contact and added a menu link to a contact form. Again, you have experienced how powerful menu links are in Joomla. Just by selecting Menu Item Type: Single...

Time for action – creating a message block


To add a message block about the Ugly Art Exhibition on the home page, we'll add a new module of the Custom HTML type:

  1. Go to Extensions | Module Manager and click on New to create a new module.

  2. In the Select a Module Type screen, select Custom HTML.

  3. Enter Visit the Bad Art Museum for the Title.

  4. In the Position drop-down list, scroll to find a list of available positions for the current template, Protostar_copy. Select Right [position-7]. This will add the block to the right column of the current template. You'll learn more about finding out what positions are available in Chapter 11, Creating an Attractive Design – Working with Templates.

  5. Click on the Custom Output tab to enter any content the module block should contain. To insert an image, click on the Image button at the bottom of the editor. If you use the example files for this book, upload and insert the bam_logo.png image file. Make sure it's aligned to the left.

  6. Add some text. In this example...

Wrapping up – changing site settings


The one-hour website is finished. However, there are a few adjustments to be made in the backend.

Time for action – changing the site configuration


The site configuration still shows some default values that don't match the new site content. Let's enter the appropriate site name and add site metadata:

  1. Navigate to System | Global Configuration.

  2. In the Site Settings section, enter CORBA - Collectors Of Really Bad Art for Site Name. In the SEO Settings section (you may have to scroll down to find it), select Include Site Name in Page Titles as After. This way, the site information will be shown on in the title bar or the current tab of the visitors' web browser:

  3. In the Metadata Settings section, add some text. Site Meta Description is used in result pages of search engines. In the Site Meta Description box, enter CORBA is an international club of Collectors Of Really Bad Art.

  4. Joomla also offers you the possibility to add Site Meta Keywords. Most search engines ignore meta keywords these days, but it won't hurt to enter a few keywords that characterize the site's content: bad art, ugly paintings...

Summary


You may not be aware of it, but you did actually do an incredible job. Your first Joomla website is up and running! You've built your site in three steps. First, you customized the layout, then you added a framework for content, and then you added further functionality to your site with modules.

You have personalized the look of the site by editing the template files. You can edit the template CSS files directly in the Template Manager editor screen.

Before you created content pages, you created the containers they belong in. These containers are called categories. You also added uncategorized articles—content pages that don't fit any category. You've seen that to make content visible on your site, there has to be a menu link that points to it. You've added items to the home page by changing their Featured settings. You've added an extra functionality to the site by using components and extensions. Using the Contacts component, you added contact details and a contact form.

In this chapter...

lock icon The rest of the chapter is locked
You have been reading a chapter from
Joomla! 3 Beginner's Guide Second Edition
Published in: Jul 2014 Publisher: ISBN-13: 9781783981502
Register for a free Packt account to unlock a world of extra content!
A free Packt account unlocks extra newsletters, articles, discounted offers, and much more. Start advancing your knowledge today.
Unlock this book and the full library FREE for 7 days
Get unlimited access to 7000+ expert-authored eBooks and videos courses covering every tech area you can think of
Renews at $15.99/month. Cancel anytime}