


Adding Fresnel and Detail Texturing nodes
We started to use textures extensively in the previous recipe, and we also had the opportunity to talk about certain useful nodes, such as Cheap Contrast and Custom Rotator. Just as with those two, Unreal includes several more that have been created to suit the needs of 3D artists, with the goal of sometimes improving the look of our models or creating specific effects in a smart way. Whatever the case, learning about them is sure to improve the look of our scenes.
We’ll be looking at some of those useful nodes in this recipe, paying special attention to the Fresnel one, which we’ll use to achieve a velvety effect across the 3D model of a tablecloth—something that would be more difficult to achieve without it. Let’s jump straight into it!
Getting ready
The scene we’ll be using in this recipe is a bit different from the ones we’ve used before. Rather than a toy tank, I thought it would be good to change the setting and have something on which we can demonstrate the new techniques we are about to see, so we’ll use a simple cloth to highlight these effects. Please open 02_04_Start if you want to follow along with me.
If you want to use your own assets, know that we’ll be creating a velvet-like material in this recipe, so it would be great to have an object onto which you can apply that.
How to do it…
We are about to take a simple material and enhance it using some of the material nodes available in Unreal, which will help us—with very little effort on our side—to improve its final appearance.
- First of all, let’s start by loading the
02_04_Startlevel and opening the material that is being applied to the tablecloth, named M_TableCloth_Start, as we are going to be working on that one. As you can see, it only has a single Constant3Vector node modifying the Base Color property of the material, and that’s where we are going to start working. - Next, create a Texture Sample node and assign the T_TableCloth_D texture to it.
- Add a Texture Coordinate node and connect it to the input pin of the previous Texture Sample node. Set a value of 20 for both its U Tiling and V Tiling properties.
- Proceed to include a Constant3Vector node and assign a soft red color to it, something similar but lighter to the color of the texture chosen for the existing Texture Sample node. I’ve gone with the following RGB values: R = 0.90, G = 0.44, and B = 0.44.
- Moving on, create a Lerp node and place it after both the original Texture Sample node and the new Constant3Vector node.
- Connect the previous Texture Sample node to the A input pin of the new Lerp node, and wire the output of the Constant3Vector node to the B input pin.
- Right-click anywhere within the material graph and type
Fresnelto create that node. Then, connect the output of the Fresnel node to the Alpha input pin of the previous Lerp node.
This new node tries to mimic the way light reflects out of the objects it interacts with, which varies according to the viewing angle at which we see those surfaces—with areas parallel to our viewing angle having clearer reflections.
Having said that, let’s look at the next screenshot, which shows the material graph at this point:
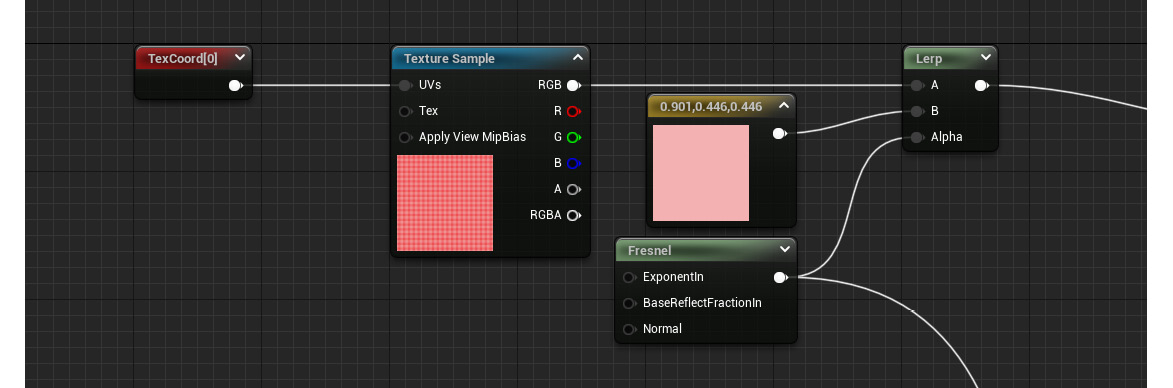
Figure 2.19 – A look at the current state of the material graph
- Select the Fresnel node and head over to the Details panel. Set the Exponent parameter to something lower than the default, which will make the effect of the Fresnel function more apparent. I’ve gone with 2.5, which seems to work fine for our purposes.
Next up, we are going to start using another new different node: the Detail Texturing one. This node allows us to use two different textures to enhance the look of a material. Its usefulness resides in the ability to create highly detailed models without the need for large texture assets. Of course, there might be other cases where this is also useful beyond the example I’ve just mentioned. Let’s see how to set it up.
- Right-click within the material graph and type
Detail Texturing. You’ll see this new node appear. - In order to work with this node, we are going to need some extra ones as well, so create three Constant nodes and two Texture Sample nodes.
- Proceed to connect the Constant nodes to the Scale, Diffuse Intensity, and Normal Intensity input pins. We’ll worry about the values later.
- Set T_ground_Moss_D and T_Ground_Moss_N as the assets in the Texture Sample nodes we created (they are both part of the Starter Content asset pack).
Important note
Using the Detail Texturing node presents a little quirk, in that the previous two Texture Sample nodes that we created will need to be converted into what is known as a Texture Object node More about this node type in the How it works… section.
- Right-click on the two Texture Sample nodes and select Convert to Texture Object.
- Give the first Constant node—the one connected to the Scale pin—a value of 20, and assign a value of 1 to the other Constant nodes.
- Connect the Diffuse output pin of Detail Texturing to the Base Color input pin in the main material node, and hook the Normal output of the Detail Texturing node to the Normal input pin of our material.
This is what the material graph should look like now:
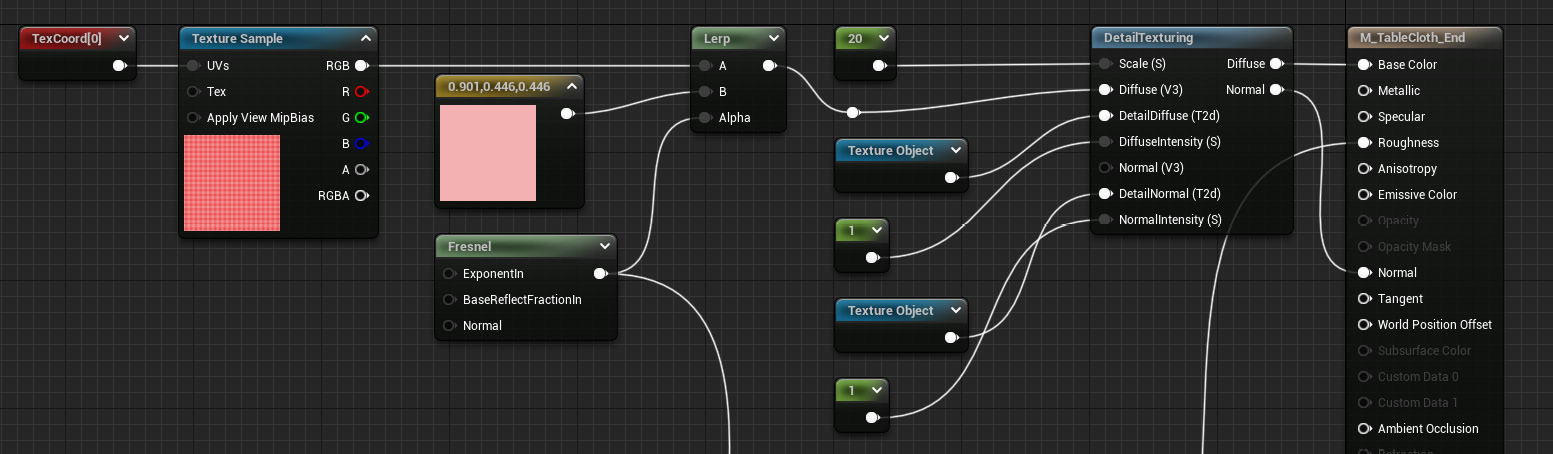
Figure 2.20 – The material graph with the new nodes we’ve just added
Before we finish, let’s continue working a bit longer and reuse the Fresnel node once again to drive the Roughness parameter of the material. The idea is to use it to specify the roughness values, making the parts that are facing the camera have less clear reflections than the parts that are facing away from it.
- Create two Constant nodes and give them different values—I’ve gone with 0.65 and 0.35 this time. The first of those values will make the areas where it gets applied appear rougher, which will happen when we look directly at the surface by virtue of using the Fresnel node. Following the same principle, the second one will make the areas that face away from us have clearer reflections.
- Add a Lerp node and connect the previous Constant nodes to its A and B pins. The rougher value (0.65) should go into the A input pin, while the second one should be fed into the B pin.
- Drag another pin from our original Fresnel node and hook it to the Alpha input pin of the new Lerp node.
- Connect the output of the Lerp node to the Roughness parameter in the main material node.
The final graph should look something along these lines:
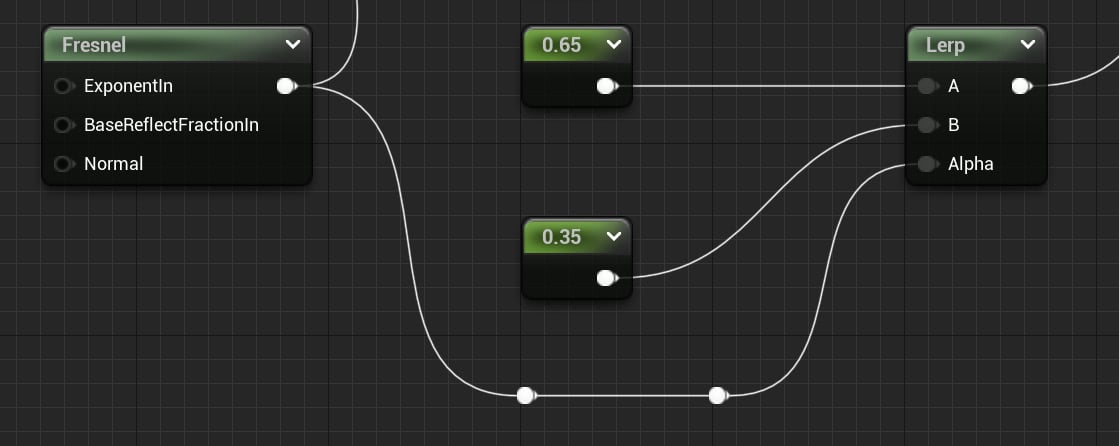
Figure 2.21 – The final addition to the material graph
Finally, all we need to do is to click on the Apply and Save buttons and assign the material to our model in the main viewport. Take a look at what we’ve created and try to play around with the material, disconnecting the Fresnel node and seeing what its inclusion achieves. It is a subtle effect, but it allows us to achieve slightly more convincing results that can trick the eye into thinking that what it is seeing is real. You can see this in the following screenshot when looking at the cloth: the top of the model appears more washed out because it is reflecting more light, while the part that faces the camera appears redder:
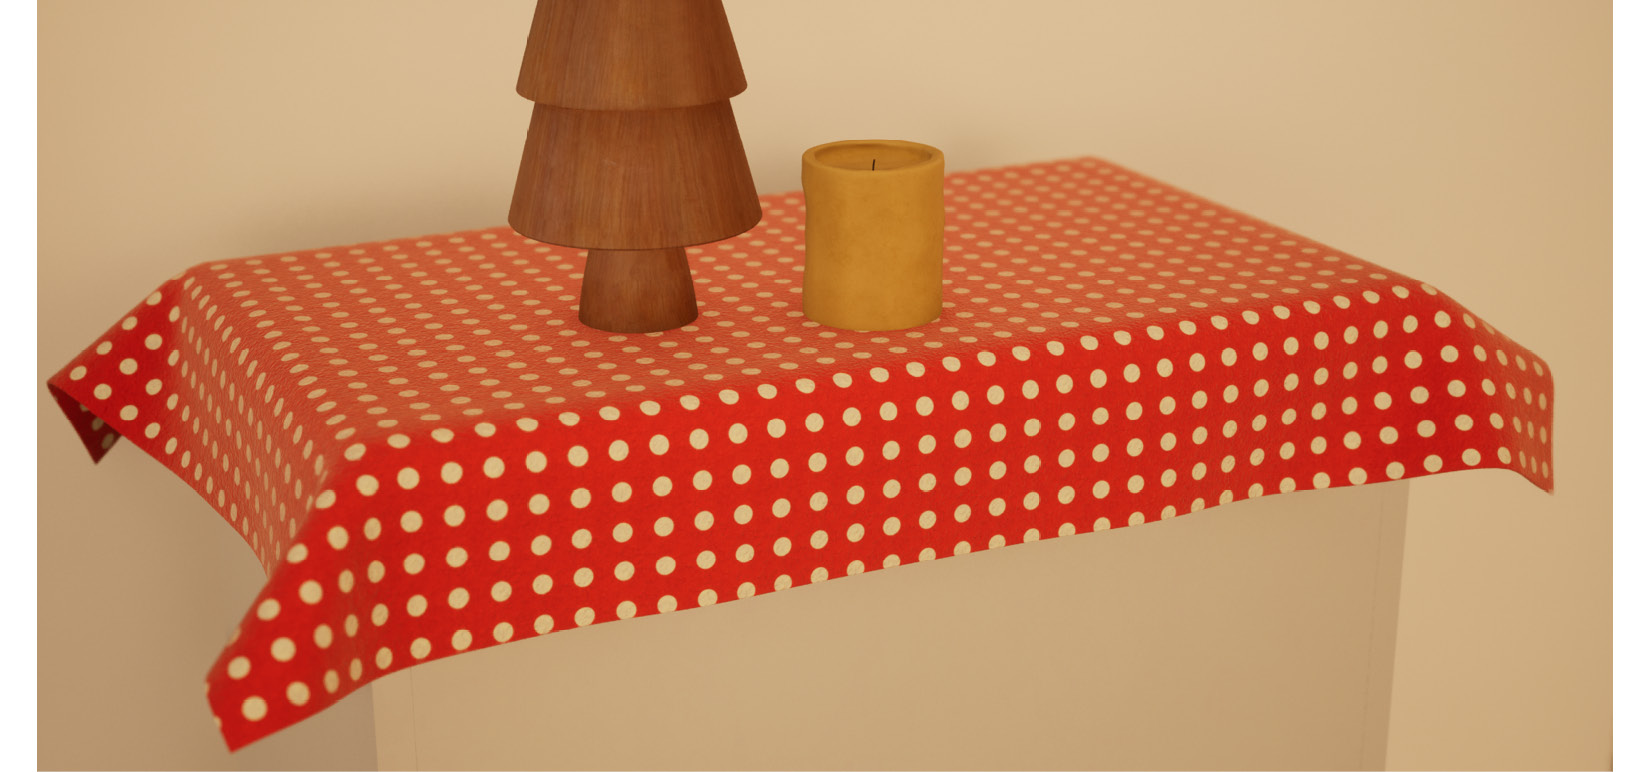
Figure 2.22 – The final look of the cloth material
How it works…
Let’s take a minute to understand how the Fresnel node works, as it can be tricky to grasp. This effect assigns a different value to each pixel of an object depending on the direction that the normal at that point is facing. Surface normals perpendicular to the camera (those pointing away from it) receive a value of 1, while the ones that look directly at it get a value of 0. This is the result of a dot product operation between the surface normal and the direction of the camera that results in a falloff effect we can adjust with the three input parameters present in that node:
- The first of them, ExponentIn, controls the falloff effect, with higher values pushing it toward the areas that are perpendicular to the camera.
- The second, BaseReflectFrctionIn, specifies “the fraction of specular reflection when the surface is viewed from straight on,” as stated by Unreal. This basically specifies how the areas that are facing the camera behave, so using a value of 1 here will nullify the effect of the node.
- The third, Normal, lets us provide a normal texture to adjust the apparent geometry of the model the material is affecting.
Detail Texturing is also a handy node to get familiar with, as seen in this example. But even though it’s quite easy to use, we could have achieved a similar effect by implementing a larger set of nodes that consider the distance to a given object and swap textures according to that. In fact, that is the logic that you’ll find if you double-click on the node itself, which isn’t technically a node but a Material Function. Doing that will open its material graph, letting you take a sneak peek at the logic driving this function. As we see in there, it contains a bunch of nodes that take care of creating the effect that we end up seeing playing its part in the material we created. Since these are normal nodes, you can copy and paste them into your own material. Doing that would remove the need to use the Detail Texturing node itself, but this also highlights why we use Material Functions in the first place: they are a nice way of reusing the same logic across different materials and keeping things organized at the same time.
Finally, I also wanted to touch base on the Texture Object node we encountered in this recipe. There can be a bit of confusion around this node, as it is apparently similar to the Texture Sample one—after all, we used both types to specify a texture, which we then used in our material. The difference is that Texture Object nodes are the format in which we send textures to a Material Function, which we can’t do using Texture Sample nodes. If you remember, we used Texture Object nodes alongside the Detail Texturing node, which was a Material Function itself—hence the need to use Texture Object nodes. We also sent the information of the Texture Sample node used for the color, but the Detail Texturing node sampled that as Vector3 information and not as a Texture node. You can think of Texture Object nodes as references to a given texture, while the Texture Sample node represents the values of that given texture (its RGB information as well as the Alpha input pin and each of the texture’s channels).
See also
You can find more documentation about the Fresnel and Detail Texturing nodes through Epic’s official documents:
- https://docs.unrealengine.com/4.27/en-US/RenderingAndGraphics/Materials/HowTo/Fresnel/
- https://docs.unrealengine.com/4.27/en-US/RenderingAndGraphics/Materials/HowTo/DetailTexturing/