Search icon
Arrow left icon
All Products
Best Sellers
New Releases
Books
Videos
Audiobooks
Learning Hub
Newsletters
Free Learning
Arrow right icon
Joomla! 3 Beginner's Guide Second Edition

You're reading from  Joomla! 3 Beginner's Guide Second Edition

Product type Book
Published in Jul 2014
Publisher
ISBN-13 9781783981502
Pages 476 pages
Edition 1st Edition
Languages
Concepts
Author (1):
Eric Tiggeler Eric Tiggeler
Profile icon Eric Tiggeler

Table of Contents (22) Chapters

Joomla! 3 Beginner's Guide Second Edition
Credits
About the Author
About the Reviewers
www.PacktPub.com
Preface
1. A New and Easy Way to Build Websites 2. Getting Joomla! Up and Running 3. First Steps – Getting to Know Joomla! 4. Web Building Basics – Creating a Site in an Hour 5. Small Sites, Big Sites – Organizing Your Content Effectively 6. Creating Killer Content – Adding and Editing Articles 7. Welcoming Your Visitors – Creating Attractive Home Pages and Overview Pages 8. Helping Your Visitors Find What They Want – Managing Menus 9. Opening Up the Site – Enabling Users to Log in and Contribute 10. Getting the Most out of Your Site – Extending Joomla! 11. Creating an Attractive Design – Working with Templates 12. Attracting Search Engine Traffic – SEO Tips and Techniques Keeping the Site Secure Creating a Multilingual Site Pop Quiz Answers Index

Chapter 6. Creating Killer Content – Adding and Editing Articles

Once you have created a framework of categories and subcategories, things can move pretty fast. There's nothing to stop you from creating a content-rich site—whether you want to add a dozen, hundreds, or even thousands of pages. In this chapter, we'll focus on adding and editing articles, the type of content that's essential to most sites. Later, you might want to add other types of content (such as image galleries or forums); we'll deal with those in Chapter 10, Getting the Most Out of Your Site – Extending Joomla!.

When creating the example site in Chapter 4, Web Building Basics – Creating a Site in an Hour, you've seen how to create a new article using the default settings. You left all of the extra function buttons and parameters alone. However, in real life, you'll probably want more control. You probably want to make your content look great, add pictures, and specify exactly how to display things and what details to...

Articles and content pages – what's the difference?


You might be tempted to think an article is the same as a page. Strictly speaking, they aren't same. You read at the beginning of this chapter that Joomla doesn't think in terms of pages. Joomla figures any web page is constructed of a whole lot of database-driven bits and pieces, and almost any combination of those bits and pieces can turn up on the visitor's browser as a web page.

Although in Joomla an article will certainly be at the center of a content page, there's bound to be much more to that page. Around the article, there will be all kinds of other dynamic content—yes, those bits and pieces again. Be that as it may, for the sake of simplicity we'll just use the word page (or content page) for articles now and then. As long as we're aware that content pages may contain more than articles, that's OK, isn't it?

Creating and editing articles – beyond the basics


Over the last few chapters, you practiced adding and editing articles. Let's recap the steps involved:

  1. To create a new article, navigate to Content | Article Manager and click on New. Alternatively, use the shortcut menu option by navigating to Content | Article Manager | Add New Article. Either of these two methods will open the Add New Article screen under Article Manager.

  2. To edit an existing article, navigate to Content | Article Manager. Select the article (select the checkbox on the left-hand side of the article's title) and click on the Edit button in the toolbar. There's also a shortcut available—just click on the title of the article to open it in Article Manager: Edit Article screen.

Apart from the screen titles, the Add New Article and Edit Article screens are identical. You're already familiar with some of the most important functions; in this chapter, we'll go to the sections we haven't explored yet.

The article editor is shown in...

Making your words look good – formatting article text


Your client, CORBA, wants to add some new content to their site that explains the characteristic qualities of bad art. You've been given a text file and have been asked to turn the contents into a new page. Can you create a new article and make it look good?

Time for action – adding styles to the article text


Let's create a new article and see how we can format it adequately.

  1. Navigate to Content | Article Manager and click on New.

  2. In the Title box, enter Just What is Ugly Art? This is the type of factual content that fits the Facts category, so let's select the Facts category (a subcategory of the Bad Art category). This is shown in the following screenshot:

  3. By default, Status (found under Details) is set to Published. Let's set it to Unpublished. This way, the article will remain invisible to your site's visitors until you're finished with it.

  4. We don't want this article to show up on our home page, so leave Featured set to No.

  5. In the text editor screen, add some article text. If you want to copy text from a word processor document, it's really important to first strip out all of the formatting. This way, you can avoid invisible word processor tags messing up your article text. To do this, open the Notepad application on your PC (or TextEdit on a...

Extending the text editor


Joomla ships with the text editor you used just now. It's actually an extension called Tiny MCE that comes with Joomla. This is a good tool for basic text editing, but you may run into limitations when you need just a little bit more, for example, when want to have some more control over the way images are displayed in the article text (their position, alignment, and so on).

If you would like to add some more advanced text editing controls, you can set Tiny MCE to its Extended view. Just navigate to Extensions | Plug-in Manager and click on Editor - TinyMCE to edit the settings.

In the Basic Options section, set Functionality as Extended. This will add some useful buttons to the editor screen. The extended text editor toolbar looks similar to the following screenshot:

In the rest of this book, I'll assume you have selected the Extended functionality of TinyMCE. You'll need some of the extra buttons and features to be able to follow along with the exercises and examples...

Adding images to articles


You've just created an all-text page on art. That's not really what makes your visually oriented visitors tick. Let's show them what it's all about and add some images! Imagine you've been sent some image files by mail and you've copied them to your hard drive.

Tip

Before uploading images, make sure they are resized to the proper dimensions for use on your web page. It's not a good idea to upload a big image and resize it in the editor screen, as loading the image file will considerably slow down the web page display in the browser. Moreover, Joomla doesn't contain image editing capabilities, so you cannot change image dimensions or crop images once they're uploaded. To resize images, use either an image editing software (such as Photoshop or GIMP) or pick a simple online resizing tool such as PicResize (http://www.picresize.com). Search for web image formats to find more information and tutorials on the best image formats and image sizes for use on the Web. In Chapter...

Time for action – uploading images


To add images to an article, you'll first use Joomla's Media Manager to upload the image files to the web server.

  1. Navigate to Content | Media Manager. The Media Manager window displays the files available in the default image folder.

  2. We'll create a specific folder for the files we want to add. Click on the Create New Folder button. A text field appears where you can type the name of the new subfolder. In this example, we've entered paintings. Now, click on the Create Folder button.

  3. Click on the icon of the new paintings folder.

  4. You'll be shown an empty folder. Add a new image by clicking on the Upload button in the toolbar.

  5. Click on the Browse button, select about five images from your computer's hard drive, click on Open, and then click on Start Upload.

    A message appears to indicate that the upload is complete. The Files section of Media Manager shows the thumbnails of the uploaded pictures, as shown in the following screenshot:

What just happened?

You've uploaded...

Time for action – inserting and aligning images


Now, let's insert the images you've just uploaded into the article text as follows:

  1. Navigate to Content | Article Manager and open the article Just What is Ugly Art? to edit it (by clicking on the article title).

  2. Let's place an image in each of the article paragraphs. Place the cursor at the beginning of the first paragraph below the introduction text, just after the first subheading, as shown in the following screenshot:

  3. Click on the Image button at the bottom of the text editor screen as shown in the following screenshot:

  4. A pop-up screen displaying the contents of the images root directory opens. Select the appropriate subfolder by clicking on the paintings folder icon.

  5. Select the image you want to insert. Joomla automatically adds the path of the image in the Image URL field.

  6. Scroll down in the pop-up window to add the other relevant details as follows:

    1. In the Image Description box, type a description. This text isn't displayed, but it informs...

Changing the way the article is displayed


The article editor screen gives you much more power than just formatting text and adding pictures. You can also control how the article should be displayed: as one individual article, split into two parts, or even split in as many parts (subpages), as you like. Let's find out how we can enhance articles with these options.

Splitting the article into intro text and main text

So far, we haven't added any instructions in our article to change the way it displays. Let's have a look at the frontend to see how it's displayed by default. To see again how our new article looks at the frontend, click on the Facts on Bad Art link on the frontend Main Menu.

Earlier in this chapter, you created a link to the Facts category. As you might have noticed (click on the Facts on Bad Art link to check this again if you want), the full five paragraph article shows up on the Facts category overview page. This is not how we want our article to display. If we were to add more...

Time for action – creating intro text


In the articles you created in earlier chapters, you saw it's good to add separate intro text to an article. Now you know why—if you don't, the article can only be displayed fully on overview pages such as the category overview you just saw. Let's fix things by adding some intro text to our new article.

  1. Navigate to Content | Article Manager and open the article that you just created (Just What are Ugly Paintings?) to edit it.

  2. In the text editor screen, add a new first line. In this example, we entered The characteristics of truly bad art.

  3. Place the cursor just after this first line to indicate that you want Joomla to split the article here. To create a Read more link to point to the full article, click on the Read more button at the bottom of the editor screen. A red dotted line appears:

  4. Click on the Options tab and set Show Intro Text to Hide. This means the intro text (the short teaser text we just created) will be hidden when the full article is shown...

Time for action – using page breaks to split up an article


Let's assume your client doesn't like the one page article on ugly paintings. Instead of having one article with several subheadings, they'd rather see a couple of short pages that explain things step-by-step. To do this, we'll edit the existing article:

  1. Navigate to Content | Article Manager and open the Just What is Ugly Art? article to edit it.

  2. Add page break locations. This is where Joomla will split the article into separate pages. In this example, we'll replace every subheading with a page break. Select the first subheading (Abstract Chaos) and delete it. Now click on the Page Break button at the bottom of the editor screen. A pop-up screen is displayed, where you can enter Page Title and Table of Contents Alias. In this case, enter Abstract Chaos in both fields as shown in the following screenshot:

    Page Title is for the new subpage. It will be displayed next to the article title, separated by a dash: Just What are Ugly Paintings...

Displaying images and links with articles


You've just seen how you can insert images anywhere you want in the article text. In the article editor screen, there's also an Images and links tab. Joomla offers these fields for images and links to make it easier to create a series of articles that share the same standardized layout: displaying an image at the top of the article and/or displaying a series of hyperlinks above (or below) the article. Although you're free to add images and hyperlinks to the article text itself, the Images and Links fields allow a fool-proof way of inserting images and links that are displayed in a fixed position.

The advantage is that you (or other content contributors) don't have to repeatedly make sure that they insert images in the appropriate article location, which can easily lead to mistakes. By adding an intro image and setting its alignment, all article intro texts will share the same layout. The same holds for the three hyperlinks you can add through Images...

Time for action – adding images and links to an article


Let's create a new article in the Facts category to try out the possibilities of the Images and links feature.

  1. In the backend, go to Content | Article Manager | Add New Article.

  2. In the Title field, enter An Overview of Bad Art Museums. From the Category drop-down list, select Facts.

  3. Enter a few paragraphs of dummy text. Insert a Read more section after the first paragraph by placing the cursor at the start of the second paragraph and clicking the Read more button.

  4. The basic article is ready. Now let's use the Images and links feature. First, we'll add Intro Image. Click on the Images and links tab and click on the Select button for Intro Image. A pop-up screen that allows you to select (or in our case, upload and select) images appears.

  5. As we haven't uploaded the appropriate images yet, let's do that now. In the Upload file section of the pop-up window, click on Browse. Select two images from your computer. If you use the example images...

Restoring a previous version of an article


When adding or revising content in an article, you might want to reverse your changes and return to a previous version of an article; maybe because you've deleted some of the article text and accidentally saved the new version, thus throwing away all content the article previously contained, or maybe because you decide you want to go back to the brilliant phrasing you used in an earlier version of the same article.

From Joomla 3.2 onwards, a powerful new feature was added: content version history. You can track older versions of articles, compare changes, and restore articles as required. Let's find out what this feature has to offer you.

  1. Go to Content | Article Manager. Open the Mission Statement article. Up to now, there's just one version of this article, as you've saved it once after writing it.

  2. We'll make a second, revised version of the article. In the editor screen, delete the first two sentences and replace them. In this example, I've replaced...

Tweaking the details – changing article settings


When editing an article, you can set a wide array of options. These allow you to control exactly which article details are shown, when the article will be published, and so on. It's a good idea to explore the options to make sure what combination of settings fits your needs best.

The following is an overview of the settings you can choose for each article.

Tip

At the top of the editor screen, there's the Alias field. Alias is an internal reference that Joomla uses for the article URL. You don't have to enter anything here; Joomla will automatically fill out the Alias field based upon the article title. However, when you change the article title, it's best to make the Alias field empty. This way, Joomla will update its contents to reflect the new article title.

The Publishing tab

The following is a list of options of the Publishing tab with a description of each:

Archiving articles


As your site grows, you might want to clean up the site contents. You probably don't want to display outdated articles, such as last year's news, among your current content. In Joomla, there are different ways to achieve this. One option is to remove old articles. Then, the articles are still available in the backend, but the site visitor cannot see them anymore. Another option is to create an archive. Archived articles are still available, but they're no longer part of the ordinary site contents. You can make them visible through a menu link of the Archived Articles menu item type.

Archiving is something you do by hand. To archive an article (or multiple articles at once), select the desired article(s) in Article Manager and hit the Archive button on the toolbar. It is shown in the following screenshot:

Tip

If you want to automatically archive articles that are older than a given period of time, consider using Joomla extensions such as AutoArchive. You can find it on the...

Time for action – creating a News archive


Let's create an archive for some old news pages on the CORBA site. This can be done by performing the following steps:

  1. Navigate to Content | Article Manager. In the Select Category filter box, select News to see only the articles in that category.

  2. Select the articles to be archived. In the following example, we've selected Bad Photography Exhibition.

  3. Click on the Archive button in the toolbar.

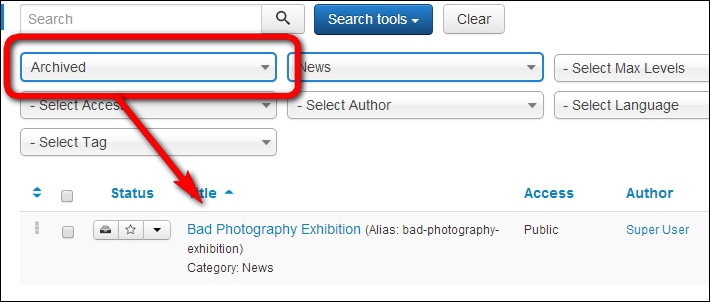
  4. A message appears to confirm that the article has been archived. The article disappears from the article list. To see archived contents, select Archived in the Select Status drop-down list, as shown in the following screenshot:

    You've created a (tiny) news archive now, but there's no way for the visitor to see its contents. Let's create a link now.

  5. Navigate to Menus | Main Menu | Add New Menu Item. As the Menu Item Type for this link, select Articles | Archived Articles.

  6. Enter Title for the hyperlink as News Archive. Adjust any other settings you want and click on...

Summary


In this chapter, you mastered creating article content.

To create new articles and edit existing ones, Article Manager is your starting point; just click on New to create a new article or select an article and click on Edit to edit it.

The article editing screen allows you to style your contents and add images. If you want more text editing control, you can set the text editor to show an extra (extended) set of buttons.

Media Manager allows you to create new image folders. This way, you can keep the image files on the web server organized.

There are several ways to display article content. It can be one continuous text page, but you can also split the article into an introductory text and the actual body text.

To break a long article into several interlinked subpages, you add page breaks to the article text. In the backend you've still got one article, in the frontend it will display as a series of pages.

Using Version Control, you can recover previous versions of articles. Every time...

lock icon The rest of the chapter is locked
You have been reading a chapter from
Joomla! 3 Beginner's Guide Second Edition
Published in: Jul 2014 Publisher: ISBN-13: 9781783981502
Register for a free Packt account to unlock a world of extra content!
A free Packt account unlocks extra newsletters, articles, discounted offers, and much more. Start advancing your knowledge today.
Unlock this book and the full library FREE for 7 days
Get unlimited access to 7000+ expert-authored eBooks and videos courses covering every tech area you can think of
Renews at $15.99/month. Cancel anytime}

Options

Description

Start Publishing, Finish Publishing

Sometimes, you'll have...