Search icon
Arrow left icon
All Products
Best Sellers
New Releases
Books
Videos
Audiobooks
Learning Hub
Newsletters
Free Learning
Arrow right icon
Photorealistic Materials and Textures in Blender Cycles - Fourth Edition

You're reading from  Photorealistic Materials and Textures in Blender Cycles - Fourth Edition

Product type Book
Published in Oct 2023
Publisher Packt
ISBN-13 9781805129639
Pages 394 pages
Edition 4th Edition
Languages
Concepts
Author (1):
Arijan Belec Arijan Belec
Profile icon Arijan Belec

Table of Contents (21) Chapters

Preface 1. Part 1: Materials in Cycles
2. Chapter 1: Creating Materials in Blender 3. Chapter 2: Introducing Material Nodes 4. Chapter 3: Mapping Images with Nodes 5. Part 2: Understanding Realistic Texturing
6. Chapter 4: Achieving Realism with Texture Maps 7. Chapter 5: Generating Texture Maps with Cycles 8. Chapter 6: Creating Bumpy Surfaces with Displacement Maps 9. Part 3: UV Mapping and Texture Painting
10. Chapter 7: UV-Unwrapping 3D Models for Texturing 11. Chapter 8: Baking Ambient Occlusion Maps 12. Chapter 9: Introducing Texture Painting 13. Chapter 10: Creating Photorealistic Textures on a 3D Model 14. Part 4: Lighting and Rendering
15. Chapter 11: Lighting a Scene in Cycles 16. Chapter 12: Creating Photorealistic Environments with HDRIs 17. Chapter 13: Preparing the Camera for Rendering 18. Chapter 14: Rendering with Cycles 19. Index 20. Other Books You May Enjoy

Baking Ambient Occlusion Maps

In this chapter, we will introduce Ambient Occlusion (AO) maps and learn how to use them to improve our materials and textures. We will first study what they are and how they work, before moving on to learning how to create them and apply them to our scenes.

By the end of this chapter, you will be able to bake AO maps and use them to improve the texture quality and realism of your models.

We will cover the following topics in this chapter:

  • Understanding Ambient Occlusion maps
  • Baking an Ambient Occlusion map
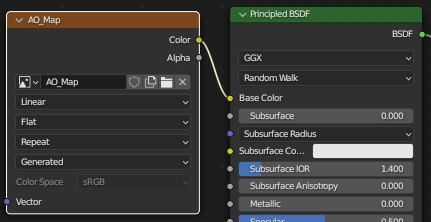
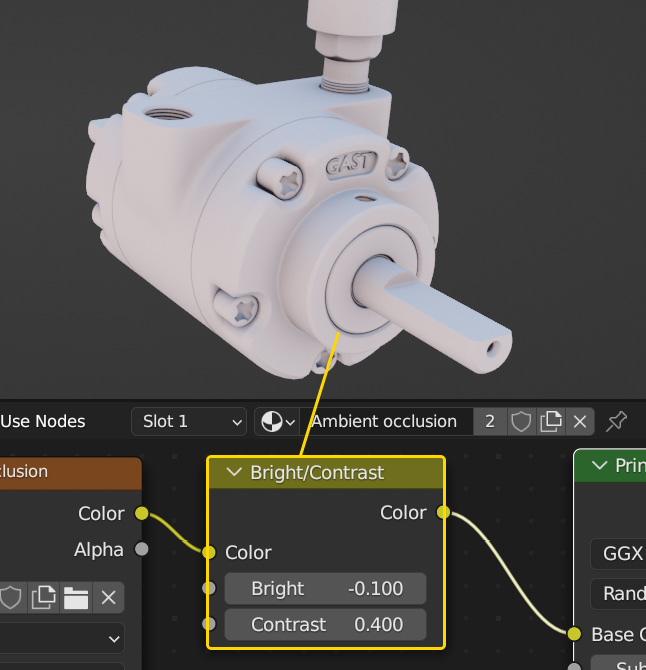
  • Applying an Ambient Occlusion map with nodes
  • Mixing Diffuse and Ambient Occlusion maps in GIMP

Technical requirements

This chapter includes an exercise that requires you to download a 3D model. You can do so with the following link: https://github.com/PacktPublishing/Photorealistic-Materials-and-Textures-in-Blender-Cycles.

The prepared resources can be found in the Chapter08 folder within the book’s downloadable resources folder, available here: https://packt.link/mA1OU

Understanding Ambient Occlusion maps

AO maps are texture maps used to simulate soft shadows on 3D models. Figure 8.1 shows a model without an AO map (left) and a model with one (right). The left model has no shading and does not look realistic, while the right model has visible shading and looks like it is in a real environment.

Figure 8.1 – A model before and after adding an AO map

Figure 8.1 – A model before and after adding an AO map

Now let’s dive into what an AO map looks like. In Figure 8.2, we can see the AO map used on the model from Figure 8.1.

Figure 8.2 – An AO map

Figure 8.2 – An AO map

As you can see, it is mostly white with some gray and black areas. The purpose of this texture map is to shade the creases of the model. We can use this image texture in combination with other textures to improve their shading and shade creases to make the model look more realistic.

Now that we understand what an AO map is, we will move on to learning how to make one in Blender.

...

Baking an Ambient Occlusion map

We will now use a model to create an AO map. This model can be downloaded from the Technical requirements section of this chapter. In the following steps, we will generate the AO map using the Cycles render engine:

  1. UV-unwrap the model, as shown in Figure 8.3.

    This model already has marked seams, but you are encouraged to clear the seams and mark them again manually to practice UV-unwrapping.

Figure 8.3 – Marking seams on a 3D model

Figure 8.3 – Marking seams on a 3D model

Figure 8.4 shows the UV map for this model.

Figure 8.4 – A UV map

Figure 8.4 – A UV map

  1. Switch to the Cycles render engine, as shown in Figure 8.5.
Figure 8.5 – Switching to the Cycles render engine

Figure 8.5 – Switching to the Cycles render engine

  1. Create a new material for the 3D model and generate a new image in an Image Texture node, as shown in Figure 8.6.
Figure 8.6 – Generating a new image

Figure 8.6 – Generating a new image

  1. In the Bake section...

Applying the Ambient Occlusion map with nodes

We will now learn how to apply an AO map to a material and use it to improve our textures.

First, let’s plug the Image Texture node with the AO map into the Base Color input of the Principled BSDF node, as shown in Figure 8.10.

Figure 8.10 – Plugging the AO map into the Principled BSDF node

Figure 8.10 – Plugging the AO map into the Principled BSDF node

This will add some shading to the 3D model, as shown in Figure 8.11.

Figure 8.11 – The effect of an AO map as visible in the viewport

Figure 8.11 – The effect of an AO map as visible in the viewport

Currently, the shading is not very noticeable and makes a minimal difference. In the next few steps, we will add some nodes so that we can tweak the result:

  1. Add a Bright/Contrast node and tweak the values to change the darkness and width of the shadows to your preference. This is demonstrated in Figure 8.12.
Figure 8.12 – Controlling the AO map with a Bright/Contrast node

Figure 8.12 – Controlling the AO map with a Bright/Contrast node

  1. Add a ColorRamp...

Mixing Diffuse and Ambient Occlusion maps in GIMP

We will now learn how to bake a Diffuse map and mix it with an AO map with GIMP. This will allow us to store both textures in one image, which reduces the number of nodes needed. In the following steps, we will bake our texture into a Diffuse map:

Add an Image Texture node and generate a blank image named Diffuse Map, as shown in Figure 8.21. Keep this node disconnected from other nodes.

Figure 8.21 – Generating a blank image

Figure 8.21 – Generating a blank image

  1. In the Bake section of the Render Properties tab, set Bake Type to Diffuse.

    For the best results, unplug all the nodes except the base color.

Figure 8.22 – Setting Bake Type to Diffuse

Figure 8.22 – Setting Bake Type to Diffuse

  1. Uncheck Direct and Indirect and bake the image by clicking on the Bake button.

    Disabling direct and indirect contributions will prevent reflections of light from interfering with the color of the image. Make sure that the Image Texture node with...

lock icon The rest of the chapter is locked
You have been reading a chapter from
Photorealistic Materials and Textures in Blender Cycles - Fourth Edition
Published in: Oct 2023 Publisher: Packt ISBN-13: 9781805129639
Register for a free Packt account to unlock a world of extra content!
A free Packt account unlocks extra newsletters, articles, discounted offers, and much more. Start advancing your knowledge today.
Unlock this book and the full library FREE for 7 days
Get unlimited access to 7000+ expert-authored eBooks and videos courses covering every tech area you can think of
Renews at $15.99/month. Cancel anytime}