Workflow Automation with Microsoft Power Automate - Second Edition
Getting Started with Power Automate
In the first chapter, we introduced some of the basic concepts of Microsoft Power Automate. Now that you’re familiar with some of the ideas and terminology behind Power Automate, let’s take a look at navigating the interface.
As a Power Automate user, you’ll have access to the web portal interface (most commonly used) as well as the desktop and mobile interfaces. If you administer a Microsoft 365 tenant, you’ll also have some administrative features available.
In this chapter, we’ll tackle the following:
Logging in to Power Automate
Creating your first flow
You’ll learn the features of the interfaces, and then we’ll create a basic flow to post to a Teams channel.
Let’s get started!
Logging in to Power Automate
Power Automate has four distinct experiences:
End user web portal: User or creator interfaces with the purpose of designing, importing, saving, exporting, and executing flows.
Mobile app: User or creator interfaces with the purpose of designing, importing, saving, exporting, and executing flows, formatted specifically for mobile devices
Desktop: Most commonly used for creating Robotic Process Automation (RPA) flows
Admin: The overall administration of the Power Automate environment for your tenant, including the number of executions or runs and data gateway configurations
Power Automate tenant administration is largely outside the scope of what we’re going to be learning from a design aspect, but should you ever need to administer the Power Automate environment, you’ll know where to start.
Regardless of which interface you’re going to use, you’ll need access to Power Automate to get the most out of this book. If you don’t have access to Microsoft Power Automate within your organization, you’ll want to go start a Microsoft 365 trial so you can gain access to it. To start a trial subscription, navigate to https://www.microsoft.com/en-us/microsoft-365/try and click the Free trial for business link.
It’s also important to note Microsoft Power Automate is a cloud-only solution—there is no required on-premises server counterpart (though you may install server-side components such as the data gateway or utilize Power Automate Desktop on Windows 10 and 11 computers). Microsoft Power Automate is available in the following Microsoft 365 clouds:
For the purposes of this book, we’ll focus on the features of the worldwide commercial solution. Users of Government Community Cloud Moderate (such as state and local governments) or Government Community Cloud High (such as federal civilian employees) may have slightly different feature sets available.
End user web portal interface
The end user web portal interface is where you’ll design, manage, and execute most of your flows. To access it, you can log in to http://flow.microsoft.com, or log in to the Microsoft 365 end user portal (https://portal.office.com) and click on the Power Automate tile. If you’re using one of the other sovereign clouds, use the links in the previous section or contact your reseller for specific links.
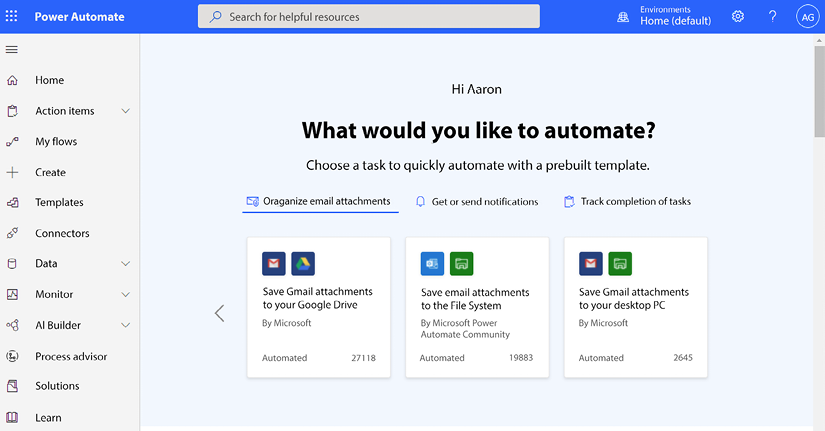
The web portal interface is depicted in Figure 2.1:
Figure 2.1: Power Automate home page
The left part of the page features a navigation menu that includes options to review action items (approvals and business process flows), as well as to create and manage your own flows and search for templates and connectors. The following list describes the options available:
Home: The dashboard displayed upon first logging in
Action items: The top-level menu item containing links to Approvals (approval workflows) and Business process flows (multi-step task-oriented flows)
My flows: Flows that you have created (or that have been shared with you)
Create: The interface for creating new flows
Templates: Pre-canned flows comprising connectors that only need to be customized
Connectors: List of connectors available in Power Automate
Data: A top-level menu item containing links to the following:
Tables (formerly Entities): Objects in Dataverse (formerly Common Data Service)
Connections: Authentication configurations for connectors
Custom connectors: Custom interfaces to REST API applications
Gateways: Basic information about existing data gateways to connect to on-premises data sources
Monitor: A top-level menu item containing links to the following:
Cloud flow activity: Review recent cloud flow runs or executions
In this book, we’ll explore some of the components to use when building your own flows. You may want to spend some time looking through the connectors (https://flow.microsoft.com/en-us/connectors/) and templates (https://flow.microsoft.com/en-us/templates/) to start getting ideas of what types of applications and services you can integrate with Power Automate. You’ll want to focus on connectors and templates that help you integrate apps that your organization uses on a regular basis.
The following options are available on the home screen:
Activity: Shows a list of recently completed flows and approval activities
Browse: Search connectors and templates to begin creating a new flow
Buttons: Allows you to create button (or instant) flows to be triggered from your mobile device
Flows: Lists your own and your team’s (that is, shared) flows
Account: Your Office 365 tenant account sign-in information
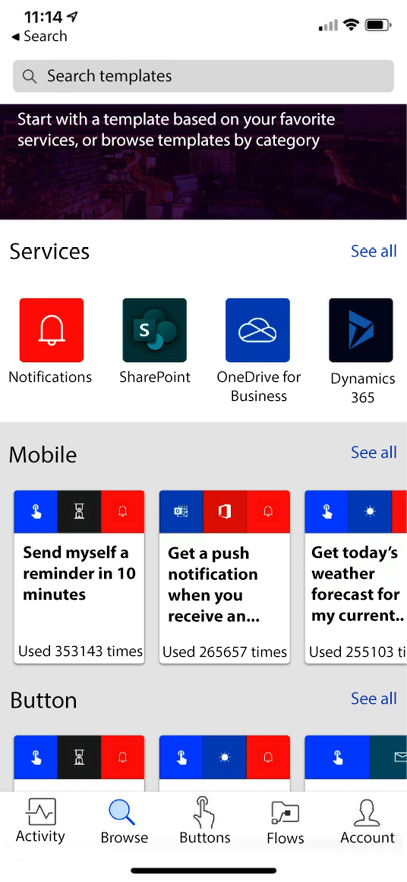
The mobile experience focuses on surfacing flow components specifically tailored to mobile devices. The majority of this book will focus on the end user web portal experience, but there will be a few opportunities to use the mobile app.
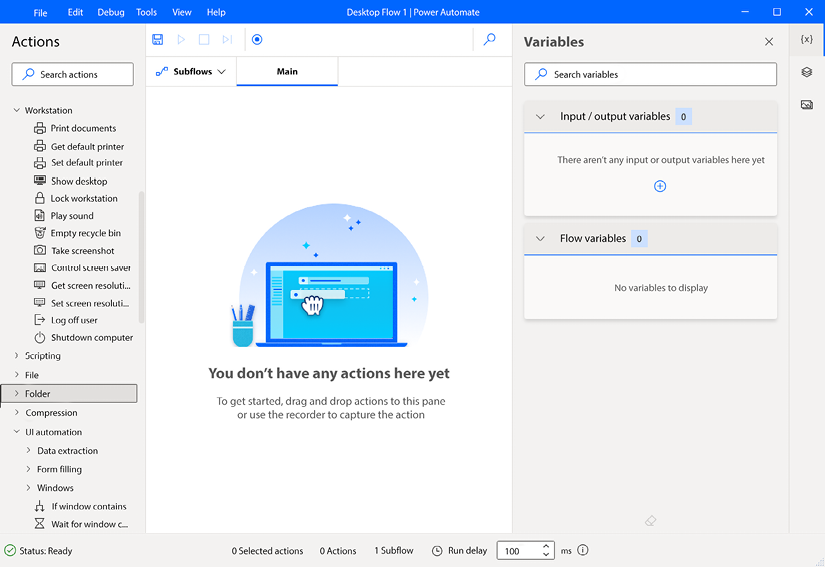
Power Automate Desktop interface
As mentioned in Chapter 1, Introducing Microsoft Power Automate, Power Automate Desktop is a new way to interact with flows. You can only create robotic process automation flows from Power Automate Desktop.
The Power Automate Desktop application itself is free to download for Windows 10 and is included with Windows 11. However, in order to use advanced features (such as RPA flows), you may need to acquire additional licensing.
Figure 2.3 shows the Power Automate Desktop application on Windows 10:
Figure 2.3: Power Automate Desktop on Windows 10
Power Automate Desktop allows you to interrogate system resources and interact with files, browser instances, applications such as Outlook and Excel, command prompts, and even printers.
Admin interface
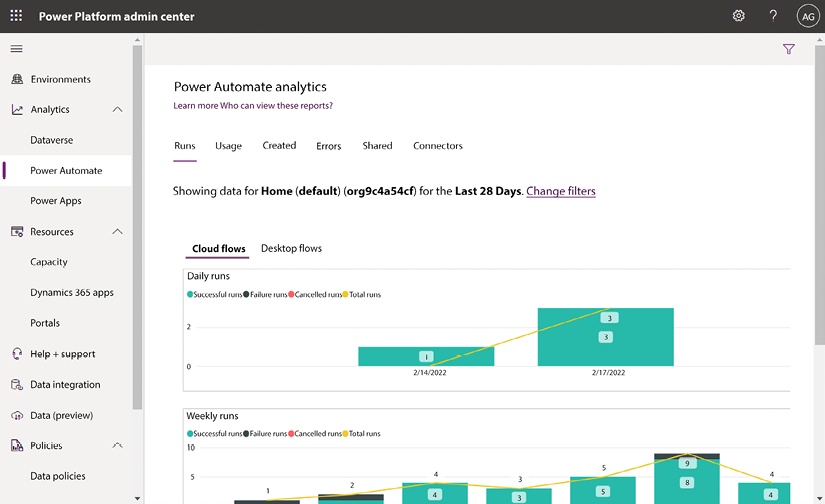
Previously, administrators needed to use both the Power Automate admin center as well as the Power Platform admin center to manage their environments. In 2021, all the functions were combined into the Power Platform admin center. You’ll have view-only access to this interface unless you’re a global admin of a Microsoft 365 tenant or have been granted Power Platform admin rights.
The Power Automate admin center (previously https://admin.flow.microsoft.com, which now redirects to https://admin.powerplatform.microsoft.com) allows you to keep track of runs executed tenant-wide, view license information, view overall environment data, and configure Data Loss Prevention (DLP) policies. In addition, the Power Platform admin center allows you to administer features across the entire Power Platform, including Power Automate, but also to Dynamics 365, Power BI, and Power Apps, as shown in Figure 2.4:
Figure 2.4: Power Platform admin center
While the admin interface will not be used extensively in this book, you should understand that it exists and that administrators of the overall Microsoft 365 environment can modify configurations and view statistical data across the organization.
Now that you’ve seen the various interfaces for Power Automate, let’s start creating!
Creating your first flow
The best way to see Power Automate in action is to start creating a flow. In this example, we’re going to create a flow that monitors Twitter for a certain hashtag and then posts a notification to a Teams channel. Such a flow might be useful if you’re trying to gauge or capture customer sentiment for a product or service, track trending public health topics related to certain keywords, monitor engagement activity, or other topic-based alerts on a social media platform.
Understanding the flow components
This particular flow is going to rely upon a few components:
An identity for Twitter (username and password)
A trigger that monitors Twitter for certain words or phrases
An identity for Office 365 (username and password)
A Microsoft Teams team
An action that posts to Microsoft Teams
To complete this flow, you’ll need your existing Microsoft 365 identity (or the identity you’re using in a test environment), as well as an identity for Twitter (https://www.twitter.com). You’ll also need access to a Microsoft Teams team where messages will be posted.
About Microsoft Teams
If you’re not familiar with Microsoft Teams, it’s a modern collaboration software platform that brings several Microsoft technologies under a single, unified user interface. You can learn how to create teams here: https://docs.microsoft.com/en-us/microsoftteams/get-started-with-teams-create-your-first-teams-and-channels. You can also learn more about Microsoft Teams in another Packt book, Expert Microsoft Teams Solutions (ISBN: 978-1801075558).
Once you have the required identities configured, we’ll start creating the flow!
Creating and executing the flow
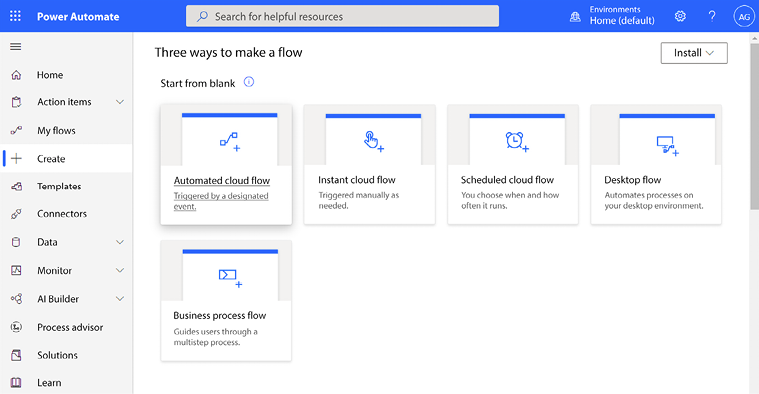
Once we have the prerequisite components for the flow (that is, the aforementioned identities and a team), we can begin the configuration. To build this sample flow, follow these steps:
On the Manage your flows page, under Start from blank, click Automated cloud flow:
Figure 2.5: Creating an automated cloud flow
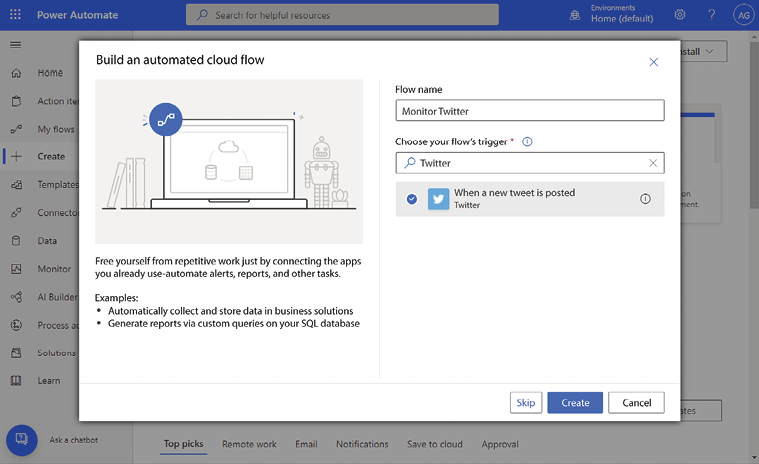
Enter a Flow name.
In the Choose your flow’s trigger box, start typing Twitter to filter triggers related to Twitter. Select When a new tweet is posted and click Create:
Figure 2.6: Creating a new cloud flow
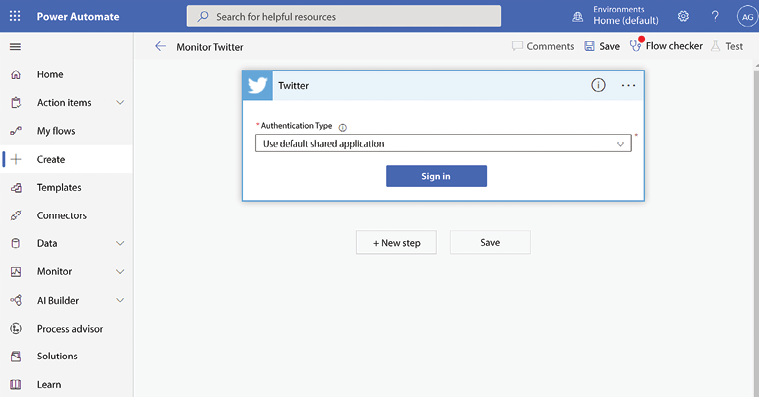
Next, click Sign in to provide the necessary Twitter credentials to access the Twitter API. You can use the Use default shared application authentication type for this basic flow:
Figure 2.7: Entering Twitter credentials
Enter the credentials of a Twitter account and then select Authorize app:
Figure 2.8: Authorizing the Twitter application
In the Search text box, enter the text that you want to search for. In this case, the flow will be configured to monitor new instances of #learningpowerautomate:
All Twitter interactions with the hashtag will be queried using the Twitter API, not just tweets posted by the account whose credentials were provided.
Figure 2.9: Entering search text
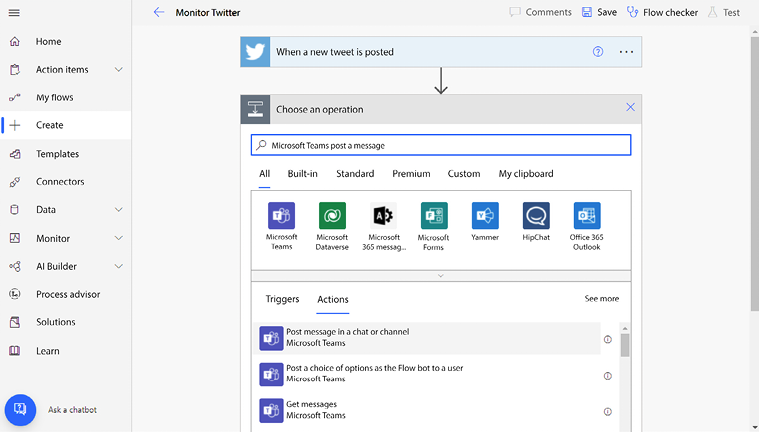
Click New step.
Under Actions, search for the Microsoft Teams Post message in a chat or channel action and select it:
Figure 2.10: Selecting the Post message action
Under Post as, select Flow bot.
Under Post in, select Channel. This will allow you to select a team and a channel to post the message. Alternatively, you could also select Chat with Flow bot (some of the screens will be different). Select a Team and Channel where you have access to post messages.
Populate the Message field. In this example, the dynamic content values Tweeted by and Tweet text have been selected to surface data provided by Twitter:
Figure 2.11: Filling out the Post message action
About Dynamic Content
Many actions will give you access to dynamic content (data that is automatically populated, calculated, or retrieved) based on the context and parameters of the flow’s connected data sources and actions. Dynamic content values are automatically generated variables with content based on the result of previously completed actions or triggers.
Scroll to the bottom of the page and select Save.
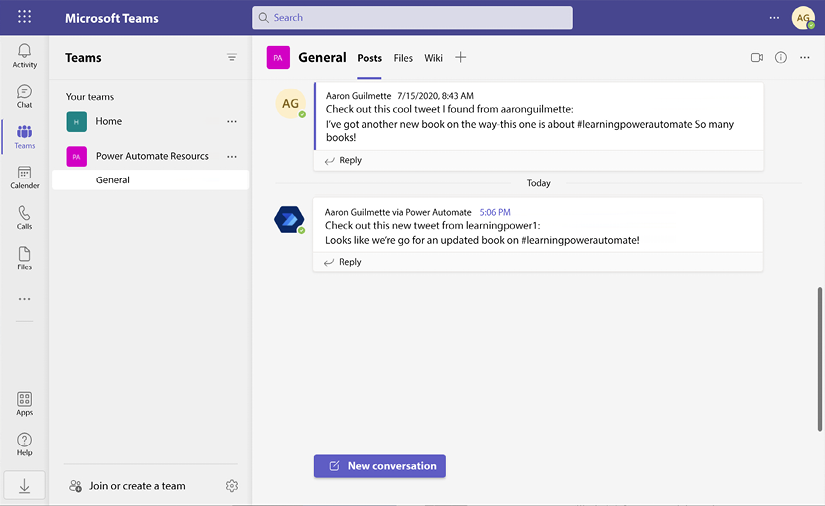
Now that the flow has been created and saved, you can test it by generating content and then checking to see whether the content gets posted to the Microsoft Teams channel as you’d expect:
Figure 2.12: Checking Microsoft Teams after tweeting
If it doesn’t look the way you expect, you can try adding different dynamic content variables or investigating the data retrieved during the run. We’ll examine some of the troubleshooting processes in Chapter 19, Monitoring and Troubleshooting Flows.
Examining the flow
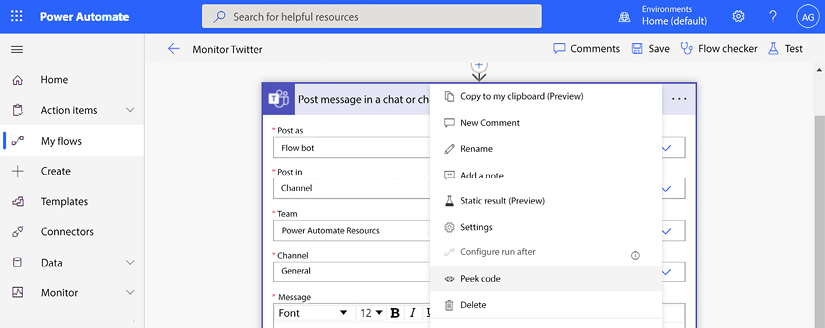
At any time, you can use a feature called Peek code that allows you to look at the underlying JavaScript Object Notation (JSON) code that controls how a step functions.
To access the JSON view for a step, click the ellipsis (...) for the step and then select Peek code:
Figure 2.13: Launching Peek code
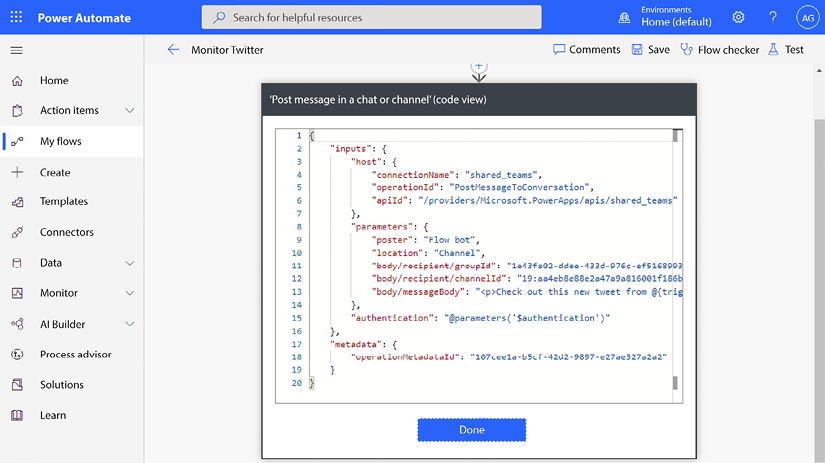
You can then navigate the detailed code for the step.
Figure 2.14: Viewing the JSON for a step
You can’t directly edit the JSON code in Power Automate’s user interface, but you can export it and edit it in an editor such as Visual Studio.
This flow built on your basic knowledge of flow components by adding dynamic content. We’ll use a lot more dynamic content in later chapters. As you can see, being able to use dynamic content placeholders and references will increase the richness of the flows you create.
When finished, you can click Done to leave the JSON code view.
Summary
In this chapter, you learned about the various Microsoft Power Automate interfaces (web, mobile, desktop, and admin) and some of the features available in each of them. Using the knowledge of Power Automate and the workflow concepts introduced in Chapter 1, Introducing Microsoft Power Automate, we built a simple flow to generate a Teams channel message based on Twitter keywords.
Our simple flow illustrated the power of automation to help organizations stay connected and generate actionable information in a relatable manner.
In the next chapter, we’re going to begin using Power Automate to perform common email tasks, such as filtering messages and working with attachments.
Learn more on Discord
To join the Discord community for this book – where you can share feedback, ask questions to the author, and learn about new releases – follow the QR code below:
Learn the latest in Power Automate with updated user interface visuals and new technology included
Apply practical knowledge like managing user inputs, documents, approvals, and database storage
Create flows that integrate with services both inside and outside the Microsoft 365 ecosystem
Description
MS Power Automate is a workflow automation tool built into MS 365 to help businesses automate repetitive tasks or trigger business processes without user intervention. It is a low-code tool that is part of the Microsoft applications framework, the Power Platform.
If you are new to Power Automate, this book will give you a comprehensive introduction and a smooth transition from beginner to advanced topics to help you get up to speed with business process automation. Complete with hands-on tutorials and projects, this easy-to-follow guide will show you how to configure automation workflows for business processes between hundreds of applications, using examples within Microsoft and including third-party apps like Dropbox and Twitter. Once you understand how to use connectors, triggers, and actions to automate business processes, you’ll learn how to manage user input, documents, and approvals, as well as interact with databases. This edition also introduces new Power Automate features such as using robotic process automation (RPA) to automate legacy applications, interacting with the Microsoft Graph API, and working with artificial intelligence models to do sentiment analysis.
By the end of this digital transformation book, you’ll have mastered the basics of using Power Automate to replace repetitive tasks with automation technology.
What you will learn
Learn the basic building blocks of Power Automate capabilities
Explore connectors in Power Automate to automate email workflows
Discover how to make a flow for copying files between cloud services
Configure Power Automate Desktop flows for your business needs
Build on examples to create complex database and approval flows
Connect common business applications like Outlook, Forms, and Teams
Learn the introductory concepts for robotic process automation
Discover how to use AI sentiment analysis
What do you get with eBook?
Instant access to your Digital eBook purchase
Download this book in EPUB and PDF formats
Access this title in our online reader with advanced features
DRM FREE - Read whenever, wherever and however you want
Aaron Guilmette, a Senior Program Manager for Customer Experience (CXP), provides guidance and assistance to customers adopting the Microsoft 365 platform. He primarily focuses on collaborative technologies, including Microsoft SharePoint Online, Microsoft Exchange, and Microsoft Teams. He also works with identity and automation solutions.
He has been involved with technology since 1998 and has provided consulting services for customers in the commercial, educational, and government sectors internationally. Aaron has also worked on technical certification exams and instructional design for Microsoft and other organizations.
Where there is an eBook version of a title available, you can buy it from the book details for that title. Add either the standalone eBook or the eBook and print book bundle to your shopping cart. Your eBook will show in your cart as a product on its own. After completing checkout and payment in the normal way, you will receive your receipt on the screen containing a link to a personalised PDF download file. This link will remain active for 30 days. You can download backup copies of the file by logging in to your account at any time.
If you already have Adobe reader installed, then clicking on the link will download and open the PDF file directly. If you don't, then save the PDF file on your machine and download the Reader to view it.
Please Note: Packt eBooks are non-returnable and non-refundable.
Packt eBook and Licensing When you buy an eBook from Packt Publishing, completing your purchase means you accept the terms of our licence agreement. Please read the full text of the agreement. In it we have tried to balance the need for the ebook to be usable for you the reader with our needs to protect the rights of us as Publishers and of our authors. In summary, the agreement says:
You may make copies of your eBook for your own use onto any machine
You may not pass copies of the eBook on to anyone else
How can I make a purchase on your website?
If you want to purchase a video course, eBook or Bundle (Print+eBook) please follow below steps:
Register on our website using your email address and the password.
Search for the title by name or ISBN using the search option.
Select the title you want to purchase.
Choose the format you wish to purchase the title in; if you order the Print Book, you get a free eBook copy of the same title.
Proceed with the checkout process (payment to be made using Credit Card, Debit Cart, or PayPal)
Where can I access support around an eBook?
If you experience a problem with using or installing Adobe Reader, the contact Adobe directly.
To view the errata for the book, see www.packtpub.com/support and view the pages for the title you have.
To view your account details or to download a new copy of the book go to www.packtpub.com/account
Our eBooks are currently available in a variety of formats such as PDF and ePubs. In the future, this may well change with trends and development in technology, but please note that our PDFs are not Adobe eBook Reader format, which has greater restrictions on security.
You will need to use Adobe Reader v9 or later in order to read Packt's PDF eBooks.
What are the benefits of eBooks?
You can get the information you need immediately
You can easily take them with you on a laptop
You can download them an unlimited number of times
You can print them out
They are copy-paste enabled
They are searchable
There is no password protection
They are lower price than print
They save resources and space
What is an eBook?
Packt eBooks are a complete electronic version of the print edition, available in PDF and ePub formats. Every piece of content down to the page numbering is the same. Because we save the costs of printing and shipping the book to you, we are able to offer eBooks at a lower cost than print editions.
When you have purchased an eBook, simply login to your account and click on the link in Your Download Area. We recommend you saving the file to your hard drive before opening it.
For optimal viewing of our eBooks, we recommend you download and install the free Adobe Reader version 9.
 Argentina
 Australia
 Austria
 Belgium
 Brazil
 Bulgaria
 Canada
 Chile
Chile
 Colombia
 Cyprus
 Czechia
 Denmark
 Ecuador
 Egypt
Egypt
 Estonia
 Finland
 France
 Germany
 Great Britain
 Greece
 Hungary
 India
India
 Indonesia
 Ireland
 Italy
Italy
 Japan
Japan
 Latvia
 Lithuania
 Luxembourg
 Malaysia
 Malta
Malta
 Mexico
 Netherlands
 New Zealand
 Norway
 Philippines
 Poland
 Portugal
 Romania
 Russia
 Singapore
 Slovakia
 Slovenia
 South Africa
 South Korea
 Spain
Spain
 Sweden
 Switzerland
 Taiwan
 Thailand
 Turkey
 Ukraine
 United States