


Part 4 – the user interface
The final element your game needs is a user interface (UI). This will display information that the player needs to see during gameplay, which is often referred to as a heads-up display (HUD) because the information appears as an overlay on top of the game view. You’ll also use this scene to display a start button after the game ends.
Your HUD will display the following information:
- The score
- The time remaining
- A message, such as Game Over
- A start button
Node setup
Create a new scene and add a CanvasLayer node named HUD. A CanvasLayer node creates a new drawing layer, which will allow you to draw your UI elements above the rest of the game so that it doesn’t get covered up by game objects, such as the player or coins.
Godot provides a variety of UI elements that can be used to create anything from indicators, such as health bars, to complex interfaces, such as inventories. In fact, the Godot editor that you use to make this game is built using the Godot UI elements. The basic nodes for a UI are all extended from Control and appear with green icons in the node list. To create your UI, you’ll use various Control nodes to position, format, and display information. Here’s what the HUD will look like when complete:
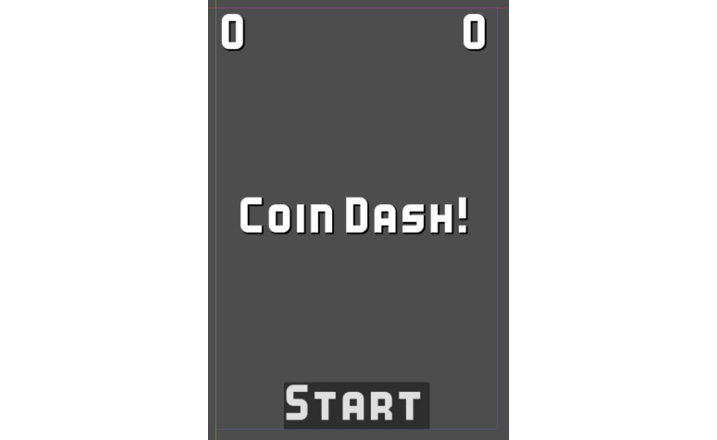
Figure 2.25: The HUD layout
Message label
Add a Label node to the scene and change its name to Message. This label will display the game’s title as well as Game Over when the game ends. This label should be centered on the game screen. You can drag it with the mouse, or set the values directly in the Inspector window, but it’s easiest to use the shortcuts provided in the layout menu, which will set the values for you.
Select HCenter Wide from the layout menu:
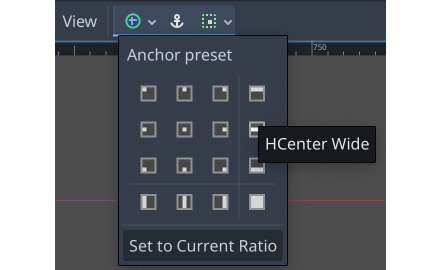
Figure 2.26: Positioning the message
The label now spans the width of the screen and is centered vertically. The Text property sets what text the label displays. Set it to Coin Dash!, and set Horizontal Alignment and Vertical Alignment both to Center.
The default font for Label nodes is very small and unattractive, so the next step is to assign a custom font. In the Label Settings property, select New LabelSettings and then click it to expand.
From the FileSystem tab, drag the Kenney Bold.ttf font file and drop it into the Font property, and then set Size to 48. You can also improve the appearance by adding a shadow – try the settings shown in the following screenshot, or experiment with your own:
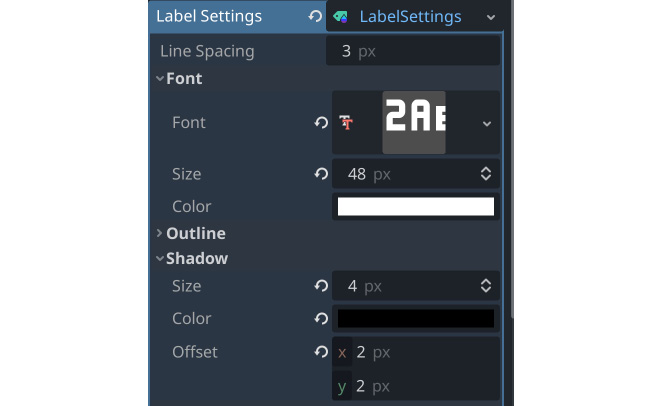
Figure 2.27: Font settings
Score and time display
The top of the HUD will display the player’s score and the time remaining on the clock. Both of these will be Label nodes, arranged at opposite sides of the game screen. Rather than position them separately, you’ll use a container node to manage their positions.
Containers
Godot’s Container nodes automatically arrange the positions and sizes of their child Control nodes (including other containers). You can use them to add padding around elements, keep them centered, or arrange them in rows and columns. Each type of Container has special properties that control how they arrange their children.
Remember that containers automatically arrange their children. If you try to move or resize a Control that’s inside a Container node, you’ll get a warning from the editor. You can manually arrange controls or arrange them with a container, but not both.
Score and time display
To manage the score and time labels, add a MarginContainer node to the HUD. Use the layout menu to set the anchors to Top Wide. In the Theme Overrides/Constants section of the Inspector window, set the four Margin properties to 10. This will add some padding so that the text isn’t against the edge of the screen.
Since the score and time labels will use the same font settings as Message, you can save time by duplicating it. Select Message and press Ctrl + D twice to create two duplicate labels. Drag them both and drop them onto MarginContainer to make them its children. Name one child Score and the other Time, and set the Text property to 0 for both. Set Vertical Alignment to Center on both, and Horizontal Alignment to Right on Score but Left on Time.
Updating the UI via GDScript
Add a script to the HUD node. This script will update the UI elements when their properties need to change, such as updating the Score text whenever a coin is collected. See the following code:
extends CanvasLayer
signal start_game
func update_score(value):
    $MarginContainer/Score.text = str(value)
func update_timer(value):
    $MarginContainer/Time.text = str(value)
The Main scene’s script will call these two functions to update the display whenever there is a change in a value. For the Message label, you also need a timer to make it disappear after a brief period.
Add a Timer node as a child of HUD, and set Wait Time to 2 seconds and One Shot to On. This ensures that, when started, the timer will only run once, rather than repeating. Add the following code:
func show_message(text):
    $Message.text = text
    $Message.show()
    $Timer.start()
In this function, you will display the message and start the timer. To hide the message, connect the timeout signal of Timer (remember that it will automatically create the new function):
func _on_timer_timeout():
    $Message.hide()
Using buttons
Add a Button node to HUD and change its name to StartButton. This button will be displayed before the game starts, and when clicked, it will hide itself and send a signal to the Main scene to start the game. Set the Text property to Start, then scroll down to Theme Overrides/Fonts, and set the font as you did with Message.
In the layout menu, choose Center Bottom to center the button at the bottom of the screen.
When a button is pressed, it emits a signal. In the Node tab for StartButton, connect the pressed signal:
func _on_start_button_pressed():
    $StartButton.hide()
    $Message.hide()
    start_game.emit()
Game over
The final task for your UI script is to react to the game ending:
func show_game_over():
    show_message("Game Over")
    await $Timer.timeout
    $StartButton.show()
    $Message.text = "Coin Dash!"
    $Message.show()
In this function, you need the Game Over message to be displayed for two seconds and then disappear, which is what show_message("Game Over") does. However, you then want to show the start button and game title once the message has disappeared. The await command pauses the execution of a function until the given node (Timer) emits a given signal (timeout). Once the signal is received, the function continues, and everything will be returned to its initial state so that you can play again.
Adding HUD to Main
The next task is to set up the communication between Main and HUD. Add an instance of HUD to Main. In Main, connect the timeout signal of GameTimer and add the following so that every time GameTimer times out (every second), the remaining time is reduced:
func _on_game_timer_timeout():
    time_left -= 1
    $HUD.update_timer(time_left)
    if time_left <= 0:
        game_over()
Next, select the instance of Player in Main and connect its pickup and hurt signals:
func _on_player_hurt():
    game_over()
func _on_player_pickup():
    score += 1
    $HUD.update_score(score)
Several things need to happen when the game ends, so add the following function:
func game_over():
    playing = false
    $GameTimer.stop()
    get_tree().call_group("coins", "queue_free")
    $HUD.show_game_over()
    $Player.die()
This function halts the game and also uses call_group() to remove all remaining coins by calling queue_free() on each of them.
Finally, pressing StartButton needs to activate Main’s new_game() function. Select the instance of HUD and connect its start_game signal:
func _on_hud_start_game():
    new_game()
Make sure you’ve removed new_game() from Main’s _ready() function (remember, that was only there to test), and add these two lines to new_game():
$HUD.update_score(score)
$HUD.update_timer(time_left)
Now, you can play the game! Confirm that all parts are working as intended – the score, the countdown, the game ending and restarting, and so on. If you find a part that’s not working, go back and check the step where you created it, as well as the step(s) where it may have been connected to the rest of the game. A common mistake is to forget to connect one of the many signals you used in different parts of the game.
Once you’ve played the game and confirmed that everything works correctly, you can move on to the next section, where you can add a few additional features to round out the game experience.


