Reader small image

You're reading from  Python Scripting in Blender

Product typeBook
Published inJun 2023
PublisherPackt
ISBN-139781803234229
Edition1st Edition
Right arrow
Author (1)
Paolo Acampora
Paolo Acampora
author image
Paolo Acampora

Paolo Acampora is a 3D artist and programmer, with experience in Animation, Visual Effects, and Real Time computer graphics. He provides tools that streamline the production workflow and let artists focus on the creative aspects of their craft. He has worked with several studios for more than a decade. He contributes to the blender development and releases his tools for the community.
Read more about Paolo Acampora

Right arrow

Rendering and Shaders

A process called rendering generates the pixels of finished images by evaluating the geometries, lights, and camera of the scene.

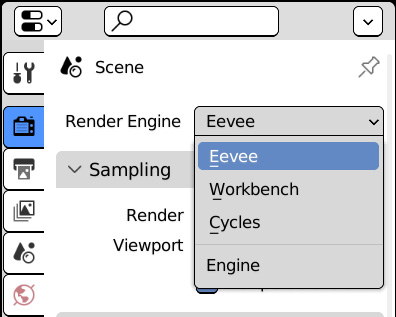
The renderers, or Render Engines, that handle those computations can be external programs, independent from the 3D application, or fully integrated features of the animation package. All renderers have strong and weak points and can be grouped into two categories: real time, which assume a few approximations to achieve immediate visualization, and offline, which take more time to take more details into account.

To generate images, renderers rely on shaders – that is, instructions on how an object reacts to the light and position of the observer, and how that translates into the rendered pixels.

Shaders can be complex and are a discipline of their own, but the basic concept of how they work is not hard to grasp.

In this chapter, you will learn where to set the render properties, how to automate the creation of shaders...

Technical requirements

We will use Blender and Visual Studio Code in this chapter. The examples created for this chapter, along with the media files, can be found at https://github.com/PacktPublishing/Python-Scripting-in-Blender/tree/main/ch12.

Render and materials

Blender comes with two render engines: Eevee, the real-time renderer that can be used in the Viewport, and Cycles, an offline renderer. Additional engines, including most of the commercial offerings, can be installed in the form of render add-ons. A third option, Workbench, can be used for quickly and simply displaying renders in the Viewport.

Setting the Render Engine

The current Render Engine, along with other render settings, can be found in the scene Render properties. It’s the first tab and is marked with an icon of a TV set:

Figure 12.1: Selecting the current Render Engine

Figure 12.1: Selecting the current Render Engine

While Workbench is designed to have only a few render options and no shading system, Eevee and Cycles can combine images, colors, and attributes using a node-based system. This can be done in the Shader Editor area, available in the Shading workspace.

The Shading workspace

Shading involves disparate activities, such as accessing image files...

The Shader Editor

The shading system supports different styles: realistic, cartoon, or technical drawings, to mention a few. Rather than providing a single interface with defined widgets, the functionalities of a renderer are scattered through interconnecting units called nodes.

Much like a function, a node performs a specific operation on one or more inputs and makes the results available through one or more outputs. Nodes are visual representations of functions, allowing non-programmers to combine logic blocks to get custom results.

Nodes are not unique to shading – they are used for Compositing and for generating meshes in the Geometry Nodes modifier.

By default, a Blender material presents a Material Output node in the Shader Editor area, with a Principled BSDF node as its Surface input. Bidirectional Scattering Distribution Function (BSFD) is a mathematical model of how a surface receives and reflects light rays. It is a form of Physically-Based Rendering (PBR...

Writing the Textament add-on

While creating a shader can take time, we can automate some of the simpler operations. For instance, we can write an add-on to ease the task of loading images from disk and connecting them to the shader.

Using texture images

With the Texture Image node, we can use an image for coloring an object. That adds variation to how a material looks, as images can vary along the extension of an object and are not limited to a single color:

Figure 12.6: An image texture of a Rubik’s cube, applied to a plain cube

Figure 12.6: An image texture of a Rubik’s cube, applied to a plain cube

The operator that we are going to write will load multiple images from disk and guess their usage from the image’s filename. For instance, an image named Metallic.png would be loaded as a Texture Image and connected to the Metallic input of a Principled node.

As usual, we will set up an environment for developing a new add-on.

Setting up the environment

We will create a Python script for our add-on...

Improving Load Textures

Nodes can be moved to a different position by setting the x and y attributes of their location property. This allows us to arrange them in our scripts.

Arranging shader nodes

Even if we can move our nodes freely, the API poses a few limitations:

  • We can’t access the exact location of the sockets
  • The width and height of new nodes are not available in the scripts

One of those two issues at a time would be tolerable, as we could either move our nodes at the height of their inputs or get the space required by a new node on the fly. Since they occur together, we will resort to a workaround.

Assuming node spacing

We cannot get the size of new nodes in a script, but we can learn the default size of a texture node beforehand by looking at an existing shader tree. For instance, after we use Load Texture, we can switch to the Scripting workspace and get the dimensions property of an 'Image Texture' node:

>>> node_tree...

Summary

In this chapter, we learned how materials work and how nodes are created and connected in the Shader Editor area. We also learned how image textures can change the appearance of shaded objects and how they can store non-color data.

This was our first encounter with node trees, a generic visual programming approach that is not limited to shaders and is planned to expand to deformation and rigging in the future.

Node-based systems are flexible and powerful, but they benefit from scripted tools, like all other aspects of Blender.

Rendering is not the final step of production as compositing and editing follow in the computer graphics pipeline. But since this stage converts three-dimensional data into images, it’s usually considered the last step of the 3D workflow.

That ends our journey into how Blender scripting works. We have covered object creation, deformation, animation, and rendering, but most importantly, how tools are designed and implemented, and how...

Questions

  1. How many render engines are present in Blender?
  2. Do the words material and shader have the same meaning?
  3. Are the shader nodes predefined values that determine how objects look or separate units performing independent operations?
  4. Can we use images for coloring objects?
  5. Can we make connections between different data types?
  6. How do we arrange nodes in a graph?
  7. In our shaders, can we alter the colors coming from an image?
lock icon
The rest of the chapter is locked
You have been reading a chapter from
Python Scripting in Blender
Published in: Jun 2023Publisher: PacktISBN-13: 9781803234229
Register for a free Packt account to unlock a world of extra content!
A free Packt account unlocks extra newsletters, articles, discounted offers, and much more. Start advancing your knowledge today.
undefined
Unlock this book and the full library FREE for 7 days
Get unlimited access to 7000+ expert-authored eBooks and videos courses covering every tech area you can think of
Renews at €14.99/month. Cancel anytime

Author (1)

author image
Paolo Acampora

Paolo Acampora is a 3D artist and programmer, with experience in Animation, Visual Effects, and Real Time computer graphics. He provides tools that streamline the production workflow and let artists focus on the creative aspects of their craft. He has worked with several studios for more than a decade. He contributes to the blender development and releases his tools for the community.
Read more about Paolo Acampora