Search icon
Arrow left icon
All Products
Best Sellers
New Releases
Books
Videos
Audiobooks
Learning Hub
Newsletters
Free Learning
Arrow right icon
Python Scripting in Blender

You're reading from  Python Scripting in Blender

Product type Book
Published in Jun 2023
Publisher Packt
ISBN-13 9781803234229
Pages 360 pages
Edition 1st Edition
Languages
Author (1):
Paolo Acampora Paolo Acampora
Profile icon Paolo Acampora

Table of Contents (19) Chapters

Preface 1. Part 1: Introduction to Python
2. Chapter 1: Python’s Integration with Blender 3. Chapter 2: Python Entities and API 4. Chapter 3: Creating Your Add-Ons 5. Chapter 4: Exploring Object Transformations 6. Chapter 5: Designing Graphical Interfaces 7. Part 2: Interactive Tools and Animation
8. Chapter 6: Structuring Our Code and Add-Ons 9. Chapter 7: The Animation System 10. Chapter 8: Animation Modifiers 11. Chapter 9: Animation Drivers 12. Chapter 10: Advanced and Modal Operators 13. Part 3: Delivering Output
14. Chapter 11: Object Modifiers 15. Chapter 12: Rendering and Shaders 16. Index 17. Other Books You May Enjoy Appendix

The Animation System

3D owes much of its popularity to the production of animated content. Its many advantages in terms of performance, quality, and scalability made it ubiquitous in motion pictures, cartoons, feature animation, and video games. With that comes the need for custom tools to ease animation-related tasks.

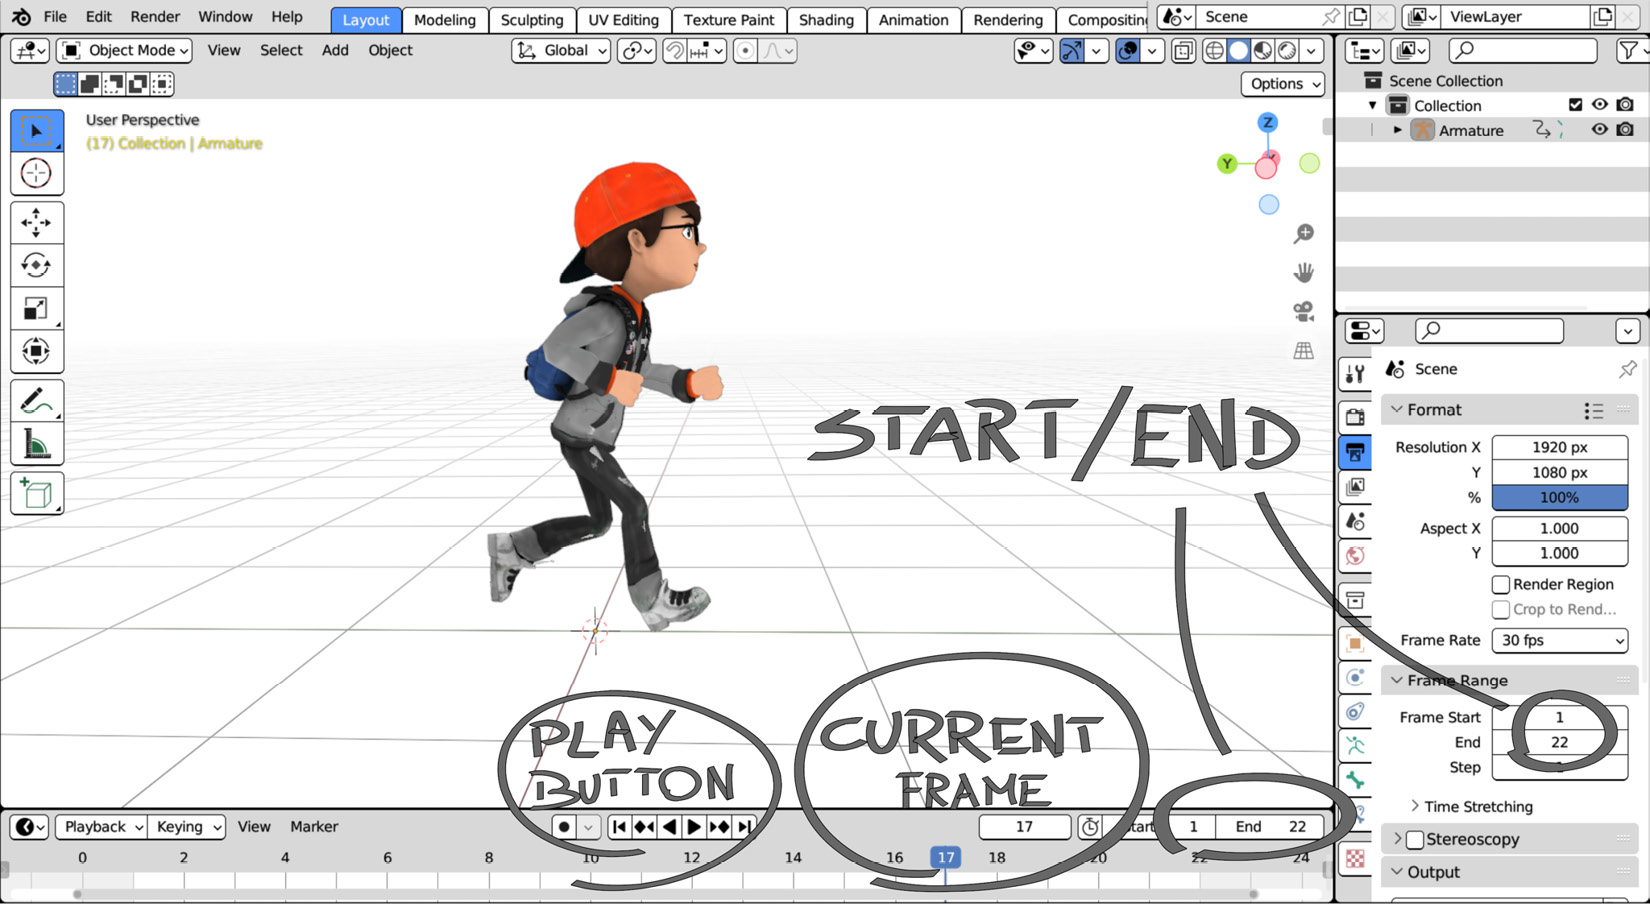
Most applications handle animation similarly, in part inherited from hand-drawn workflows: a sequence is broken into frames, whose rapid succession creates the illusion of motion.

A programmer working in 3D will have to account for animated values changing over time, and how such data is stored.

That might change in the future, but at the time of writing, animation involves a huge amount of manual work, leaving much room for automation.

In this chapter, you will get acquainted with the Blender animation process, learn how to access animation data in Python, and build one tool that sets the playback range and another that animates objects.

This chapter...

Technical requirements

We will use Blender and Visual Studio Code in this chapter. The examples created in this chapter can be found at https://github.com/PacktPublishing/Python-Scripting-in-Blender/tree/main/ch7.

Understanding the animation system

While animations consist of a sequence of frames, only one frame is displayed on the screen at one time. Animators can scroll through these frames and play their animation like a video:

Figure 7.1: Playing an animation in Blender

Figure 7.1: Playing an animation in Blender

The animation Timeline, at the bottom of the screen in the Layout workspace, controls and displays the current frame and the start/end of the sequence. It provides immediate visual feedback and is essential to animation.

Timeline and Current Frame

A Timeline is a Blender area for playing animations and changing the playback settings. It is marked with a clock icon and, because of its importance, is in more than one workspace: Animation, Layout, Rendering, and Compositing display a timeline.

In addition to the frame Start and End values, there is a slider for the Current Frame area and a button bar with Media Controls:

Figure 7.2: Blender’s animation Timeline

Figure 7.2: Blender’s animation...

Writing the Action to Range add-on

Animators set the first and last frames of the scene according to the duration of the shot. If there are animated objects, this add-on can set the playback range automatically.

This operator will allow you to choose between the render and preview range.

Setting the environment

Let’s create a folder for this chapter in our project. Then, in the Blender Preferences area, we need to set the ch7 folder as our Scripts Folder. We must restart Blender to update its search paths.

Our add-on contains an operator, like the ones from Chapter 3, and Chapter 4:

  1. Select PythonScriptingBlender/ch7/addons.
  2. Create a new file by clicking the New File icon.
  3. Name the new file action_to_range.py.
  4. Open the file by double-clicking it.

We can now start writing our first animation add-on.

Writing the Action to Range information

The operator will be invoked from the View menu of the Timeline view, as reported in the location...

Editing keyframes

Animation software gives visual cues of keyframe distribution. In Blender, keyframes are displayed with special colors in the interface and as diamond widgets in the animation editors.

Animated properties have colored backgrounds. If the current frame is a keyframe, the background is yellow; otherwise, it is green:

Figure 7.12: Location is animated; the current frame is the keyframe for X and Y

Figure 7.12: Location is animated; the current frame is the keyframe for X and Y

Keyframes of the selected objects are displayed as diamonds in the Timeline editor:

Figure 7.13: The animation Timeline. Frames 1 and 24 have keyframes

Figure 7.13: The animation Timeline. Frames 1 and 24 have keyframes

Blender transitions from one keyframe to the other by tracing a graph between them. These graphs are referred to as animation curves or f-curves.

Animation curves and the Graph Editor

Like most animation software, Blender generates a transition between two animated values by inbetweening two or more keyframes. A keyframe contains two elements – a moment...

Accessing animation data in Python

Let’s switch to the Scripting Workspace area to familiarize ourselves with the animation system API.

Adding keyframes in Python

The Python class of every animatable object provides a method that we can use to insert keyframes, named keyframe_insert. It is very similar to the Insert Keyframe menu and requires a data_path string for specifying which property to animate. Optional parameters such as index and frame allow us to specify one of the channels of an aggregate property or a frame different from the current one:

keyframe_insert(data_path,
                index=- 1,
                frame=bpy.context.scene.frame_current,
[…]
Returns
        Success of keyframe insertion.

The following lines set a keyframe for the active object...

Writing the Vert Runner add-on

In this section, we will write an add-on that animates the selected objects along the geometry of the active object. The animation will trace a path that connects the vertices of a mesh, hence the name Vert Runner:

Figure 7.16: Animating a toy along the vertices of a path

Figure 7.16: Animating a toy along the vertices of a path

This can be a basis for procedural walks or patrols, motion effects, or any other case where we have a geometrical path.

In this operator, the selected objects and the active ones are treated differently: the active object is the reference geometry on which the selected objects are moved.

Setting the environment

Let’s start by adding a new script to our add-ons directory:

  1. Select PythonScriptingBlender/ch7/addons in VS Code.
  2. Create a new file by clicking on the New File icon.
  3. Name the new file vert_runner.py.
  4. Open the file by double-clicking it.

As usual, we will start with the add-on information.

Writing the...

Summary

In this chapter, we became familiar with object animation, learned how animations are created and stored, and looked at which scene settings are directly related to the animation system. We also learned how animation can be partly automated and approached from a geometric perspective, with a glimpse at the trigonometric representation of rotation angles.

Being able to automate part of the animation process is a valuable skill. Sometimes, the math involved might emerge and require solving, but we should not fear that, as math usually comes with a set of ready-to-use solutions for most ordinary use cases.

We have just started our journey into generated animation, which will continue in Chapter 8, where we will learn how to enrich animation curves with procedural effects.

Questions

  1. How are animated values stored?
  2. Can one animation curve contain the keyframes of an entire Vector property?
  3. How are animation curves grouped?
  4. The current frame number is 1. Without changing that setting, can we insert a keyframe at frame 4 using the user interface?
  5. The current frame number is 1. Without changing that setting, can we insert a keyframe at frame 4 using the Python API?
  6. Does a smooth motion require a keyframe on every frame?
  7. How are keyframes interpolated?
  8. Are there more ways to interpolate two rotations?
lock icon The rest of the chapter is locked
You have been reading a chapter from
Python Scripting in Blender
Published in: Jun 2023 Publisher: Packt ISBN-13: 9781803234229
Register for a free Packt account to unlock a world of extra content!
A free Packt account unlocks extra newsletters, articles, discounted offers, and much more. Start advancing your knowledge today.
Unlock this book and the full library FREE for 7 days
Get unlimited access to 7000+ expert-authored eBooks and videos courses covering every tech area you can think of
Renews at €14.99/month. Cancel anytime}