Reader small image

You're reading from  Pentaho 5.0 Reporting by Example: Beginner's Guide

Product typeBook
Published inAug 2013
PublisherPackt
ISBN-139781782162247
Edition1st Edition
Tools
Right arrow
Author (1)
Right arrow

Chapter 6. Adding Groups

In this chapter, we will use the report we created in the previous chapter and configure it to work with groups.

Through the use of groups, we will be able to group our information according to several criteria and thereby provide the end user a more clearer view of their data. Groups are a feature commonly used in many reports.

The topics that will be covered in this chapter are as follows:

  • Modifying the query in our data set as well as the layout of our report.

  • Discussing the hierarchy of positioning objects within different sections, and enabling an object to go up or down within the hierarchy level.

  • Generating a group for each country value. We will also take a look at how we can enforce each group to start on a new page.

  • Modifying the functions so that they perform their calculations based on the values present in each group.

As an extra, we will invite you to create your own report from the ground up, as well as give you a series of tips to assist you in its creation...

Starting practice


We should now open the report created in the previous chapter (03_Adding_Realtional_DS.prpt) and save it with the following name: 05_Adding_Groups.prpt. This report will serve as the base report we will be using throughout this chapter.

Time for action – modifying the SQL query


We will now modify the previously defined SQL query with the objective of getting a data set that is more suitable to working with groups.

  1. Go to the Data panel (in the Panel tab). Within the Data Sets tree, we will right-click on the JDBC: sakila db node and select the Edit Datasource... option, as shown in the following screenshot:

  2. Just as in the previous chapter, we will be presented with the Connections Editor window. What we will do here is select the sakila db item within the Connection section; then, in the Available Queries section, we will select CountryCustomerAmount.

  3. Now, in the Query section, we will select the SQL query written there and delete it and then replace it with the following code:

    SELECT country.country_id, country.country, customer.first_name, customer.last_name, SUM(payment.amount) sum_amount
    FROM payment 
    INNER JOIN customer ON customer.customer_id=payment.customer_id
    INNER JOIN address ON address.address_id=customer.address_id...

Time for action – configuring the layout


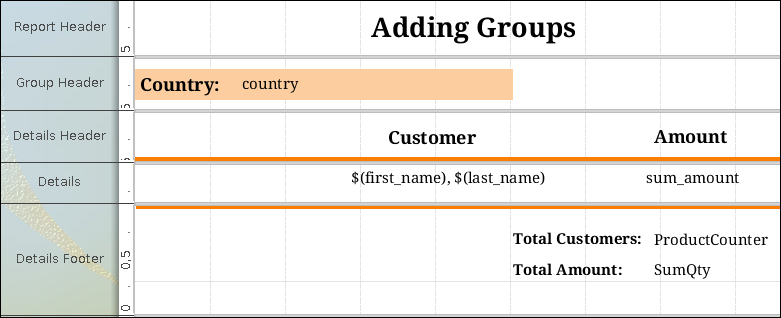
We will now modify the layout of our report so that it looks like the following:

We will modify the Report Header, Group Header, Details Header, Details, and Details Footer sections.

  1. In the Report Header section, we will insert a label to serve as the title, containing the text Adding Groups.

  2. In the Group Header section, we will delete the label we were previously using as the title and put a label containing the text Country:. We will also diminish this object's length and place a text field to its right. We will set the Attributes.field value of this newly added text field to country. In PRD, overlapping objects might not be shown correctly in the final report; this is why we adjusted the label's length. When an overlap between objects exists, PRD colors them red to alert us. However, there are some objects that can overlap, such as rectangle, ellipse, horizontal line, and vertical line.

  3. We will now add a rectangle to the Group Header section. We do...

Configuring the Group section


We will now configure the Group section. We are now going to modify our report so that it groups customers by country in an appropriate way. In order to do this, we will edit an attribute in the Group section.

Time for action – adding groups


If we preview our report, we will be able to see the following:

However, if we compare these results with the ones obtained by MySQL, we will note that the PRD groups are not being created properly.

As we can see, the highlighted customers appearing in our report belong only to Canada; that is, our report is showing incorrect results.

In order for the groups to be correctly formed, we need to go to the Structure tab, navigate to Master Report | Group, select it, and modify the following:

  • Attributes.group = [country_id]

  • Attributes.name = GroupCountry

What we just did was indicated to PRD that the groups should be formed by these registries, which share the same country_id values. We could have put just country instead of country_id, but it is much more efficient to use fields of a numeric nature. With respect to GroupCountry, it is the name by which this group will be referenced in our report.

Note

PRD supports adding one or more grouping criteria, but in our case...

Modifying functions


We will now modify the functions of our report so that they perform their calculations correctly, taking these newly created groups into account. We will also configure the Group section of our report so that every time the country changes, it continues on a new page.

Time for action – modifying functions and page breaks


Follow these steps to modify functions and page breaks:

  1. If we pay attention to the values being reported by our report's functions, we will see that the calculations are not being correctly performed by the group. In order to fix this, we should make the following modification:

    • Reset on Group Name = GroupCountry

  2. We can now perform a preview to see that the calculations are being performed correctly.

  3. We will now configure our report so that each country begins on a new page. We will go to the Structure tab, navigate to Master Report | Group, and make the following modification:

    • Style.pagebreak-after = true

What just happened?

We configured the functions of our report to correctly perform their calculations on a per-group basis, and then configured the Group section so that each new country begins on a different page.

Learning more about groups

A basic requirement for creating groups is that the data set should be ordered according to the...

Summary


In this chapter, we created a copy of the report we used in the previous chapter and configured it to perform customer groupings according to the country to which they belong.

We modified the query of our data set so that we could obtain data in a way more easily suited for the group example. We then modified the layout of our report so that it applied to the one presented in this guide. During the recreation of this layout, we had to move an object downwards in the positioning hierarchy.

We configured the Attributes.group value of the Group section and created groups based on their country_id fields. We also configured the Style.pagebreak-after value of this group so that each new group begins on a different page.

We modified the Reset on Group Name value of the functions so that they perform their calculations by group.

Finally, in order to strengthen the knowledge acquired, we proposed the creation of a new report from the ground up.

In the next chapter, we will explain how to create...

lock icon
The rest of the chapter is locked
You have been reading a chapter from
Pentaho 5.0 Reporting by Example: Beginner's Guide
Published in: Aug 2013Publisher: PacktISBN-13: 9781782162247
Register for a free Packt account to unlock a world of extra content!
A free Packt account unlocks extra newsletters, articles, discounted offers, and much more. Start advancing your knowledge today.
undefined
Unlock this book and the full library FREE for 7 days
Get unlimited access to 7000+ expert-authored eBooks and videos courses covering every tech area you can think of
Renews at $15.99/month. Cancel anytime