Search icon
Arrow left icon
All Products
Best Sellers
New Releases
Books
Videos
Audiobooks
Learning Hub
Newsletters
Free Learning
Arrow right icon
Low Poly 3D Modeling in Blender

You're reading from  Low Poly 3D Modeling in Blender

Product type Book
Published in Feb 2024
Publisher Packt
ISBN-13 9781803245478
Pages 318 pages
Edition 1st Edition
Languages
Concepts
Author (1):
Samuel Sullins Samuel Sullins
Profile icon Samuel Sullins

Table of Contents (22) Chapters

Preface 1. Part 1:Getting Started with Low Poly Modeling
2. Chapter 1: Getting Familiar with Blender 3. Chapter 2: Understanding Low Poly Modeling 4. Chapter 3: Creating a Low Poly Tree 5. Part 2:Modeling and Shading for Low Poly
6. Chapter 4: Exploring Modifiers 7. Chapter 5: Creating Low Poly Mushrooms 8. Chapter 6: Understanding Materials and Shading 9. Part 3:Creating Your Own Assets
10. Chapter 7: Creating a Low Poly Tractor 11. Chapter 8: Low Poly Environment Modeling 12. Chapter 9: Modeling a Kangaroo 13. Chapter 10: Creating Low Poly Houses and Buildings 14. Chapter 11: Using the Asset Browser 15. Part 4:Building a Complete Low Poly Scene
16. Chapter 12: Blocking Out the Scene 17. Chapter 13: Building the Scene 18. Chapter 14: The Big Render 19. Index 20. Other Books You May Enjoy Appendix

Exploring Modifiers

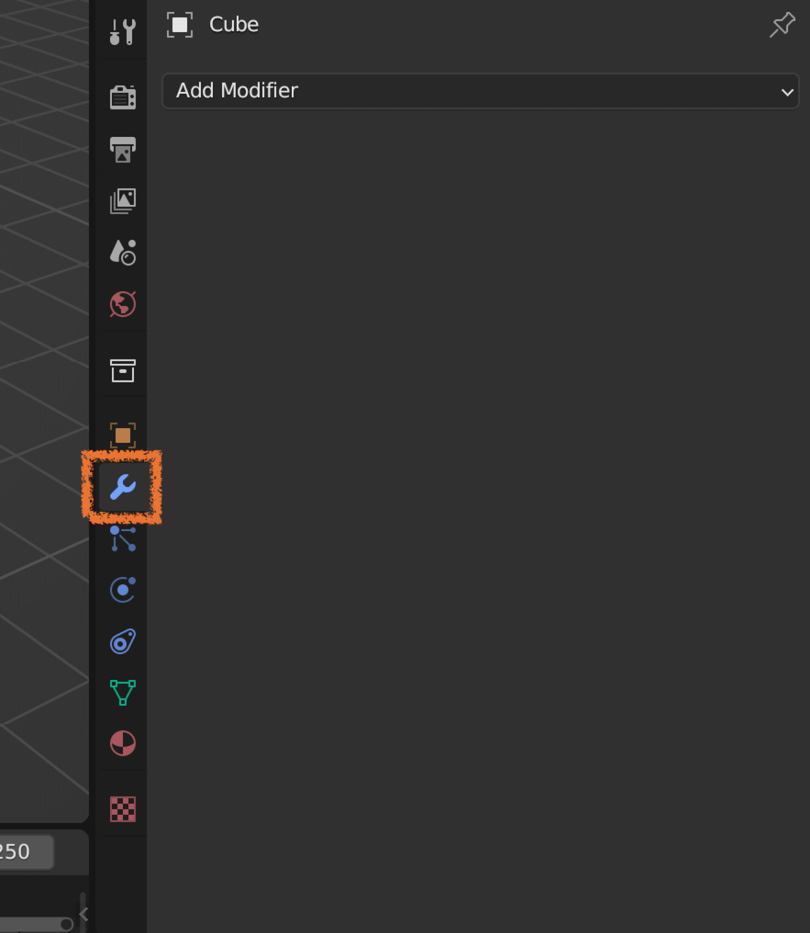
In this chapter, you’re going to learn about modifiers. Modifiers are powerful because they allow you to make edits and changes that are not permanent until you apply them. When you use modifiers to edit an object, you can go back and edit your modifiers at any time.

Modifiers also simplify and automate tasks such as modeling symmetrical objects or duplicating an object many times. For example, if you want a symmetrical object, you can create half of that object and add a Mirror modifier, which will generate the other half of the object for you.

In this chapter, we’ll cover the following:

  • Understanding what modifiers are
  • Learning about the Array modifier
  • Learning about the Mirror modifier and how to use it to build a low poly chair
  • Learning about the Bevel modifier
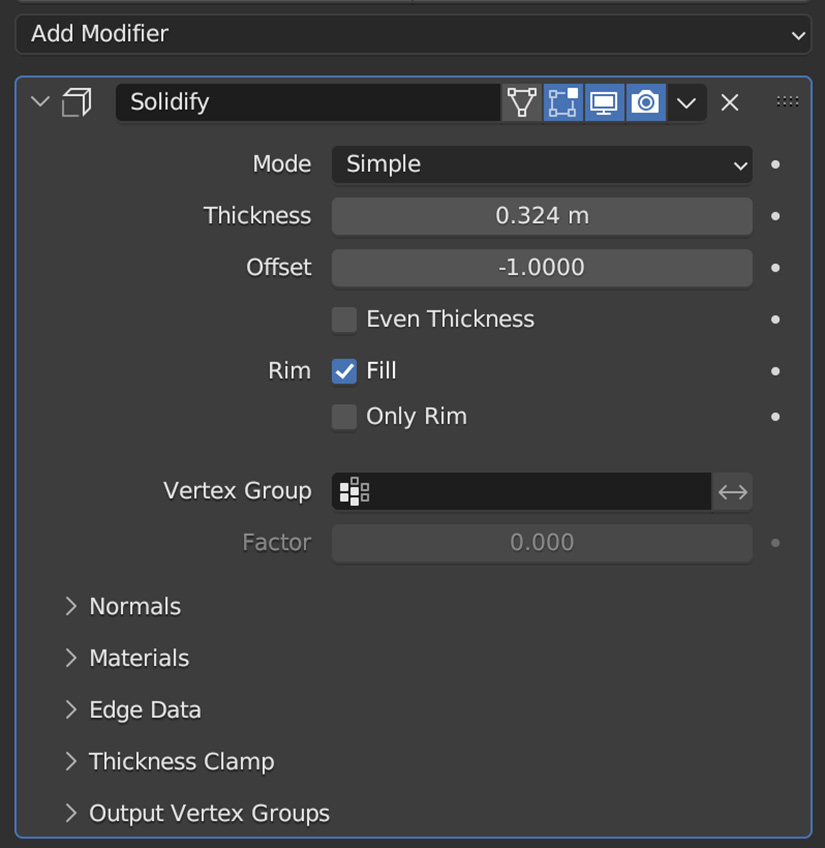
  • Learning about the Solidify modifier

What are modifiers?

Modifiers are a non-destructive tool. When you use a modifier to do something, it can always be undone again or edited until the modifier has been applied.

There are many different kinds of modifiers. Each one performs a single specific task. You work with modifiers in the Modifier tab of the Properties panel.

Blender has tons of useful modifiers, but in this chapter, we’ll cover the Array, Mirror, Bevel, and Solidify modifiers.

Now, let’s build a small example to see the Array modifier in action. You’ll use the Array modifier to make a bunch of duplicates of the default cube. So, follow along:

  1. Open a new Blender file and select the default cube.
  2. Now, click the blue wrench icon in the Properties panel to open the Modifiers tab.
Figure 4.1 – The Modifiers panel

Figure 4.1 – The Modifiers panel

The blank space is called the modifier stack. This is where you can see all the modifiers currently affecting your object...

The Array modifier

Now, let’s learn more about the Array modifier. The Array modifier is one of the most useful modifiers. It duplicates an object over and over again, in a straight line, as many times as you want. You’ll commonly use this modifier for anything repetitive, such as a fence or a wooden bridge. You can also pair it with a Curve modifier to create a line of objects along a curve, though that’s not covered in this book. The Array modifier is extremely simple to use.

Figure 4.3 – The modifier stack with an Array modifier in it

Figure 4.3 – The modifier stack with an Array modifier in it

The Array modifier is great for creating rows, lines, or grids of objects. The Count value allows you to control how many duplicates are created. The values in the Relative Offset section allow you to control how far apart the duplicates are on the X, Y, and Z axes.

And that’s really all there is to it! Play around with it to get the hang of how it works, then add a second Array modifier...

The Mirror modifier

The Mirror modifier is incredibly useful because you’ll often want to create symmetrical 3D models.

Without the Mirror modifier, you’d have to try to make your 3D model symmetrical by hand, constantly trying to keep it the same on both sides. That would be difficult and error-prone. It would take a long time to finish your model.

With the Mirror modifier, you don’t have to do any of that. You simply build half of your model, and the Mirror modifier copies it to create the other half of the model. This keeps it perfectly symmetrical.

This modifier is used for all sorts of awesome things—almost anything symmetrical can be created with a Mirror modifier, such as a full character or a battle vehicle.

The Mirror modifier is simple to use. You’ll understand it best if you build an example project, so let’s put together a simple chair.

Building a low poly chair with a Mirror modifier

You’re ready to use...

The Bevel modifier

The Bevel modifier is the exact same thing as the Bevel tool (Ctrl + B) but in the modifier form. It’s like using the Bevel tool on your entire mesh. You have controls for the number of segments and how strong the bevel is. You also get a Threshold value, which controls which edges get beveled.

The Bevel modifier is really great when you need to soften up the edges of an object a little bit—it helps you lose the hard, sharp edge that you have by default. In low poly modeling, you won’t find yourself using this very often. Still, it’s a good tool to know about. You’ll use this most often when trying to recreate real-world objects. In real life, even the sharpest objects (such as the edge of a knife) have a slight roundness or bevel. Nothing real has perfectly sharp edges like objects in Blender have.

Let’s try out the Bevel modifier:

  1. Again, open a new Blender scene and select the default cube.
  2. Navigate to...

The Solidify modifier

The Solidify modifier is a bit like the Extrude tool in Edit Mode. It simply adds thickness to the mesh it is applied to. This can be useful when you have an object (for example, a cup) that is only made of faces (and is thin, such as a plane). The Solidify modifier adds some quick thickness for you.

Let’s test out the Solidify modifier on a plane so you can see how it works:

  1. Delete the default cube in your scene.
  2. Press Shift + A and add a new plane instead. A plane is just a single, square face; it is infinitely thin—a great test subject for the Solidify modifier.
  3. Open the Modifier tab, click the Add New button, and choose Solidify.

Here’s what the Solidify modifier looks like:

Figure 4.20 – The Solidify modifier

Figure 4.20 – The Solidify modifier

This modifier has one important setting: Thickness. This simply adjusts how thick it is. Negative values will simply make the extrusion happen in the opposite direction...

Summary

In this chapter, you learned all about modifiers in Blender. You learned about what modifiers are and how they work non-destructively on your mesh. You also learned how to use some specific kinds of modifiers—namely, the Bevel, Array, Solidify, and Mirror modifiers.

These are the most fundamental and useful modifiers, but it doesn’t mean they’re the only ones you’ll ever need. There are tons of other modifiers, but they’re not covered in this book—there’s just not enough space!

In the next chapter, you’re going to learn how to make some low poly mushrooms. And don’t ask why I picked mushrooms.

lock icon The rest of the chapter is locked
You have been reading a chapter from
Low Poly 3D Modeling in Blender
Published in: Feb 2024 Publisher: Packt ISBN-13: 9781803245478
Register for a free Packt account to unlock a world of extra content!
A free Packt account unlocks extra newsletters, articles, discounted offers, and much more. Start advancing your knowledge today.
Unlock this book and the full library FREE for 7 days
Get unlimited access to 7000+ expert-authored eBooks and videos courses covering every tech area you can think of
Renews at $15.99/month. Cancel anytime}