Chapter 9. Starting Your First Game
This is it! We have done some basic planning. Now let's begin the project and build your first game. In this chapter, we will cover the following topics:
Setting up a new Unity project
Backing up
Good practices to keep your project clean
Preparing the player prefab
Brief introduction to physics and the Rigidbody component
Collisions and triggers
Adding physics force on input
Update function versus FixedUpdate
First gameplay
Setting up a new Unity project for our game
There are a few basic but important things. Create a new project in Unity. Save it in an easily accessible place. Make sure you have switched the project type to 2D. It will save us some time while importing assets such as Sprites or textures. There's nothing to worry about here; just make sure you select 2D, as in the following screenshot:
Backing up isn't a direct topic in this book; however, I really want to highlight how important this is. Backing up your files will definitely save you from disaster at some point. Lots of things can happen, from hardware failure to rare internal Unity bugs that can ruin your project. That's why it's wise to have a copy of your project somewhere. I don't want to tell you how you should back up your files. There are many ways of doing it, and some are very simple and free.
I would love to tell you a lot about version control and ways to secure your project. However, version control is a rather advanced topic...
Preparing the player prefab
Download the
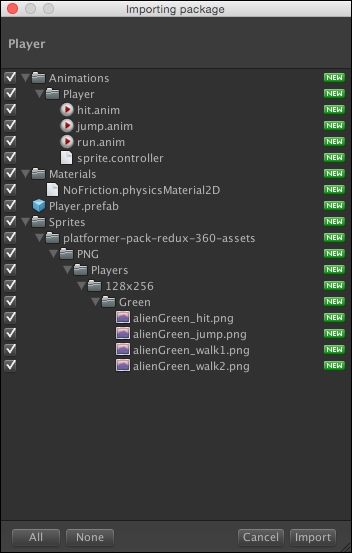
Player.unitypackage file. Make sure your Unity Project is open first and then double-click on the Player.unitypackage file:
Unity displays a window with the assets we are importing to the project. You might ask yourself a question, "Why do I need all this? This is confusing." Don't worry about it too much now. I have prepared Player.prefab with some assets for our Jake. In this book, we will learn about programming the game and not about preparing game art. This is the main reason we will work with prepared assets. We will go through every prefab we are importing to understand how things work. However, you will write the code to control this prefab and create the game!
After pressing Import, you will notice a bunch of folders being created in Unity. We should have:
Animations: This folder contains all Unity animation files
Materials: This is for storing all materials and physics materials
Sprites: This is for storing all art sprite assets courtesy...
This is the moment when we start writing the code for our game. Create a new C# script and call it PlayerController. Remember to keep your project structure nice and clean. The wise thing to do is to create a folder called Scripts and keep the code there. Add the PlayerController component to the Player game object in our scene.
The first and relatively simple functionality we can add is the ability to jump. We already have basic physics with gravity working on the Player game object. Before we can make our Player game object jump, we need to know when this should happen. The user always needs some sort of interface in order to interact with the game. On the PC and Mac, in most of cases, it will be the mouse or keyboard. On mobile devices, it will be the touchscreen.
Unity gives us a lot of out-of-the-box functions we can call to check whether user is trying to interact through any input.
As we are writing a standalone game, I think it best if we stick to the mouse control.
Please open the Unity Scripting Reference and search for Input. You can have a read through the documentation on the Input class of jump straight to the Input.GetMouseButtonDown public method. Read it thoroughly.
Input.GetMouseButtonDown returns true during the frame when the user pressed the given mouse button. According to the documentation...
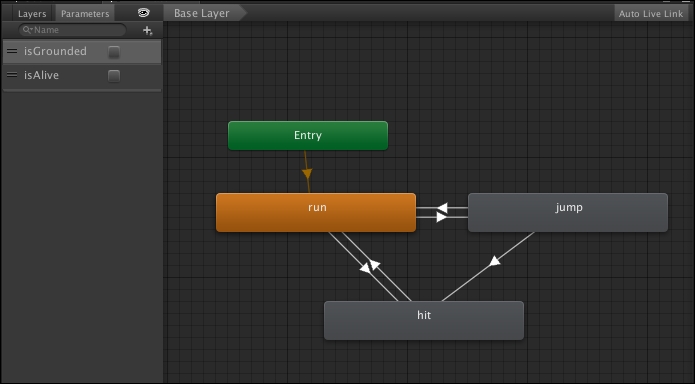
Another important topic in this book is how to animate Jake. Certain animations will be played on the character for specific events. You probably noticed Jake's face is sad during the game. Unity has a really clever system already built-in for controlling animation: Mecanim. If you haven't heard about it yet, I encourage you to dive into Unity's documentation. Anyway, we won't go into too much detail about animating stuff in Unity. All I want you to know is that I have prepared the following animation clips for you:
Run: This is played when the player is grounded and alive
Jump: This is played during the jump
Hit: This is played when the player hits the obstacle and dies
To preview how animation clips are connected, open the Animator view by going to Window | Animator and selecting the Player game object from the hierarchy:
This is an Animator view. As we want to focus on programming in this book, we won't discuss the details here. All I want you to notice is the Parameters tab and...
This section will cover the code that is present in this chapter:
We finally started actively working on game development. You are doing great. We wrote our basic PlayerController, implemented jumping physics, and even discussed triggering animations.
In the next chapter, we will start working on the GameManager class that will allow enclosed game loops.