Reader small image

You're reading from  Swift Game Development - Third Edition

Product typeBook
Published inSep 2018
Reading LevelIntermediate
PublisherPackt
ISBN-139781788471152
Edition3rd Edition
Languages
Right arrow
Authors (2):
Siddharth Shekar
Siddharth Shekar
author image
Siddharth Shekar

Siddharth Shekar is a game developer and teacher with over 6 years' industry experience and 12 years' experience in C++ and other programming languages. He is adept at graphics libraries such as OpenGL and Vulkan, and game engines such as Unity and Unreal. He has published games on the iOS and Android app stores. He has also authored books including Swift Game Development, Mastering Android Game Development with Unity, and Learning iOS 8 Game Development Using Swift, all published by Packt Publishing. He currently lives in Auckland, New Zealand, and is a lecturer in the games department at Media Design School. He teaches advanced computer graphics programming, PlayStation 4 native game development, and mentors final year production students.
Read more about Siddharth Shekar

Stephen Haney
Stephen Haney
author image
Stephen Haney

Stephen Haney has written two books on iOS game development. He began his programming journey at the age of 8 years on a dusty, ancient laptop using BASIC. He has been fascinated with building software and games ever since. Now well versed in multiple languages, he enjoys programming as a creative outlet the most. He believes that indie game development is an art forman amazing combination of visual, auditory, and psychological challengesrewarding to both the player and the creator. He enjoyed writing this book and sincerely hopes that it directly furthers your career or hobby.
Read more about Stephen Haney

View More author details
Right arrow

Chapter 9. Adding Menus and Sounds

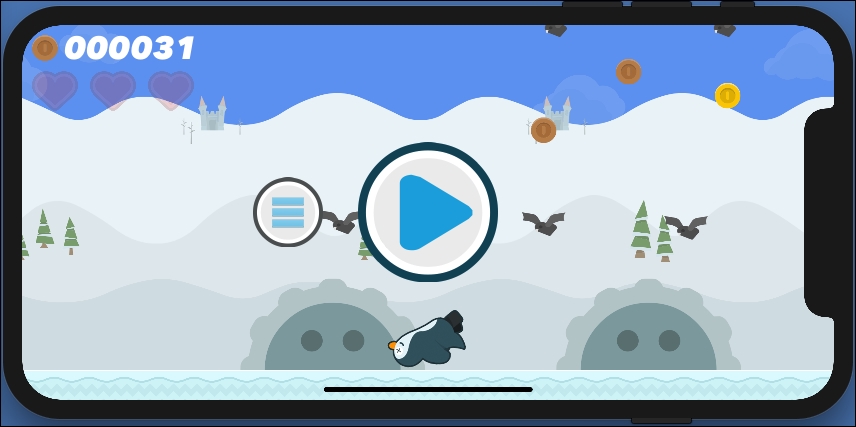
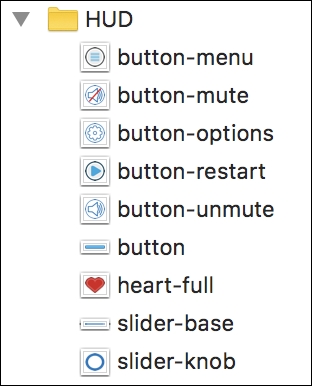
It is easy to overlook menu design, but the menu provides your game's first impression to the player. When used correctly, your menus reinforce the brand of your game and provide a pleasant break in the action that retains the player between gameplay tries. We will add two menus in this chapter: a main menu that shows when the game starts, and a retry menu that appears when the player loses a game.

Likewise, immersive sounds are vital to a great game. Sound is your opportunity to support the mood of the game world and emphasize key gameplay mechanics, such as coin collecting and taking damage. Additionally, every fun game deserves addictive background music! We will add background music and sound effects in this chapter to complete the mood of the game world.

The topics in this chapter include the following:

  • Building the main menu scene

  • Adding the restart game menu

  • Adding music with AVAudio

  • Playing sound effects with SKAction

Building the main menu


We can use SpriteKit components to build our main menu. We will create a new scene in a new file for our main menu, and then use code to place a background sprite node, a logo text node, and button sprite nodes. Let's start by adding the menu scene to the project and building out the nodes.

Creating the menu scene and menu nodes

To create the menu scene, follow these steps:

  1. You already added the background texture assets in Chapter 8, Polishing to a Shine—HUD, Parallax Backgrounds, Particles, and More. To double-check, open Assets.xcassets and locate the Backgrounds Sprite Atlas. You should have a sprite called background-menu with the background textures for the menu scene. If not, you can find these two textures in the Backgrounds folder of the asset bundle.

  2. Add a new Swift file to your project named MenuScene.swift.

  3. Add the following code to create the MenuScene scene class:

            import SpriteKit 
     
            class MenuScene: SKScene { 
                // Grab the HUD sprite...

Wiring up the START GAME button


Just like in GameScene, we will add a touchesBegan function to the MenuScene class to capture touches on the START GAME button. To implement touchesBegan, open MenuScene.swift and, at the bottom of the class, add a new function named touchesBegan, as shown here:

override func touchesBegan(_ touches: Set<UITouch>, with event: UIEvent?) { 
    for touch in (touches) { 
        // Find the location of the touch: 
        let location = touch.location(in: self) 
        // Locate the node at this location: 
        let nodeTouched = atPoint(location) 
        if nodeTouched.name == "StartBtn" { 
            // Player touched the start text or button node 
            // Switch to an instance of the GameScene: 
            self.view?.presentScene(GameScene(size: self.size)) 
        } 
    } 
} 

Run the project and tap the Start button. The game should switch to the GameScene class, and gameplay will begin. Congratulations, you have successfully implemented...

Wiring up GameScene for game over


We need to tell the HUD class to show the restart and main menu buttons once the player runs out of health. Open GameScene.swift and add a new function to the GameScene class named gameOver, as shown here:

func gameOver() { 
    // Show the restart and main menu buttons: 
    hud.showButtons() 
} 

That is all for now; we will add to the gameOver function in the next chapter, when we implement a high score system.

Informing the GameScene class when the player dies


So far, the GameScene class is oblivious to whether the player is alive or dead. We need to change that in order to use our new gameOver function. Open Player.swift, locate the die function, and add the following code at the bottom of the function:

// Alert the GameScene: 
if let gameScene = self.parent as? GameScene { 
    gameScene.gameOver() 
} 

We access GameScene by traveling up the node tree. The Player node's parent is the GameScene class.

Run the project and die. You should see the two new buttons appear after death, as shown here:

Good work. The buttons are displaying properly, but nothing happens yet when we tap on them. To complete our restart menu, we simply need to implement tap events for the two new buttons in the GameScene class's touchesBegan function.

Implementing touch events for the restart menu


Now that our buttons are displaying, we can add touch events in the GameScene class that are similar to the START GAME button in the MenuScene class.

To add the touch events, open GameScene.swift and locate the touchesBegan function. We will add the restart menu code at the bottom of the for loop. I am including the entire touchesBegan function in the following code, with new additions in bold:

override func touchesBegan(_ touches: Set<UITouch>, with event:  
    UIEvent?) { 
    for touch in (touches) { 
        // Find the location of the touch: 
        let location = touch.location(in: self) 
        // Locate the node at this location: 
        let nodeTouched = atPoint(location) 
        // Attempt to downcast the node to the GameSprite protocol 
        if let gameSprite = nodeTouched as? GameSprite { 
            // If this node adheres to GameSprite, call onTap: 
            gameSprite.onTap() 
        } 
         
        // Check...

Adding music with AVAudio


SpriteKit and Swift make it very easy to play sounds in our games. We can drag sound files into our project, just like image assets, and trigger playback with SKActionplaySoundFileNamed.

We can also use the AVAudio class from the AVFoundation framework for more precise audio control. We will use AVAudio to play our background music.

Adding sound assets to the game

Locate the Sound directory in the Assets folder and add it to your project by dragging and dropping it into the project navigator. Once you are done, you should see the Sound folder show up in your project, just like any other file.

Playing background music

First, we will add the background music. We want our music to play, regardless of which scene the player is currently looking at, so we will play the music from the view controller itself. To play the music, follow these steps:

  1. Open GameViewController.swift and add the following import statement at the very top, just below the existing import lines, to allow...

Playing sound effects


Playing simple sounds is even easier. We will use SKAction objects to play sounds on specific events, such as when picking up a coin or starting the game.

Adding the coin sound effect to the Coin class

First, we will add a happy sound each time the player collects a coin. To add the coin sound effect, follow these steps:

  1. Open Coin.swift and add a new property to the Coin class to cache a coin sound action:

            let coinSound =  
                SKAction.playSoundFileNamed("Sound/Coin.aif",  
                waitForCompletion: false) 
  2. Locate the collect function and add the following line at the bottom of the function to play the sound:

            // Play the coin sound: 
            self.run(coinSound) 

That is all you need to do to play the coin sound every time the player collects a coin. You can run the project now to test it out if you like.

To avoid memory-based crashes, it is important to cache each playSoundFileNamed action object and rerun the same object each time you want to...

Adding Options to the Menu Scene


Create a new file called OptionsScene.swift.

Next, add in the assets for the Options Scene menu button, mute, unmute, slider base, and slider knob assets from the chapter and add them into the Assets.xcassts file. Add them under the HUD folder as follows:

In the OptionsScene class, add the following properties for the texture atlas, mute button, slider base, slider knob, and menu button:

import SpriteKit

class OptionsScene: SKScene {
    
// Grab the HUD sprite atlas:
    let textureAtlas:SKTextureAtlas = SKTextureAtlas(named:"HUD")
    
    let muteButton = SKSpriteNode()
    let sliderBase = SKSpriteNode()
    let sliderKnob = SKSpriteNode()
    
    let menuButton = SKSpriteNode()
}// class end

Now, we will add the functions to the class. First, we will add the didMove function, which will get called as soon as the Scene is loaded:

    override func didMove(to view: SKView) {
        
        // Position nodes from the center of the scene:
        self.anchorPoint...

Summary


We have taken huge steps toward finishing the game in this chapter. We learned how to create menus in SpriteKit, added the main menu to the game, and gave the player a way to restart the game when they run out of health. Then, we enhanced the gameplay experience with catchy background music and timely sound effects. We also added a mute and volume slider for the background music.

Next, we will explore advanced techniques that you can use to make your games more fun for your players, in Chapter 10, Standing Out in the Crowd with Advanced Features.

lock icon
The rest of the chapter is locked
You have been reading a chapter from
Swift Game Development - Third Edition
Published in: Sep 2018Publisher: PacktISBN-13: 9781788471152
Register for a free Packt account to unlock a world of extra content!
A free Packt account unlocks extra newsletters, articles, discounted offers, and much more. Start advancing your knowledge today.
undefined
Unlock this book and the full library FREE for 7 days
Get unlimited access to 7000+ expert-authored eBooks and videos courses covering every tech area you can think of
Renews at $15.99/month. Cancel anytime

Authors (2)

author image
Siddharth Shekar

Siddharth Shekar is a game developer and teacher with over 6 years' industry experience and 12 years' experience in C++ and other programming languages. He is adept at graphics libraries such as OpenGL and Vulkan, and game engines such as Unity and Unreal. He has published games on the iOS and Android app stores. He has also authored books including Swift Game Development, Mastering Android Game Development with Unity, and Learning iOS 8 Game Development Using Swift, all published by Packt Publishing. He currently lives in Auckland, New Zealand, and is a lecturer in the games department at Media Design School. He teaches advanced computer graphics programming, PlayStation 4 native game development, and mentors final year production students.
Read more about Siddharth Shekar

author image
Stephen Haney

Stephen Haney has written two books on iOS game development. He began his programming journey at the age of 8 years on a dusty, ancient laptop using BASIC. He has been fascinated with building software and games ever since. Now well versed in multiple languages, he enjoys programming as a creative outlet the most. He believes that indie game development is an art forman amazing combination of visual, auditory, and psychological challengesrewarding to both the player and the creator. He enjoyed writing this book and sincerely hopes that it directly furthers your career or hobby.
Read more about Stephen Haney