Search icon
Arrow left icon
All Products
Best Sellers
New Releases
Books
Videos
Audiobooks
Learning Hub
Newsletters
Free Learning
Arrow right icon
Swift Game Development - Third Edition

You're reading from  Swift Game Development - Third Edition

Product type Book
Published in Sep 2018
Publisher Packt
ISBN-13 9781788471152
Pages 434 pages
Edition 3rd Edition
Languages
Authors (2):
Siddharth Shekar Siddharth Shekar
Profile icon Siddharth Shekar
Stephen Haney Stephen Haney
Profile icon Stephen Haney
View More author details

Table of Contents (22) Chapters

Swift Game Development Third Edition
Contributors
Preface
Other Books You May Enjoy
1. Designing Games with Swift 2. Sprites, Camera, Action! 3. Mix in the Physics 4. Adding Controls 5. Spawning Enemies, Coins, and Power-Ups 6. Generating a Never-Ending World 7. Implementing Collision Events 8. Polishing to a Shine – HUD, Parallax Backgrounds, Particles, and More 9. Adding Menus and Sounds 10. Standing out in the Crowd with Advanced Features 11. Introduction to SceneKit 12. Choosing a Monetization Strategy 13. Integrating with Game Center 14. Introduction to Spritekit with ARKit 15. Introduction to Scenekit with ARKit 16. Publishing the Game on the App Store 17. Multipeer Augmented Reality Index

Chapter 4. Adding Controls

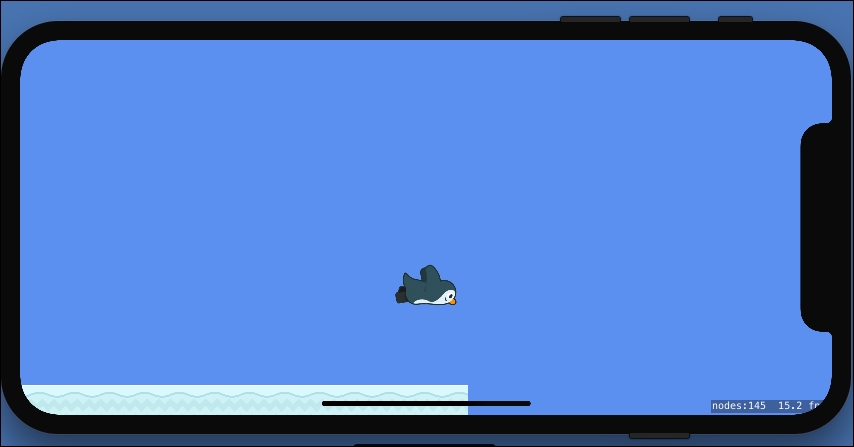
Players control mobile games through a very limited number of interactions. Often, games feature only a single mechanic: tap anywhere on the screen to jump or fly. Contrast that with a console controller with dozens of button combinations. With so few actions, keeping users engaged with polished, fun controls is vital to the success of your game.

In this chapter, you will learn how to implement several popular control schemes that have emerged from the App Store. First, we will experiment with tilt controls; the physical orientation of the device will determine where the player flies. Then, we will wire up the onTap events on our sprite nodes. Finally, we will implement and polish a simple control scheme for flying in our game: tap anywhere on the screen to fly higher. You can combine these techniques to create unique and enjoyable controls in your future games.

The topics in this chapter include the following:

  • Retrofitting the Player class for flight

  • Polling for device...

Retrofitting the Player class for flight


We need to perform a few quick setup tasks before we can react to player input. We will remove some of our older testing code and add a physics body to the Player class.

The Beekeeper

First, clean up the old bee physics tests from the last chapter. Open GameScene.swift, find didMove, and locate the bottom two lines; one sets a mass for bee2, and the other applies an impulse to bee2. Remove these two lines:

bee2.physicsBody?.mass = 0.2 
bee2.physicsBody?.applyImpulse(CGVector(dx: -25, dy: 0))

Updating the Player class

We need to give the Player class its own update function. We want to store player-related logic in Player and we need it to run before every frame:

  1. Open Player.swift and add the following function inside Player:

    func update() { } 
  2. In GameScene.swift, add this code at the bottom of the GameScene class:

    player.update() 
            }         override func update(_ currentTime: TimeInterval) { 
    
  3. Perfect. The GameScene class will call the Player class...

Assigning a physics body to the player


We will use physics forces to move our player around the screen. To apply these forces, we must first add a physics body to the player sprite.

Creating a physics body shape from a texture

When gameplay allows, you should use circles to define your physics bodies—circles are the most efficient shape for the physics simulation and result in the highest frame rate. However, the accuracy of Pierre's shape is very important to our gameplay, and a circle is not a great fit for his shape. Instead, we will assign a special type of physics body, based on his texture.

Apple introduced the ability to define the shape of a physics body with opaque texture pixels in Xcode 6. This is a convenient addition as it allows us to create extremely accurate shapes for our sprites. There is a performance penalty, however, it is computationally expensive to use these texture-driven physics bodies. You will want to use them sparingly, only on your most important sprites.

To create...

Polling for device movement with Core Motion


Apple provides the Core Motion framework to expose precise information on the iOS device's orientation in physical space. We can use this data to move our player on the screen when the user tilts their device in the direction they want to move. This unique style of input offers new gameplay mechanics in mobile games.

You will need a physical iOS device for this Core Motion section. The iOS simulator in Xcode does not simulate device movement. However, this section is only a learning exercise and is not required to finish the game we are building. Our final game will not use Core Motion. Feel free to skip the Core Motion section if you cannot test with a physical device.

Implementing the Core Motion code

It is very easy to poll for device orientation. We will check the device's position during every update and apply the appropriate force to our player. Follow these steps to implement the Core Motion controls:

  1. In GameScene.swift, near the very top,...

Wiring up the sprite onTap events


Your games will often require the ability to run code when the player taps a specific sprite. I like to implement a system that includes all the sprites in your game so that you can add tap events to each sprite without building any additional structure. We have already implemented onTap methods in all of our classes that adopt the GameSprite protocol; we still need to wire up the scene to call these methods when the player taps the sprites.

Note

Before we move on, we need to remove the Core Motion code, since we will not be using it in the finished game. Once you finish exploring the Core Motion example, please remove it from the game by following the previous section's bullet points in reverse.

Implementing touchesBegan in the GameScene

SpriteKit calls our scene's touchesBegan function every time the screen is touched. We will read the location of the touch and determine the sprite node in that position. We can check whether the touched node adopts our GameSprite...

Teaching our penguin to fly


Let's implement the control scheme for our penguin. The player can tap anywhere on the screen to make Pierre fly higher and release to let him fall. We are going to make quite a few changes--if you need help, refer to the checkpoint at the end of this chapter. Start by modifying the Player class; follow these steps to prepare our Player for flight:

  1. In Player.swift, add some new properties directly to the Player class:

            // Store whether we are flapping our wings or in free-fall: 
    var flapping = false 
            // Set a maximum upward force. 
            // 57,000 feels good to me, adjust to taste: 
            let maxFlappingForce: CGFloat = 57000 
            // Pierre should slow down when he flies too high: 
            let maxHeight: CGFloat = 1000 
  2. So far, Pierre has been flapping his wings by default. Instead, we want to display the soaring animation by default and only run the flap animation when the user presses the screen. In the init function, remove the line that...

Listening for touches in GameScene


The SKScene class (that GameScene inherits from) includes handy functions that we can use to monitor touch input. Follow these steps to wire up the GameScene class:

  1. In GameScene.swift, in the touchesBegan function, add this code at the very bottom to start the Player flapping when the user touches the screen:

    player.startFlapping() 
  2. After touchesBegan, create two new functions in the GameScene class. These functions stop the flapping when the user lifts his or her finger from the screen, or when an iOS notification interrupts the touch:

            override func touchesEnded(_ touches: Set<UITouch>, 
                with event: UIEvent?) { 
    player.stopFlapping() 
            } 
    
            override func touchesCancelled(_ touches: Set<UITouch>,  
                with event: UIEvent?) { 
    player.stopFlapping() 
            } 

Fine-tuning gravity


Before we test out our new flying code, we need to make one adjustment. The default gravity setting of 9.8 feels too real. Pierre lives in a cartoon world; real-world gravity is a bit of a drag. We can adjust gravity in the GameScene class; add this line at the bottom of the didMove function:

// Set gravity 
self.physicsWorld.gravity = CGVector(dx: 0, dy: -5) 

Spreading your wings


Run the project. Tap the screen to make Pierre fly higher; release to let him fall. Play with the action; Pierre rotates toward his vector and builds or loses momentum as you tap and release. Terrific! You have successfully implemented the core mechanic of our game. Take a minute to enjoy flying up and down, as in this screenshot:

Improving the camera


Our camera code works well; it follows the player wherever they fly. However, we can improve the camera to enhance the flying experience. In this section, we will add two new features:

  • Zoom the camera out as Pierre Penguin flies higher, reinforcing the feeling of increasing height.

  • Suspend vertical centering when the player drops below the halfway point of the screen. This means the ground never fills too much of the screen and adds the feeling of cutting upwards into the air when Pierre flies higher and the camera starts tracking him again.

Follow these steps to implement these two improvements:

  1. In GameScene.swift, create a new variable in the GameScene class to store the center point of the screen:

    	var screenCenterY:CGFloat = 0 
  2. In the didMove function, set this new variable with the calculated center of the screen's height:

            // Store the vertical center of the screen: 
    screenCenterY = self.size.height / 2 
  3. We need to rework the didSimulatePhysics function significantly...

Pushing Pierre forward


This style of game usually moves the world forward at a constant speed. Rather than applying force or impulse, we can manually set a constant velocity for Pierre during every update. Open the Player.swift file and add this code at the bottom of the update function:

// Set a constant velocity to the right: 
self.physicsBody?.velocity.dx = 200 

Run the project. Our protagonist penguin will move forward, past the swarm of bees and through the world. This works well, but you will quickly notice that the ground runs out as Pierre moves forward, as shown in this screenshot:

Recall that our ground is only as wide as the screen width multiplied by six. Rather than extending the ground further, we will move the ground's position at well-timed intervals. Since the ground is made up of repeating tiles, there are many opportunities to jump its position forward seamlessly. We simply need to figure out when the player has travelled the correct distance.

Tracking the player's progress


First, we need to keep track of how far the player has flown. We will use this later as well, for keeping track of a high score. This is easy to implement. Follow these steps to track how far the player has flown:

  1. In the GameScene.swift file, add two new properties to the GameScene class:

            let initialPlayerPosition = CGPoint(x: 150, y: 250) 
    var playerProgress = CGFloat() 
  2. In the didMove function, update the line that positions the player to use the new initialPlayerPosition constant instead of the old hardcoded value:

            // Add the player to the scene: 
    player.position = initialPlayerPosition
  3. In the didSimulatePhysics function, update the new playerProgress property with the player's new distance:

            // Keep track of how far the player has flown 
    playerProgress = player.position.x -
    initialPlayerPosition.x

Perfect! We now have access to the player's progress at all times in the GameScene class. We can use the distance traveled to reposition the ground...

Summary


In this chapter, we have transformed a tech demo into the beginnings of a real game. We have added a great deal of new code. You learned how to implement three distinct mobile game control methods: physical device motion, sprite tap events, and flying higher when the screen is touched. We polished the flying mechanic for maximum fun and sent Pierre flying forward through the world.

You also learned how to implement two common mobile game requirements: looping the ground and a smarter camera system. Both of these features make a big impact on our game.

Next, we will add more content to our level. Flying is already fun, but traveling past the first few bees feels a little lonely. We will give Pierre Penguin some company in Chapter 5, Spawning Enemies, Coins, and Power-ups.

lock icon The rest of the chapter is locked
You have been reading a chapter from
Swift Game Development - Third Edition
Published in: Sep 2018 Publisher: Packt ISBN-13: 9781788471152
Register for a free Packt account to unlock a world of extra content!
A free Packt account unlocks extra newsletters, articles, discounted offers, and much more. Start advancing your knowledge today.
Unlock this book and the full library FREE for 7 days
Get unlimited access to 7000+ expert-authored eBooks and videos courses covering every tech area you can think of
Renews at $15.99/month. Cancel anytime}