Reader small image

You're reading from  Swift Game Development - Third Edition

Product typeBook
Published inSep 2018
Reading LevelIntermediate
PublisherPackt
ISBN-139781788471152
Edition3rd Edition
Languages
Right arrow
Authors (2):
Siddharth Shekar
Siddharth Shekar
author image
Siddharth Shekar

Siddharth Shekar is a game developer and teacher with over 6 years' industry experience and 12 years' experience in C++ and other programming languages. He is adept at graphics libraries such as OpenGL and Vulkan, and game engines such as Unity and Unreal. He has published games on the iOS and Android app stores. He has also authored books including Swift Game Development, Mastering Android Game Development with Unity, and Learning iOS 8 Game Development Using Swift, all published by Packt Publishing. He currently lives in Auckland, New Zealand, and is a lecturer in the games department at Media Design School. He teaches advanced computer graphics programming, PlayStation 4 native game development, and mentors final year production students.
Read more about Siddharth Shekar

Stephen Haney
Stephen Haney
author image
Stephen Haney

Stephen Haney has written two books on iOS game development. He began his programming journey at the age of 8 years on a dusty, ancient laptop using BASIC. He has been fascinated with building software and games ever since. Now well versed in multiple languages, he enjoys programming as a creative outlet the most. He believes that indie game development is an art forman amazing combination of visual, auditory, and psychological challengesrewarding to both the player and the creator. He enjoyed writing this book and sincerely hopes that it directly furthers your career or hobby.
Read more about Stephen Haney

View More author details
Right arrow

Chapter 11. Introduction to SceneKit

We will now move from the 2D world to 3D. With SceneKit, we can make 3D games quite easily, especially since the syntax for SceneKit is quite similar to SpriteKit. When we talk about 3D games, it doesn't mean that you get to put on your 3D glasses to make the game. In 2D games, we mostly work with the x and y coordinates. In 3D games, we deal with all three axes: x, y, and z.

Additionally, in 3D games, we have different types of lights that we can use. Also, SceneKit has an inbuilt physics engine that takes care of forces such as gravity and also aids collision detection.

We can also use SpriteKit in SceneKit for GUI and buttons, so that we can add scores and interactivity to the game. There is a lot to cover in this chapter, so let's get started.

The topics covered in this chapter are:

  • Creating a Scene with SCNScene

  • Adding objects to the scene

  • Importing scenes from an external 3D application

  • Creating the Hero Class and physics

  • Adding an enemy and collision detection...

Creating a Scene with SCNScene


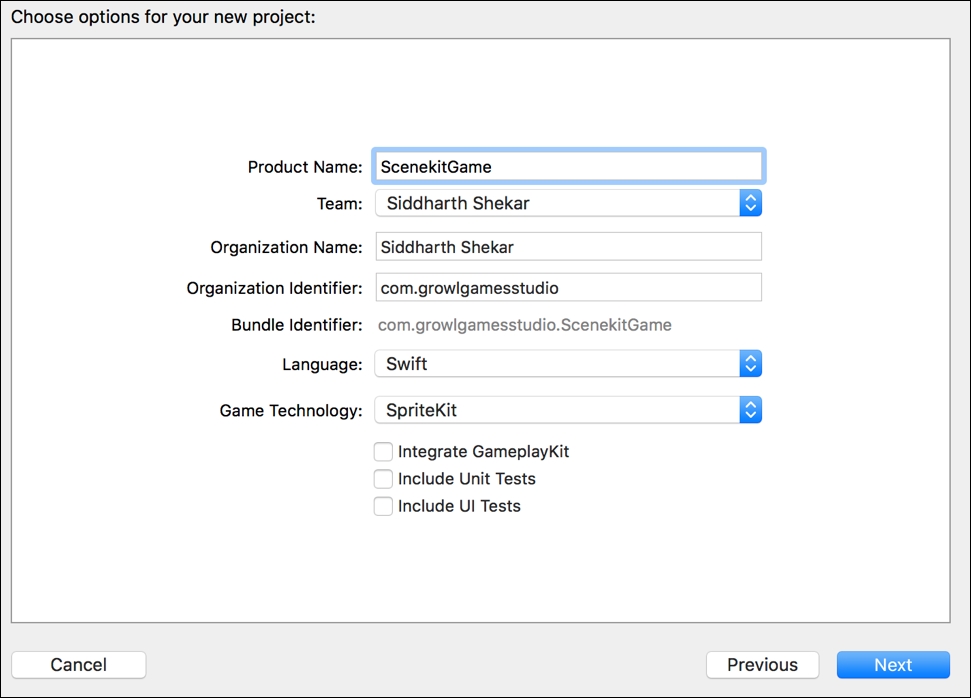
We first create a new SceneKit project. It is very similar to creating other projects, only, this time, make sure you select SceneKit from the dropdown. Don't forget to select Swift when selecting the language. Uncheck the checkboxes as in the following screenshot:

Once the project is created, open it. Click on the GameViewController class and delete all the contents in the viewDidLoad and handleTap functions, as we will be creating a separate class and will add touch behavior to it.

Create a new class called GameSCNScene and import the following headers. Inherit from the SCNScene class and add an init function that takes in a parameter called view of type SCNView:

import SceneKit

class GameSCNScene: SCNScene{

    var scnView: SCNView!
    var _size: CGSize!

        required init(coder aDecoder: NSCoder) {
        fatalError("init(coder:) has not been implemented")
    }
    
    init(currentview view: SCNView) {
        
      	super.init()
    }
}

Also create...

Adding objects to the scene


Let's next add geometry to the scene. We can create basic geometry such as spheres, boxes, cones, tori, and so on in SceneKit with a lot of ease. Let's create a sphere first and add it to the scene.

Adding a sphere

Create a new function called addGeometryNodes in the GameViewController class, as follows:

func addGeometryNode() {

   let sphereGeometry = SCNSphere(radius: 1.0)
   sphereGeometry.firstMaterial?.diffuse.contents = UIColor.orange
        
   let sphereNode = SCNNode(geometry: sphereGeometry)
   sphereNode.position = SCNVector3Make(0.0, 0.0, 0.0)
   self.rootNode.addChildNode(sphereNode)        
}

We will use the SCNSphere class to create a sphere. We can also call SCNBox, SCNCone, SCNTorus, and so on to create a box, a cone, or a torus.

When creating a sphere, we have to provide the radius as a parameter, which will determine the size of the sphere. Although, to place the shape we have to attach it to a node so that we can add it to the scene.

Create...

Importing scenes from an external 3D application


Although we can add objects, cameras, and light through code, it will become very tedious and confusing when we have a lot of objects to add to the scene. In SceneKit, this problem can be easily overcome by importing scenes prebuilt in other 3D applications.

All 3D applications, such as 3D StudioMax, Maya, Cheetah 3D, Blender, and so on, have the ability to export scenes in Collada(.dae) and Alembic(.abc) format. We can import this scene with lighting, camera, and textured objects in SceneKit directly, without the need for setting up the scene.

In this section, we will import a Collada file into the scene. In the resources folder for this chapter, you will find the theDude.DAE file and theDude.png file. Drag the files into the current project under the art.scnassets:

If the model is not showing up in the scene, then you might have to drag and drop the .png onto the model in the view.

Next, in the GameSCNScene, add the following code after the...

Creating the hero class and physics


Create a new class, called Hero, and add the following code to it:

import SceneKit
class Hero: SCNNode {
    
    var isGrounded = false
    
    var monsterNode = SCNNode()
    var jumpPlayer = SCNAnimationPlayer()
    var runPlayer = SCNAnimationPlayer()
    
    init(currentScene: GameSCNScene){
        super.init()
        self.create(currentScene: currentScene)
    }
    required init?(coder aDecoder: NSCoder) {
        fatalError("init(coder:) has not been implemented")
    }
    func create(currentScene: GameSCNScene){
    
    }
} 

At the top of the create variables, which we will be needing later, we create a bool to check whether the character is grounded or not. Create a SCNNode to access the character node and create two SCNAnimationPlayer variables to access the player animations.

We create a custom init function, which takes in GameSCNScene, so that we can add the current scene to the parent scene. We call the super.init function in the custom...

Adding an enemy and collision detection


Create a new file called Enemy and, similar to how we created the Hero class, we will pass the GameSCNScene in it:

import SceneKit

class Enemy: SCNNode{
    
    var _currentScene: GameSCNScene!
    
    init(currentScene: GameSCNScene) {
        
        super.init()
        self.create(currentScene: currentScene)
        
    }
    
    required init?(coder aDecoder: NSCoder) {
        fatalError("init(coder:) has not been implemented")
    }
    
    
    func create(currentScene: GameSCNScene){
        
        print("spawn enemy")
        
        self._currentScene = currentScene
        
        let geo = SCNBox(width: 4.0, height: 4.0, length: 4.0, chamferRadius: 0.0)
        geo.firstMaterial?.diffuse.contents = UIColor.yellow
        
        self.geometry = geo
       
        self.position = SCNVector3Make(0, 20.0 , 60.0)
        self.physicsBody = SCNPhysicsBody.kinematic()
        self.name = "enemy"
        
        self.physicsBody...

Adding a SpriteKit overlay


To show the score and a button, we will add it to the 2D SpriteKit layer. To add the overlay, create a class called OverlaySKscene. In the class, add the following:

import SpriteKit

class OverlaySKScene: SKScene {
    
    let _gameScene: GameSCNScene!
    let myLabel: SKLabelNode!
    var gameOverLabel: SKLabelNode!
    var jumpBtn: SKSpriteNode!
    var playBtn: SKSpriteNode!
    
    required init?(coder aDecoder: NSCoder) {
        fatalError("init(coder:) has not been implemented")
    }
    
    init(size: CGSize, gameScene: GameSCNScene){

super.init(size: size)
    
    }
}

We import SpriteKit as we will have to create a SubClass of SpriteKit. Create global variables of type GameSCNScene, SKLabelNodes, and SpriteNodes. Here, we create two LabelNodes: one for displaying the score and the other to show the gameover text. We also create two SpriteNodes: one for the play button and the other for the jump button.

We add the required init function and the default...

Adding labels and buttons


Next, in the init function, add the following code:

        _gameScene = gameScene
        
        myLabel = SKLabelNode(fontNamed:"Chalkduster")
        myLabel.text = "Score: 0";
        myLabel.fontColor = UIColor.whiteColor()
        myLabel.fontSize = 65;
        myLabel.setScale(1.0)
        myLabel.position = CGPointMake(size.width * 0.5, size.height * 0.9)
        self.addChild(myLabel)

  gameOverLabel = SKLabelNode(fontNamed:"Chalkduster")
        gameOverLabel.text = "GAMEOVER";
        gameOverLabel.fontSize = 100;
        gameOverLabel.setScale(1.0)
        gameOverLabel.position = CGPointMake(size.width * 0.5, size.height * 0.5)
        gameOverLabel.fontColor = UIColor.whiteColor()
        self.addChild(gameOverLabel)
        gameOverLabel.hidden = true

        
        playBtn = SKSpriteNode(imageNamed: "playBtn")
        playBtn.position = CGPoint(x: size.width * 0.15, y: size.height * 0.2)
        self.addChild(playBtn)
        playBtn.name ...

Adding touch interactivity


To add touch interactivity, we will use the touchesBegan function, similar to how we have always used it in SpriteKit. Here, we get the location of the touch and the name of the sprite under the touch location. If the sprite name is jumpBtn and the gameOver Boolean is false, then we call the heroJump function in the gameScene class. If gameOver is true and the play button is clicked, then we call the startGame function in the SceneKit class.

Add the function as follows to detect touches:

    override func touchesBegan(touches: NSSet, withEvent event: UIEvent) {
        /* Called when a touch begins */
        
        for touch: AnyObject in touches {
            let location = touch.locationInNode(self)
            
            let _node:SKNode = self.nodeAtPoint(location);
            
            if(_gameScene.gameOver == false){
            
                if(_node.name == "jumpBtn"){
                
                    _gameScene.heroJump()
             ...

Adding the Gameloop


In the GameSCNScene class, import SpriteKit at the top:

import UIKit
import SceneKit
import SpriteKit

Also create a global variable called skScene of type OverlaySKScene. Add the following code in the GameSCNScene at the end of the init function:

skScene = OverlaySKScene(size: _size, gameScene: self)
scnView.overlaySKScene = skScene
skScene.scaleMode = SKSceneScaleMode.Fill        

Here, we initialize the skScene global variable we created earlier and pass in the size of the current scene and the current SceneKit class. Next, we assign the skScene class to the overlaySKScene property of scnView. Finally, we set the scaleMode of the skScene variable to type SKSceneScaleMode.Fill.

Next, create a new function called heroJump as follows:

func heroJump(){
        
hero.jump() 
          
}

We call the jump function of the hero class here, which will get called whenever we press the jump button.

Next, we will still need to add the Boolean and functions to the class to make our game...

Adding wall and floor parallax


What is a game without a parallax effect? In SpriteKit, we added parallax using sprites. In SceneKit, we will use planes to add it to the scene. Apart from adding parallax, we will also see how to add diffuse, normal, and specular maps to the plane. Also, we will learn what those terms mean.

Create a new file called ScrollingBackground.swift.

Add four global SCNNodes:

import SceneKit

class ScrollingBackground{ 
    
    var parallaxWallNode1: SCNNode!
    var parallaxWallNode2: SCNNode!
    var parallaxFloorNode1: SCNNode!
    var parallaxFloorNode2: SCNNode!

Add a new function, called create, and pass in a variable called currentScene as GameSCNScene. Add the following code to the create function:

    func create(currentScene: GameSCNScene){
        
        //Preparing Wall geometry
        let wallGeometry = SCNPlane(width: 250, height: 120)
        wallGeometry.firstMaterial?.diffuse.contents = "monster.scnassets/wall.png"
        wallGeometry.firstMaterial...

Adding particles


As the icing on the cake, we will include a rain particle effect. To create a particle effect in SceneKit, go to File | New and, under Resource, select SceneKit Particle system. Click Next and, on the next screen, select Rain from the Particle System Template dropdown. Click Next and give the file a name. I called it rain. Now you will have a rain.scnp and spark.png file in the project.

Add the following code at the end of the init function of the GameSCNScene class:

        // add particle system
        let rain = SCNParticleSystem(named: "rain", inDirectory: 
                                                            nil)
        rain!.warmupDuration = 10
        
        let particleEmitterNode = SCNNode()
        particleEmitterNode.position = SCNVector3(0, 100, 0)

        particleEmitterNode.addParticleSystem(rain!)
        self.rootNode.addChildNode(particleEmitterNode)

We create a new constant called rain, assign SCNParticleSystem to it, and provide the rain particle...

Adding character animation


To make sure that the correct animation gets played when the player runs and jumps, we have to extract the run and jump animations from the collada file.

In the Hero class's create function, after updating the anchor point, add the following code to get the run and jump animations:

        // get the animation keys and store it in the anims
        let animKeys = monsterNode.animationKeys.first
        let animPlayer = monsterNode.animationPlayer(forKey: animKeys!)
        let anims = CAAnimation(scnAnimation: (animPlayer?.animation)!)
        // get the run animation from the animations
        let runAnimation = Hero.animation(from: anims, startingAtFrame: 31, endingAtFrame: 50)
        runAnimation.repeatCount = .greatestFiniteMagnitude
        runAnimation.fadeInDuration = 0.3
        runAnimation.fadeOutDuration = 0.3
        
        //set the run animation to the player
        runPlayer = SCNAnimationPlayer(animation: SCNAnimation(caAnimation: runAnimation...

Summary


In this chapter, we saw how to make a 3D game in SceneKit. From making simple geometries to making floors, we created a fully-fledged game with a complete game loop. We added a scene already created in a 3D software package with animation and imported it into SceneKit.

We imported the COLLADA objects into the scene and saw how to access the objects through code. We added an enemy and physics to the scene. We used SceneKit's physics engine to calculate collision and also applied force to hero objects.

Additionally, we also saw how to integrate SpriteKit into SceneKit to display the score and buttons on the scene. We also used SpriteKit's touchBegan function to detect touches on the screen and created the play and jump buttons.

Parallax scrolling was also added to the scene using planes. Also, we looked at different types of maps, such as diffuse, normal, and specular maps, and the functionality of each. Finally, we added a rain particle system and character animation to the scene.

lock icon
The rest of the chapter is locked
You have been reading a chapter from
Swift Game Development - Third Edition
Published in: Sep 2018Publisher: PacktISBN-13: 9781788471152
Register for a free Packt account to unlock a world of extra content!
A free Packt account unlocks extra newsletters, articles, discounted offers, and much more. Start advancing your knowledge today.
undefined
Unlock this book and the full library FREE for 7 days
Get unlimited access to 7000+ expert-authored eBooks and videos courses covering every tech area you can think of
Renews at $15.99/month. Cancel anytime

Authors (2)

author image
Siddharth Shekar

Siddharth Shekar is a game developer and teacher with over 6 years' industry experience and 12 years' experience in C++ and other programming languages. He is adept at graphics libraries such as OpenGL and Vulkan, and game engines such as Unity and Unreal. He has published games on the iOS and Android app stores. He has also authored books including Swift Game Development, Mastering Android Game Development with Unity, and Learning iOS 8 Game Development Using Swift, all published by Packt Publishing. He currently lives in Auckland, New Zealand, and is a lecturer in the games department at Media Design School. He teaches advanced computer graphics programming, PlayStation 4 native game development, and mentors final year production students.
Read more about Siddharth Shekar

author image
Stephen Haney

Stephen Haney has written two books on iOS game development. He began his programming journey at the age of 8 years on a dusty, ancient laptop using BASIC. He has been fascinated with building software and games ever since. Now well versed in multiple languages, he enjoys programming as a creative outlet the most. He believes that indie game development is an art forman amazing combination of visual, auditory, and psychological challengesrewarding to both the player and the creator. He enjoyed writing this book and sincerely hopes that it directly furthers your career or hobby.
Read more about Stephen Haney