Reader small image

You're reading from  Microsoft PowerPoint Best Practices, Tips, and Techniques

Product typeBook
Published inFeb 2023
Reading LevelN/a
PublisherPackt
ISBN-139781839215339
Edition1st Edition
Languages
Right arrow
Author (1)
Chantal Bossé
Chantal Bossé
author image
Chantal Bossé

Chantal Bossé has worked in instructional design and training for over 25 years and is the founder of CHABOS Inc., specializing in M365 training and high-stakes presentation design and coaching. She has been a Microsoft PowerPoint, M365 Apps & Services Most Valued Professional (MVP) since 2013 and has helped over 250,000 international French-speaking learners on LinkedIn Learning with her courses on PowerPoint, Teams, and communication. She thrives on helping people understand and leverage technology to help them work efficiently and deliver engaging and impactful presentations.
Read more about Chantal Bossé

Right arrow

Adding and Modifying Visual Elements

Even if we discussed how AI can help us improve our presentations with more visual content, we need to constantly think about how we can make our content more visual. And PowerPoint has many features that can help you create more engaging presentations right from its interface.

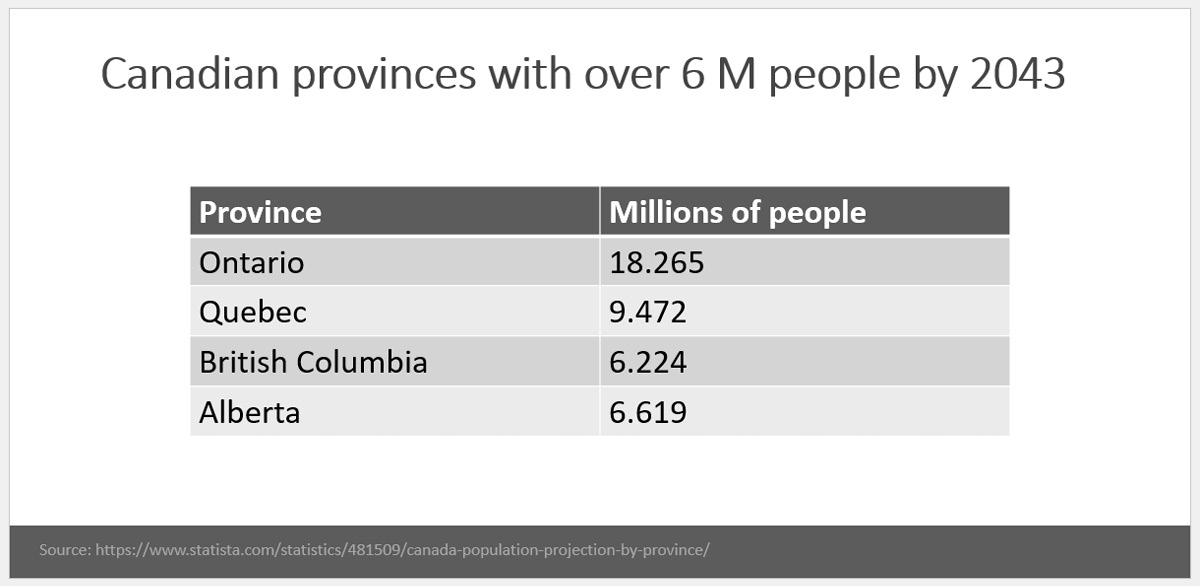
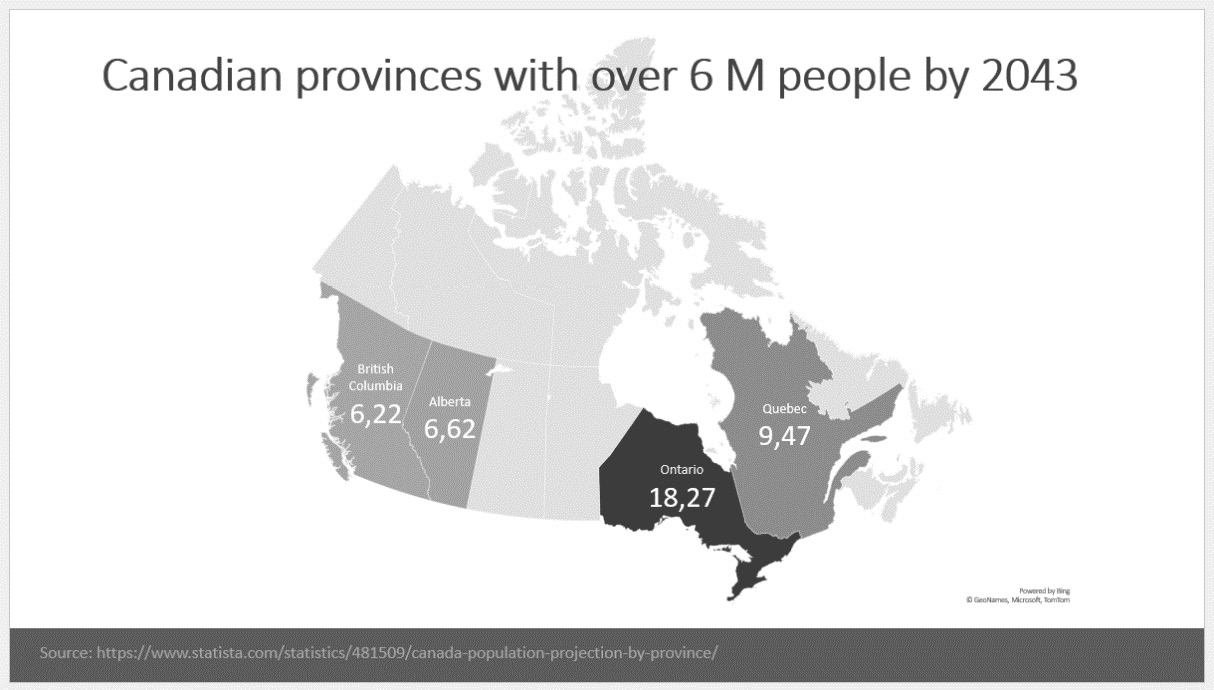
If you have read through Chapter 1, Analyzing Your Audience and Presentation Delivery Needs, you probably remember I mentioned how important it was to start thinking about images or visuals that came to mind while planning content for your slides. Now is the time to start using some PowerPoint features to transform sentences and bullet points into relevant visuals that will grab people’s attention and be remembered by your audience.

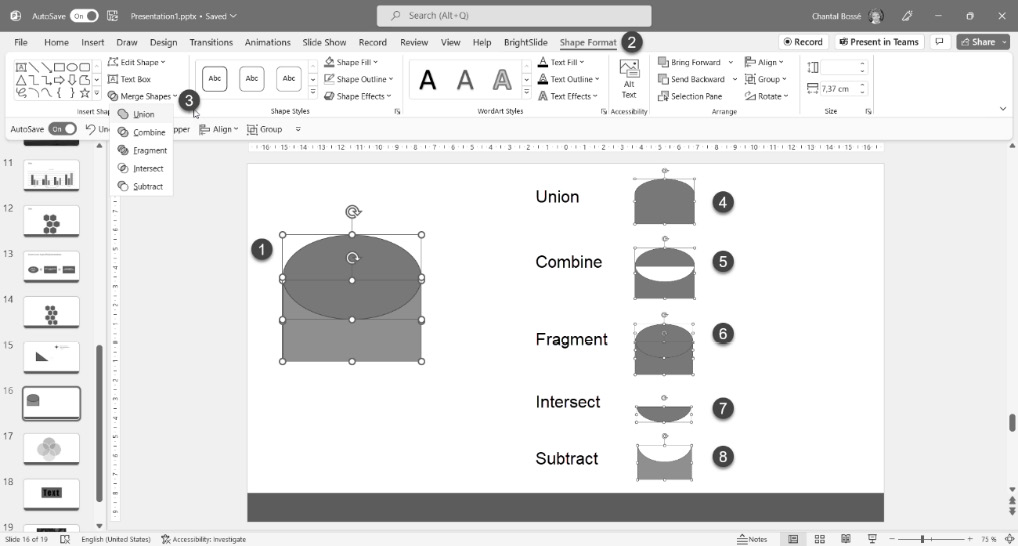
My goal is to help you discover some lesser-known tools, so I will not focus on adding simple shapes or inserting stock images without customizing them. In this chapter, we will discuss the following topics:

  • Inserting and...

Technical requirements

Most topics discussed in this chapter don’t require having a Microsoft 365 (M365) subscription, the tools and features having been introduced in previous versions of PowerPoint. I will identify when a feature is in M365 only. Also, be aware that since the subscription version of PowerPoint is being updated on an ongoing basis, it is possible that some features will not look exactly the same in your version of the application.

Inserting and modifying a map

When I say you need to start thinking visually when creating presentations, it means to stop being on autopilot when creating your content. Any content you need to deliver needs to be examined to seek visual ways to create it. Let’s look at an example of content that can be greatly improved with one of PowerPoint’s features (Office 365 (O365) only): inserting a map. For the slide example in Figure 6.1, I created a table with data showing four Canadian provinces that should have more than 6 million people by 2043:

Figure 6.1 – Table listing four Canadian provinces with their population by 2043

Figure 6.1 – Table listing four Canadian provinces with their population by 2043

It is not a bad slide per se, but it does lack visual appeal. Instead, we can leverage PowerPoint’s map feature so that we can make each province visible within Canada, as in Figure 6.2:

Figure 6.2 – Population information shown in a map of Canada

Figure 6.2 – Population information shown in a map of Canada

As you can see, it adds...

Converting bullet points into SmartArt

I am among the users that feel that the SmartArt feature would benefit from an upgrade. After all, it was introduced when Microsoft replaced the menus with the Ribbon in Office 2007 and has not been worked on much since then. But I also feel anyone creating presentations should not have to work hard to produce their content, which is why using SmartArt can be a good starting point to reduce the number of bullet points you use.

Of course, if you are using the subscription model of PowerPoint with M365, you can leverage the Designer feature, as discussed in Chapter 5, Using Artificial Intelligence to Improve Your Visuals. But even so, there are times when design ideas might not fit with what you have in mind for your visuals. That is when using the Convert to SmartArt Graphic function might be helpful:

  • When you are on a slide with bullet points, first select the content placeholder. Then, in the Home tab, in the Paragraph group, look...

Creating new shapes with Edit Points

There are many default shapes available in PowerPoint, but it does not mean they will always fit your needs. This is when the Edit Points tool can come to your rescue! Even though it has been available for over 20 years, many users are still unaware it exists. There are two ways of accessing Edit Points:

  • The first way to access Edit Points is to select a shape (1), click on the Shape Format tab, and go to Edit Shape | Edit Points (Figure 6.18):
Figure 6.18 – Accessing Edit Points through the Shape Format tab

Figure 6.18 – Accessing Edit Points through the Shape Format tab

  • The second way is by right-clicking on a shape and clicking on Edit Points (Figure 6.19):
Figure 6.19 – Accessing Edit Points with a right-click on the shape

Figure 6.19 – Accessing Edit Points with a right-click on the shape

Whichever method you choose, your shape will now show black dots where two line segments meet or where a curve ends, depending on the shape you have on your slide. Those dots are called vertexes...

Creating new shapes with the merging tools

If you have read through the book chronologically, you might now be at a point where you have many creative ideas to make your presentations more visually appealing. At the same time, you might also be feeling stuck with the same old standard shapes list within PowerPoint, thinking you will have to reach out to a graphic designer to create what you have in mind.

Wait until you have read this section before reaching out for help! The Merge Shapes tool might be just what you need. I will show you how to use the tool with three specific examples that might be helpful for any business presentation.

But first, let’s explore where you will find the Merge Shapes tool and which options are available to create new shapes. As the name implies, you need to select at least two shapes on your slide to activate the tool (Figure 6.22):

Figure 6.22 – Activating and finding the Merge Shapes tool

Figure 6.22 – Activating and finding the Merge Shapes tool

Select the...

Using and customizing stock images and other graphics

If you have been using PowerPoint for a long time, you might remember the Clipart gallery, a collection of graphic elements supplied by Microsoft in the Office suite for many years. It became out of date and most of the time was not considered professional in a business setting as design expectations evolved.

With the introduction of the M365 subscription model, Microsoft has brought back a whole new set of stock images, and I must say they look very good. They also add new elements to it on a regular basis. If you have an Office 2021 version, you will have access to stock images although you will not get the full selection, as this license does not get feature updates. And if you are a user of PowerPoint for the web, which connects to the site with a Microsoft account, but no M365 license, you will get a subset of stock images that do not include elements considered Premium content.

You might be wondering how you are allowed...

Summary

In this chapter, we discussed how to create more visually appealing elements on your slides by adding maps and using and customizing SmartArt. We also learned how to create our own shapes with Edit Points and Merge Shapes, and customize the creative content supplied by Microsoft in the Stock Images library.

You now have enough knowledge about the tools and features to start creating your own visual content or adapting any default elements supplied in PowerPoint. Yes—there will be times when you will feel overwhelmed by the possibilities. After all, our brains don’t have a creative switch that we can flip on or off!

Just give yourself time to get more comfortable with the tools, and don’t feel as though you need to change all your visuals at once. Here is a challenge for your next presentation: plan more design time before your event and set the goal of using one technique you learned in this chapter. As you get more familiar with the tools and features...

lock icon
The rest of the chapter is locked
You have been reading a chapter from
Microsoft PowerPoint Best Practices, Tips, and Techniques
Published in: Feb 2023Publisher: PacktISBN-13: 9781839215339
Register for a free Packt account to unlock a world of extra content!
A free Packt account unlocks extra newsletters, articles, discounted offers, and much more. Start advancing your knowledge today.
undefined
Unlock this book and the full library FREE for 7 days
Get unlimited access to 7000+ expert-authored eBooks and videos courses covering every tech area you can think of
Renews at $15.99/month. Cancel anytime

Author (1)

author image
Chantal Bossé

Chantal Bossé has worked in instructional design and training for over 25 years and is the founder of CHABOS Inc., specializing in M365 training and high-stakes presentation design and coaching. She has been a Microsoft PowerPoint, M365 Apps & Services Most Valued Professional (MVP) since 2013 and has helped over 250,000 international French-speaking learners on LinkedIn Learning with her courses on PowerPoint, Teams, and communication. She thrives on helping people understand and leverage technology to help them work efficiently and deliver engaging and impactful presentations.
Read more about Chantal Bossé