Reader small image

You're reading from  Practical Arduino Robotics

Product typeBook
Published inMar 2023
PublisherPackt
ISBN-139781804613177
Edition1st Edition
Tools
Concepts
Right arrow
Author (1)
Lukas Kaul
Lukas Kaul
author image
Lukas Kaul

Lukas Kaul is a robotics Research Scientist, currently working at the Toyota Research Institute in Silicon Valley, where he develops mobile manipulation technologies to support people in their homes and in their workplace. Throughout his career he has worked on projects as diverse as humanoid robots, aerial robots and mobile manipulation systems. A maker at heart, Lukas has been using Arduino technology extensively for more than a decade in countless side-projects, ranging from mapping systems to self-balancing robots. Lukas is passionate about teaching robotics with Arduino to inspire and empower anyone who wants to enter the exciting field of robotics. He holds a PhD degree from the Karlsruhe Institute of Technology, Germany.
Read more about Lukas Kaul

Right arrow

Building an Advanced Line-Following Robot Using a Camera

This chapter highlights best practices for building a basic mobile robot base with an Arduino Mega board and geared DC motors. It exemplifies real-time feedback control for autonomous line following with an advanced camera sensor. Building on what we learned in the previous chapters, we will walk step by step through the building and programming process.

This chapter combines a lot of what was covered in the previous chapters and is structured as follows:

  • Building a reliable mobile base for this and many other robotics projects
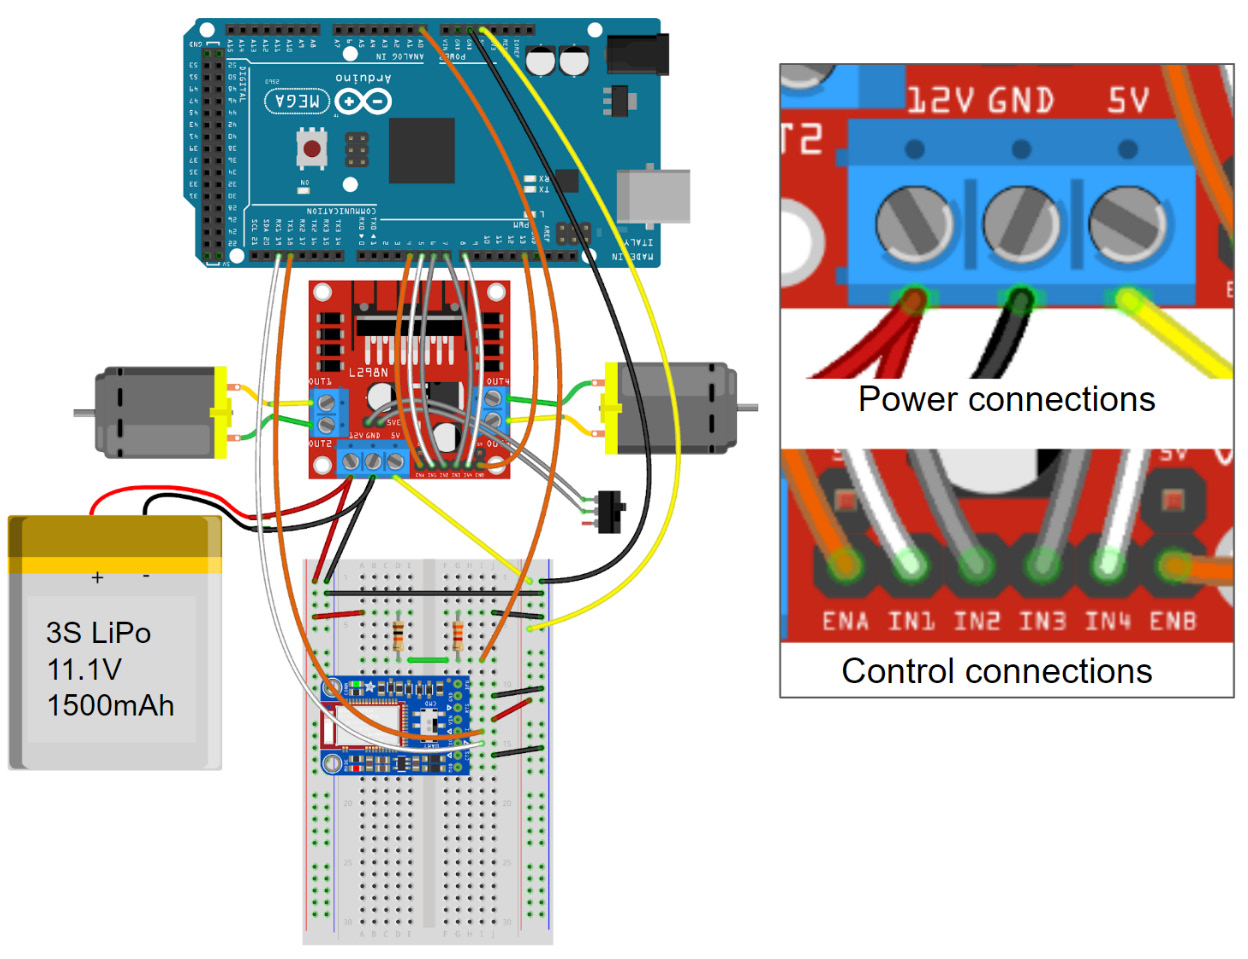
  • Wiring and integration of electronic components
  • Integrating the Arduino, batteries, and motor drivers
  • Writing the code for the line-following application
  • Testing and tuning

Technical requirements

This chapter is a speed walk through the entire process of building a small mobile robot from scratch. You can build your own robot differently with parts you might already have available, but if you want to replicate the exact design, you will need the following components and parts.

Important note

If you are planning to also build the next chapter...

Line following – the “Hello, World!” of robotics

Building a mobile robot that can follow a dark line on a bright background is a great project to put much of our learning to use, without being overly complicated. By the end of this chapter, you will have a robot that can autonomously follow a line, completely on its own. You will see feedback control, DC motor control, and Bluetooth communication in action, all in one project. Even though this robot is not complicated, and we will only demonstrate a very basic line-following algorithm, it gives you a great platform to experiment with many more ideas. You can improve the line-following algorithm to make it go as fast as possible or you can add additional sensors to give your robot more capabilities. You can add a camera gimbal so that your robot can use the camera for more than just line following. You can develop a ground station to view live telemetry from your robot, or you can add an RC receiver and add an RC...

Building a reliable mobile base

A simple and reliable mobile base for a robot is an incredibly useful thing to have as you start building your own, increasingly complex robots. There are many good designs and starter kits available for this purpose, but to solidify what we have learned about building robots, we will build ours from scratch. The design is focused on simplicity, low cost, and flexibility. It has two driven wheels and a passive caster, and it will serve you well as a base for many further experiments and robot designs.

Building the frame

The T-shaped frame is made of nothing but two pieces of construction-grade wood, cut to length. We will refer to the part that forms the top of the T as the front, but for other applications, that might just as well be the back. Construction-grade wood is cheap and sturdy, as well as easy to source. It is also easy to work with using common tools, and it makes it easy to attach boards, batteries, sensors, and other additions with...

Wiring up the robot

With the robot built and the electronic components attached, it is time to wire it up! The importance of good wiring of a robot is an often-overlooked part of a robot build, but it is critical to your robot’s reliability. Figure 12.6 gives you an overview of the complete wiring that we will discuss in detail in the following paragraphs:

Figure 12.6 – Symbolic wiring diagram of the line-following robot with close-ups of the motor driver connections

Figure 12.6 – Symbolic wiring diagram of the line-following robot with close-ups of the motor driver connections

Let us split the aspects of wiring into three categories (battery and motor, connections on the breadboard, and connections between boards) and go over these three categories one by one.

Battery and motor connections

Most hobby lithium batteries come with high-current connectors, such as the red Deans connectors (also called T-connectors), or the yellow XT60 connectors. These connectors are designed to carry high currents and ensure correct polarity when you mate them....

Integrating the camera

Now, let us turn your mobile base into a robot with a camera that can follow a line. To that end, we need to integrate one more component – the camera. Cameras are not a very common sensor for DIY Arduino robots since they produce a lot of data that is difficult to process on a small microcontroller. To circumvent this problem, the PixyCam modules (https://pixycam.com/) do all the image processing on board and let the Arduino access very high-level information, such as the location of color patches or the beginning and end of a line in an image. A PixyCam makes for a very powerful line sensor, and you can use it in many other interesting projects, such as sorting machines, object trackers, or even an automatic Rubik’s Cube solver. We will be using Pixy2.1, but other versions will work just as well.

Electrical integration

The Pixy camera runs off 5V and can communicate with the Arduino board over SPI, which makes the electrical integration...

Software

Now that our robot is built and ready for action, it is time to write the Arduino program to bring it to life. With everything that we have covered in the past chapters under our belt, this will be the easy part.

Overview

Before we dive into writing the code, let us define the desired behavior of our robot and how we would like to control it. When the robot is powered on, it is in Manual control mode and you can drive it around via Bluetooth with an emulated control pad on your smartphone. We will use the Adafruit Bluefruit Connect app for this purpose, which we already got to know in the previous chapter. If we tap the 2 button, the robot switches to Line following mode and autonomously follows a black line on the ground (if there is one). If it loses the line, it should stop. By tapping the 1 button, we can bring the robot back under manual control.

Motor control

Since we have two motors and certainly do not want to write the same motor control code twice, we...

Tuning and testing

There are a few parameters that we need to tune in order for the robot to function as expected. We can start with the directions in which the wheels turn. Our code assumes that if we pass a positive value to a motor’s SetPwm() function, the associated wheel spins forward. You can test this out by pressing the up arrow in the control pad on your phone and checking whether the wheels turn forward. If they spin the wrong way, you can either swap the order of the way the motor cables are plugged into the motor controller, or you can swap the values of the motor_dir_pin_A and motor_dir_pin_B variables for that motor.

The value of the button_increment variable determines how much the pmw value is increased for every button pressed on the control pad. The best value depends on the battery and the motors that you use. One press should be just enough to get the motors spinning reliably. You can do some testing and adjust the value accordingly.

The value of line_follow_pwm_offset...

Summary

In this chapter, we put together a lot of what we learned in this book so far to create a Bluetooth-controlled, camera-equipped, line-following robot from scratch. This robot is an ideal starting point for you to explore the control of mobile robots and to try out different controller ideas. There are some straightforward ways to improve upon the simple line-following algorithm. For example, you can use the direction of the line vector to make line following more robust and allow your robot to go faster around the track. The Pixy camera can also detect intersections of lines and turn signs, and you can experiment with these features. How about using one of the controller buttons to let the robot turn around and continue to follow the line in the opposite direction? Or changing controller parameters on the fly and seeing the effects in real time, without having to re-upload the program? Or plotting the deviation from the line in the live plotter on the phone app?

You can...

Further reading

Since line following robots are popular projects among DIY roboticists, you can find a lot of related projects online. Following is a link to one of them, as wells as link to the PixyCam website where you can learn all about its many features that we did not cover in this chapter:

lock icon
The rest of the chapter is locked
You have been reading a chapter from
Practical Arduino Robotics
Published in: Mar 2023Publisher: PacktISBN-13: 9781804613177
Register for a free Packt account to unlock a world of extra content!
A free Packt account unlocks extra newsletters, articles, discounted offers, and much more. Start advancing your knowledge today.
undefined
Unlock this book and the full library FREE for 7 days
Get unlimited access to 7000+ expert-authored eBooks and videos courses covering every tech area you can think of
Renews at $15.99/month. Cancel anytime

Author (1)

author image
Lukas Kaul

Lukas Kaul is a robotics Research Scientist, currently working at the Toyota Research Institute in Silicon Valley, where he develops mobile manipulation technologies to support people in their homes and in their workplace. Throughout his career he has worked on projects as diverse as humanoid robots, aerial robots and mobile manipulation systems. A maker at heart, Lukas has been using Arduino technology extensively for more than a decade in countless side-projects, ranging from mapping systems to self-balancing robots. Lukas is passionate about teaching robotics with Arduino to inspire and empower anyone who wants to enter the exciting field of robotics. He holds a PhD degree from the Karlsruhe Institute of Technology, Germany.
Read more about Lukas Kaul