


How to program your Arduino board
The main goal of the Arduino project is to make programming microcontrollers easy, and this section will walk you through the necessary steps. If this is your first time working with microcontrollers, you will hopefully enjoy the process. If you have experience in programming microcontrollers in more traditional ways with hardware-specific IDEs, ISP programmers, and a datasheet always on hand, you might be surprised by how much smoother the experience with the Arduino toolchain is. The whole process involves four steps, and we will go through each of them:
- Installing the Arduino IDE on your system
- Writing the program code in the IDE’s editor
- Compiling the code for your Arduino board
- Transmitting the compiled machine code to your Arduino board
Installing the Arduino IDE
To download the Arduino IDE, go to https://www.arduino.cc/en/software and select the download link for your operating system (Windows, Linux, and macOS are supported). Download the installer and follow the instructions for the full installation. The installation includes the hardware drivers that are necessary to enable the IDE to communicate with the Arduino boards via USB, so make sure to select the option to install the hardware drivers when prompted.
Once the IDE is installed successfully, you can open it, and it will look just as shown in Figure 1.3. The IDE has a simple and clear interface. Besides the buttons we already discussed, there are several drop-down menus accessible at the top and a few more shortcut buttons on the left. These include access to the Boards Manager and Library Manager, which we will talk about in more detail later.
You will notice that the IDE already shows some code in the editor when you first open it. This is a bare minimum, valid Arduino program (or sketch) that can be compiled and run on any Arduino board, but that does nothing at all.
You can see that every Arduino program or sketch consists of at least two functions: setup() and loop(). Just like the comments suggest, the setup function is executed only once right after the program starts. In it, we typically put all the code that configures the functionality of the pins and that initializes connected hardware, such as the sensors of our robot. After the setup function has been completed, the program will repeatedly execute the loop function as fast as it possibly can, until the Arduino is shut off or reset. Let us fill in these empty functions with a bit of code that actually does something! Even with only the Arduino Uno board and no additional hardware to interface with, we can still use the built-in LED on pin 13 and the serial interface to generate some interesting behavior and bring our Arduino board to life.
Writing your first Arduino program
To use the LED that is connected to pin 13, we must first configure pin 13 as a digital output pin. This will enable it to drive the LED. To do this, we need to add the following line of code to the setup function:
pinMode(13, OUTPUT);
This will tell the microcontroller on our Arduino board that we want to use this pin as an output, and not as input or as part of the SPI interface, for example. This line of code will work for our Arduino Uno where the LED is connected to pin 13. But it would not produce the intended effect on a different board type where the LED is connected to a different pin. We can instead write the following line, where we replaced the number 13 with the LED_BUILTIN macro:
pinMode(LED_BUILTIN, OUTPUT);
During compilation, LED_BUILTIN will be automatically replaced with the correct pin number for the board we are working with, which means that our program will work across many different boards. Similarly, OUTPUT will be replaced with the number 1.
To enable the serial interface such that we can send messages between the PC and the Arduino, we need to add the following line of code to the setup function:
Serial.begin(115200);
This line will start the serial interface at a baud rate of 115200 bps. The baud rate determines the data transmission speed of the serial interface. 115,200 bps will be our default serial baud rate for all examples in this book, as it allows for both reliable and fast communication. Directly after this line, we can start to use the serial interface. As is customary in programming tutorials, let us let our program print the words "Hello, world!" to the serial monitor. To do this, all we need to do is add the following line at the end of our setup function:
Serial.println("Hello, world!");
The Serial.println() functions will write the characters of the sentence "Hello, world!" one by one to the serial output. It will automatically add a line break at the end of it to make parsing and displaying this message easier. This is it for the setup function; there is nothing else we need to add.
In the loop function, we will periodically turn the LED on and off again, and also print out a corresponding message. To turn the LED on, we need to add the following line at the top of the loop function:
digitalWrite(LED_BUILTIN, HIGH);
This line sets the digital output of pin 13 to 5V, causing the LED to light up. Let’s also print a corresponding message and wait for half a second before we turn the LED off again with the following two lines:
Serial.println("LED on. ");
delay(500);
The delay function implements a busy wait and will halt the program execution for the specified number of milliseconds. It is usually good practice to avoid the use of delay() (or any other form of busy waiting in general) everywhere except in the setup function. The reason is that a busy wait prevents the CPU from doing anything useful during this time, which can cause many unintended consequences. We will introduce methods to avoid the use of delay in a later chapter, but for this first example, there is nothing wrong with using it. Lastly, let us turn the LED off again, print a notification, and wait another half a second before we automatically repeat the blink process all over again:
digitalWrite(LED_BUILTIN, LOW);
Serial.println("LED off.");
delay(500);
And this is all we need to do to write a program that lets the LED blink at a frequency of 1 Hz and outputs a little notification over the serial port every time it turns the LED on or off. Figure 1.5 shows how the final program looks in the Arduino IDE:
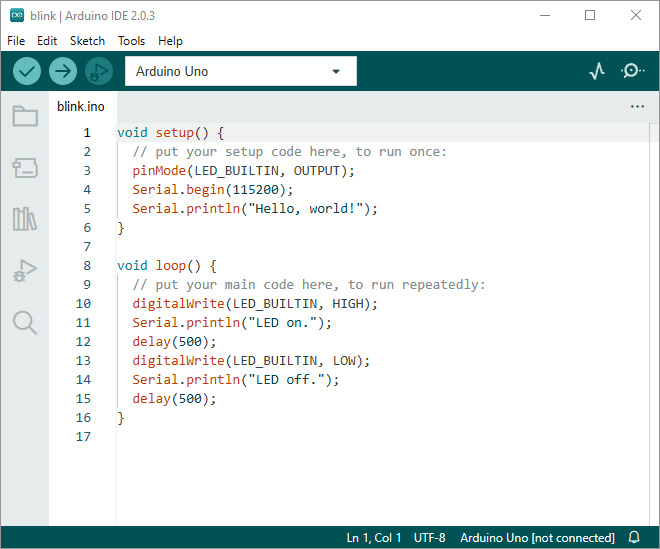
Figure 1.5 – The blink program with serial output statements
You might have noticed that this is not actually valid C++ code, since the main() function is missing. During the compilation process, this function will be automatically generated, and it calls the setup function once and then the loop function in an endless loop.
Compiling the code for your Arduino board
Now that you have written the code for your program, we need to translate it into machine code for the microcontroller on the Arduino Uno. To do this, you first need to tell the IDE what board you are using. Click the drop-down window in the center, click on Select other board and port and type the word uno in the search bar under BOARDS. Select the Arduino Uno entry. If your Arduino is connected to your PC, you can find and select the serial port on the right under PORTS. This step is needed to transmit the program to the board. Figure 1.6 shows where to select the board type and the serial port that you will be using for programming. When you are done, click OK:
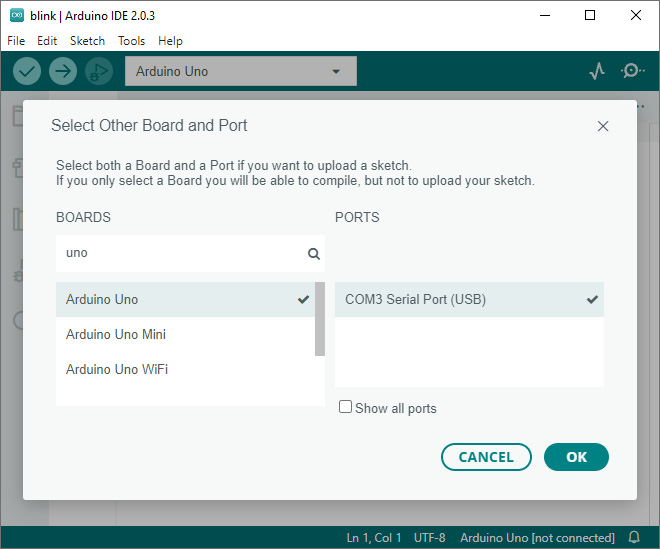
Figure 1.6 – Selecting the board type and serial port
Now, you can click on the checkmark symbol in the top-left corner to compile your program. As soon as you click on it, the console window (titled Output) will appear under the editor. The IDE will also display a pop-up message that says Compiling sketch…, and if all goes well, this message will change to Done compiling. A message in the black console window under the editor will inform you how much program storage space and dynamic memory are being used by your program. Figure 1.7 shows what the IDE looks like when compilation is successful:
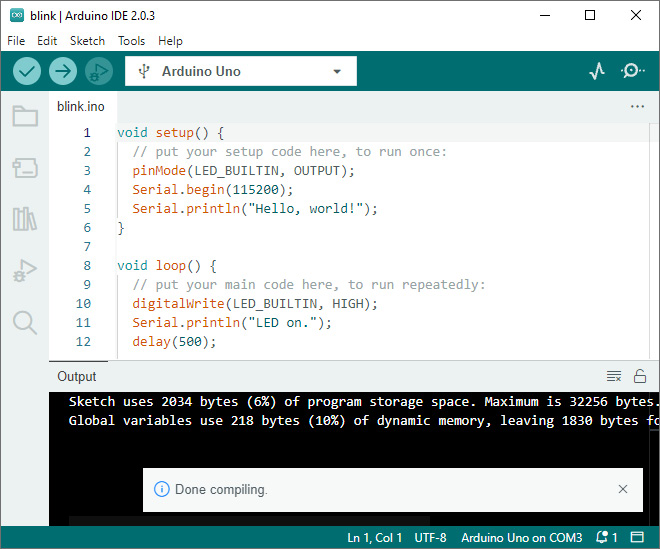
Figure 1.7 – How the IDE looks after successful compilation
The information in the console can be useful to keep an eye on for larger programs. If any of these values get close to 100%, the program can become unstable during execution. In this case, you will want to either optimize your program to use less storage and dynamic memory or upgrade to a more capable Arduino board that has more of them.
Transmitting the code to your Arduino board and running it
If everything is set up correctly, it is time to transmit your code to the Arduino! To start this process, click the arrow symbol in the top-left corner of the IDE. This will trigger the familiar compilation process, and as soon as the IDE is done compiling, it will start transferring the compiled machine code to the Arduino board via the USB-to-serial programmer interface. This should only take a short amount of time and is accompanied by two new pop-up messages: Uploading... and, if all goes well, Done uploading. If you look at the TX and RX LEDs on your Arduino board, you will see both blinking very rapidly during the transmission.
After the program is successfully transmitted, the Arduino board will immediately start running it. If all went well, you should see the status LED turn on and off at a frequency of 1 Hz. But we also put some serial print commands in our code. To see the content of these messages, we can use the serial monitor that is built into the Arduino IDE. In the IDE, click on the magnifier glass icon in the top-right corner to open the serial monitor. It will appear as a new tab under the editor area, next to the console. You will need to select the baud rate from the drop-down list in the right corner of the serial monitor that matches the one in the Serial.begin() command of our sketch – 115200 in our case. As soon as you set the correct baud rate, you should see alternating lines of "LED on." and "LED off." appear. And if you push the RESET button on your Arduino to start the program from the beginning, you will see the line "Hello, world!" appear once. This shows you that the setup function is indeed executed once at the beginning of the program. Figure 1.8 shows the output of the serial monitor, as well as the baud rate setting:
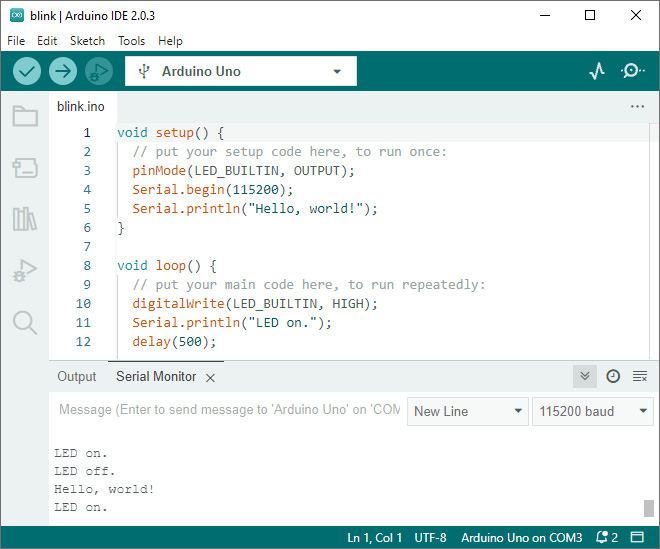
Figure 1.8 – Expected output in the serial monitor
You will also see the TX LED flicker every time the status LED switches on or off. This is signaling that the Arduino is transmitting serial data, namely the messages ("LED on." and "LED off."). You can use the serial monitor to send a message to your Arduino board. To do this, type anything you like into the line at the top of the serial monitor and press Enter. This will send your text, character by character, to the Arduino board. The moment you press Enter, you will see the RX LED light up for a brief moment, indicating that data is in fact transmitted from the PC to the main microcontroller. We did not program our Arduino to react to serial data, so it will just ignore it and it has no effect on the execution of our program. But with a few minor changes to our program, we could control the frequency of the blinking with a message from the serial monitor, for example.
Congratulations, you have successfully written your first Arduino program and it is running right now on an Arduino Uno board on your desk! Now that everything is set up and working, you might want to play around with the program a little bit to get more familiar with the workflow. You can change the words that are being printed or the frequency of the blinking, or you can try to change the serial baud rate (both on the Arduino and on the PC side). You can also see what happens when there is an error in your program code – for example, when you delete a semicolon at the end of a line. In this case, the compiler will fail, but it will give you a useful error message and even highlight the area of code where the problem lies.


