Reader small image

You're reading from  Hands-On ROS for Robotics Programming

Product typeBook
Published inFeb 2020
PublisherPackt
ISBN-139781838551308
Edition1st Edition
Tools
Concepts
Right arrow
Author (1)
Bernardo Ronquillo Japón
author image
Bernardo Ronquillo Japón

Bernardo Ronquillo Japn is an Internet of Things (IoT) and robotics expert who has worked for top technology companies since 1995, including Instituto de Astrofsica de Canarias, Gran Telescopio Canarias, Altran, and Alestis Aerospace. Using his skills and experience, he founded The Robot Academy, where he develops open source hardware and software solutions for engineers and makers: Social Robot IO (2015), for the stimulation of children with autistic spectrum disorder; Robot JUS (2016), which helps engineers get deeper technical insights with the Robot Operating System (ROS) when using low-complexity hardware; and IIoT All-in-One (2018) as an industrial IoT training package for assisting companies in their digital transformation process.
Read more about Bernardo Ronquillo Japón

Right arrow

Programming in ROS - Commands and Tools

This chapter focuses on running ROS within GoPiGo3. In the previous chapter, we did the same for a remote laptop, and in the next chapter, we will teach you how to make both a robot and your laptop work together as a single ROS environment.

In this chapter, you will finally learn how to use ROS in the depth required for the advanced chapters later on, which deal with robot navigation and machine learning. ROS can be hard to use at the beginning due to the following factors:

  • It is command-line-based.
  • It handles asynchronous events.
  • It is a distributed computing environment.

Paradoxically, these are the three features that make it really powerful for programming robots. The effort you've invested will be worth it, as you will soon discover.

By working through this chapter, you will become familiar with ROS's command-line interaction...

Technical requirements

The code files for this chapter are available at https://github.com/PacktPublishing/Hands-On-ROS-for-Robotics-Programming/tree/master/Chapter6_ROS_programming.

When you have completed the Raspberry Pi setup, as explained in the Setting up a physical robot section, clone the book repository (https://github.com/PacktPublishing/Hands-On-ROS-for-Robotics-Programming) in your home folder:

$ cd ~
$ git clone https://github.com/PacktPublishing/Hands-On-ROS-for-Robotics-Programming

Remember this location in order to keep a check of your work because, in this chapter, our intention is that you create all the code by yourself. Alternatively, if you decide to use the provided code, you will just need to copy the Chapter6_ROS_programming folder to the ROS workspace as usual:

$ cp -R ~/Hands-On-ROS-for-Robotics-Programming/Chapter6_ROS_programming ~/catkin_ws/src

The...

Setting up a physical robot

As mentioned in Chapter 3, Getting Started with ROS, we will now start working with a physical robot. Therefore, the first thing to do is to prepare the software you need to be running in the Raspberry Pi. This section will guide you through the process step by step.

Downloading and setting up Ubuntu Mate 18.04

Mate is, at the time of writing, the recommended Ubuntu desktop to run under Raspberry Pi. It is a complete Ubuntu distribution with a nice desktop interface. Follow these steps to make it run in your GoPiGo3:

  1. Download the image from https://ubuntu-mate.org/download/, selecting the Raspberry Pi version (recommended): AArch32 (ARMv7). Burn the image onto a micro SD card. Afterward, place...

A quick introduction to ROS programming

This section is devoted to explaining an easy ROS example with GoPiGo3. By doing this, we can put our robot to work quickly so that, in later sections, we can deal with ROS commands and tools in a practical way, applying such commands and understanding what they do.

This very simple example is based on the distance sensor in GoPiGo3. It consists of publishing sensor readings and accessing them from other ROS nodes.

Setting up the workspace

To start using contributed ROS packages or to create your own, you will need to have a workspace in which to put the code. The step-by-step procedure to accomplish such a task is as follows:

  1. From a bash terminal, create a folder and initialize the...

Case study 1 – writing a ROS distance-sensor package

In this section, you will create a ROS package from scratch and produce the code to provide minimal ROS functionality with GoPiGo3, that is, reading its distance sensor. Be aware that the code you previously cloned at this location is the working solution for what your code is expected to do:

 ~/Hands-On-ROS-for-Robotics-Programming/Chapter6_ROS_programming/pkg_mygopigo

We encourage you to try to build the ROS package by yourself, following the explanations that are provided next in this chapter.

Creating a new package

First, let's set up a folder in the workspace where we will place the package files:

  1. Move to the src location in the catkin_ws worspace folder...

Working with ROS commands

In the first part of this section, we will cover three categories: commands to be used inside bash (shell), ROS execution commands, and information commands.

Shell commands

Shell commands are bundled into a ROS core package, rosbash (http://wiki.ros.org/rosbash). Let's move on to see what each one provides.

Changing the current location

First, we will cover roscd, which is equivalent to the Linux bash cd command. Its advantage is that you only have to specify the package name in order to move to the location of the package:

$ roscd mygopigo...

Creating and running publisher and subscriber nodes

If you have understood how the requirement, distance-sensor.py, publisher script works, then the following subscriber script should be pretty straightforward to follow:

#!/usr/bin/env python

import rospy
from sensor_msgs.msg import Range

def callback(msg):
print msg.data
rospy.loginfo(rospy.get_caller_id() + 'GoPiGo3 measures distance %s mm', msg.data*1000)

rospy.init_node('distance_sensor_subscriber')

sub = rospy.Subscriber('distance_sensor/distance', Range, callback)

rospy.spin()

This snippet corresponds to the distance-sensor_subscriber.py file in the ./pkg_mygopigo/src folder of the code for this chapter. The main difference in the subscriber script is that, since we are listening to a topic, we do not need to specify a rate of execution. We simply loop forever with the following line:

rospy...

Automating the execution of nodes using roslaunch

Once you have decided which nodes you want to run as part of your robot, you can automate the launch process for all scripts by using the roslaunch command. Its syntax is as follows:

$ roslaunch <name_of_package> <name_of_launch_file>

For our example, this is pretty simple as there is only one node. The launch file is in the repository at ./pkg_mygopigo/launch/easyDistance.launch and its syntax is based on XML:

<launch>
<node name="easyDistance_sensor" pkg="mygopigo" type="distance-sensor.py" output="screen" />
node name="distance_subscriber" pkg="mygopigo" type="distance-sensor_subscriber.py" output="screen" />
</launch>

The <launch> tag delineates the robot description. Then, you include one <node>...

Case study 2 – ROS GUI development tools – the Pi Camera

As we mentioned at the end of the Installing ROS Melodic section, in order to be able to use the camera, we first need to install its ROS package. Since the binaries are not available for ROS Melodic (only for Kinetic), we need to build the package from the source, and this is a perfect example in that you will know how to do it with any other package. Let's do this with the following steps:

  1. Go to your catkin workspace and download the source code:
$ cd ~/catkin_ws/src
$ git clone https://github.com/UbiquityRobotics/raspicam_node.git
  1. There are some dependencies to be installed for ROS. To carry out this task, we are going to create the 30-ubiquity.list file:
$ sudo -s
$ echo “yaml https://raw.githubusercontent.com/UbiquityRobotics/rosdep/master/raspberry-pi.yaml” > /etc/ros/rosdep/sources...

Customizing robot features using ROS parameters

ROS parameters store the global configuration of the robot. This is a convenient way in which to define your application so that you can abstract the functionality to a high level and make it available for the end user. We are going to illustrate how ROS parameters work by using a rqt plugin that allows for dynamically reconfiguring of some of them. It is as it sounds; you can modify robot characteristics on the fly:

  1. Launch raspicam_node and then the rqt plugins:
T1 $ roslaunch raspicam_node camerav2_410x308_30fps.launch
T2 $ rqt_image_view
T3 $ rosrun rqt_reconfigure rqt_reconfigure

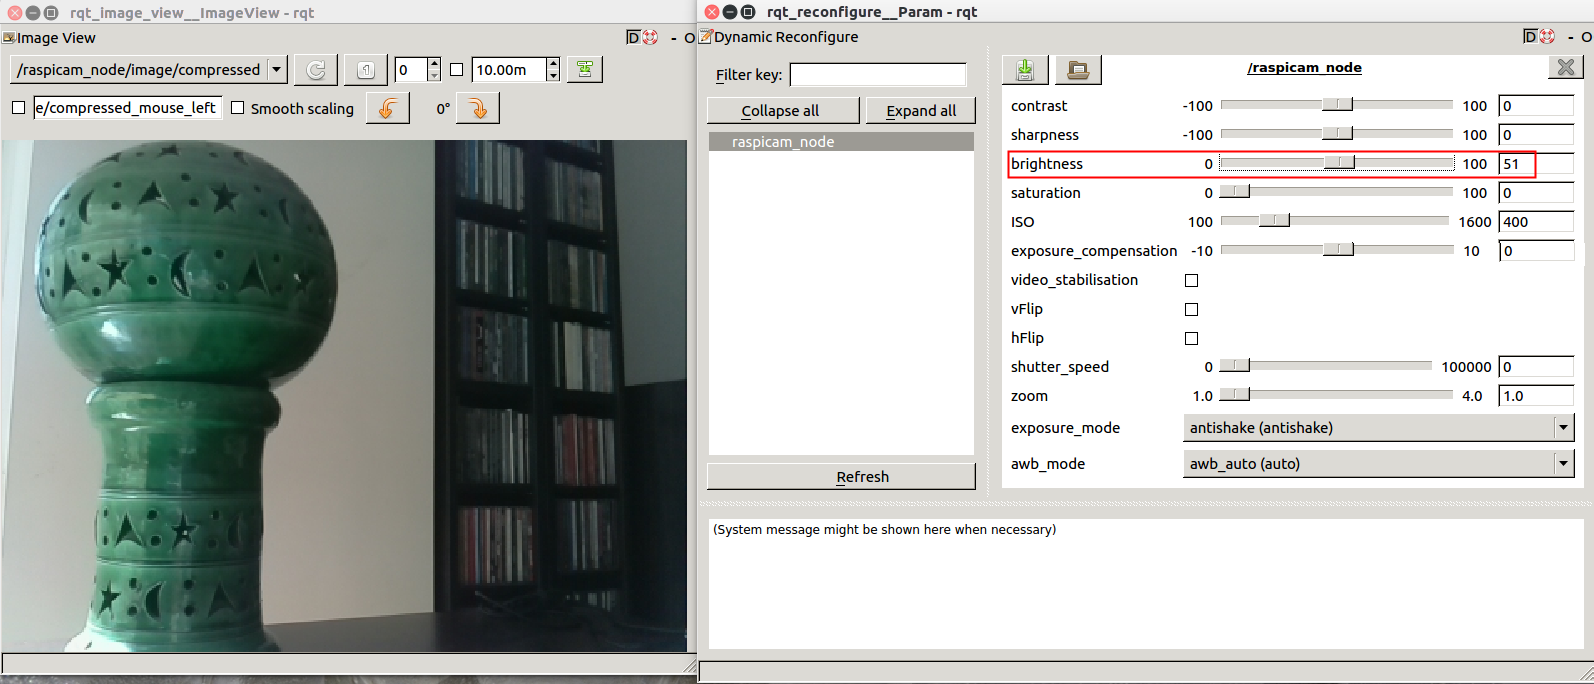
Your desktop should show the following two windows:

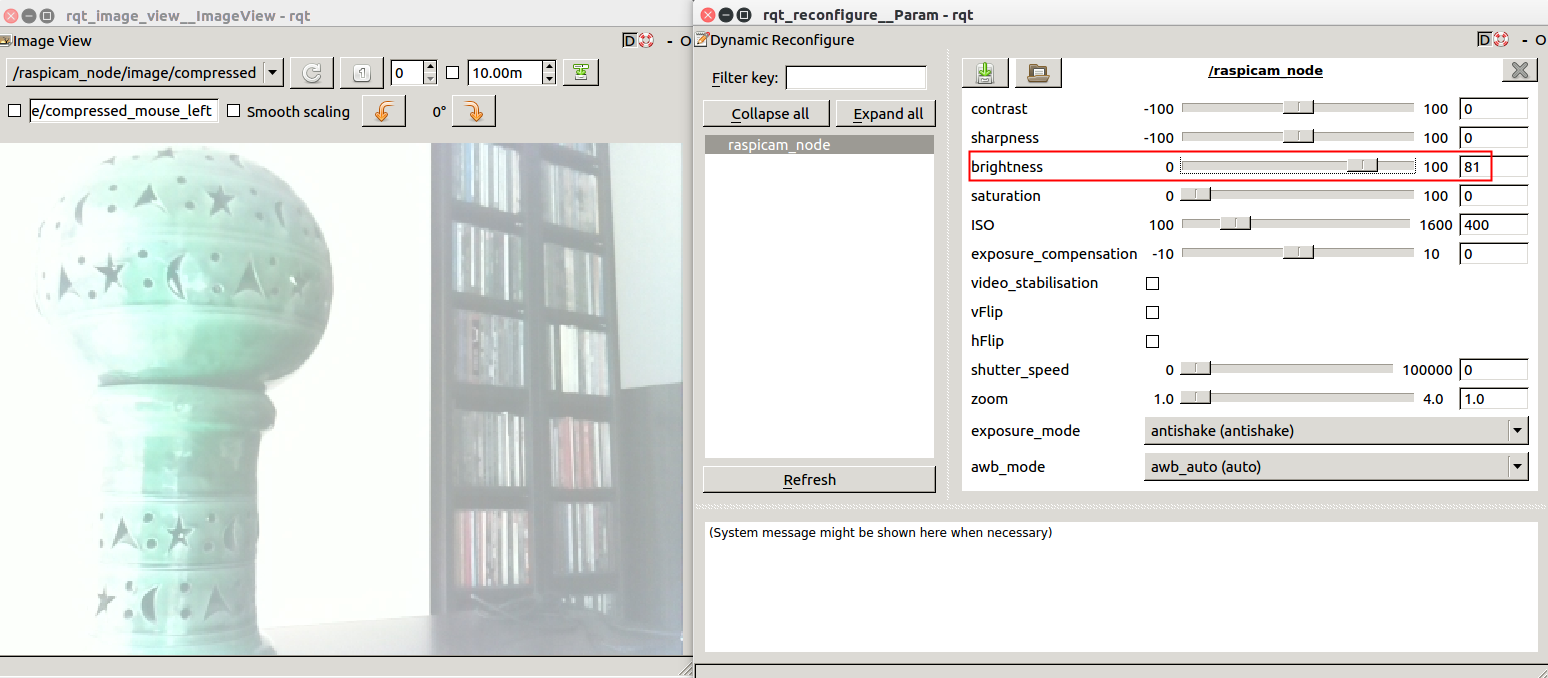
  1. Check the parameters on the right-hand side and focus on the brightness (the box marked in red). Modify its value from 51 to 81 and then check the result:

Wow! You can dynamically modify the configuration...

Summary

In this chapter, we have established the basis for programming in ROS. You have built your own package with a simple GoPiGo3 functionality: reading a distance sensor in order to work on programming concepts. You have also learned how to read Pi Camera images and make them available to ROS for further processing, which is the starting point for performing computer vision tasks.

In the next chapter, you will put the two ROS worlds together: the robot and your laptop. This way, once you have the GoPiGo3 package running in the robot, you will have the power to undertake all computing and processing tasks from your powerful laptop.

Questions

  1. What is the difference between ROS topics and ROS messages?

A) Both stand for the data transmitted from one node to the other.
B) A topic is how you identify a transmission channel and a message is one sample of the content that flows through that channel.
C) Any topic name has to be unique, while several topics can transmit the same message.

  1. Which command would use to record a ROS session?

A) rosbag
B) rosrecord
C) roswrite

  1. Can a ROS node have a publisher and a subscriber at the same time?

A) Yes, if the topic subscriber is the same as the topic publisher.
B) No, because it would imply a programming conflict: a node with a publisher loops at a constant rate, that is, rate.sleep(), while a node with a subscriber only runs an iteration if it receives a message, that is, rospy.spin().
C) Yes, and the node is driven by the subscriber, that is, the node broadcasts a...

Further reading

To go deeper into the concepts we have explained in this chapter, you can follow the following references and tutorials:

lock icon
The rest of the chapter is locked
You have been reading a chapter from
Hands-On ROS for Robotics Programming
Published in: Feb 2020Publisher: PacktISBN-13: 9781838551308
Register for a free Packt account to unlock a world of extra content!
A free Packt account unlocks extra newsletters, articles, discounted offers, and much more. Start advancing your knowledge today.
undefined
Unlock this book and the full library FREE for 7 days
Get unlimited access to 7000+ expert-authored eBooks and videos courses covering every tech area you can think of
Renews at $15.99/month. Cancel anytime

Author (1)

author image
Bernardo Ronquillo Japón

Bernardo Ronquillo Japn is an Internet of Things (IoT) and robotics expert who has worked for top technology companies since 1995, including Instituto de Astrofsica de Canarias, Gran Telescopio Canarias, Altran, and Alestis Aerospace. Using his skills and experience, he founded The Robot Academy, where he develops open source hardware and software solutions for engineers and makers: Social Robot IO (2015), for the stimulation of children with autistic spectrum disorder; Robot JUS (2016), which helps engineers get deeper technical insights with the Robot Operating System (ROS) when using low-complexity hardware; and IIoT All-in-One (2018) as an industrial IoT training package for assisting companies in their digital transformation process.
Read more about Bernardo Ronquillo Japón