This chapter covers the following recipes:
The Android SDK provides a powerful tool to program mobile devices, and the best way to master such a tool is to jump right in. Although you can read this book from beginning to end, as it is a cookbook, it is specifically designed to allow you to jump to specific tasks and get the results immediately.
Activities are the fundamental building block of most Android applications as the activity class provides the interface between the application and screen. Most Android applications will have at least one activity, if not several (but they are not required). A background service application will not necessarily require an activity if there is no user interface.
This chapter explains how to declare and launch activities within an application and how to manage several activities at once by sharing data between them, requesting results from them, and calling one activity from within another.
This chapter also briefly explores the intent object, which is often used in conjunction with activities. Intents can be used to transfer data between activities in your own application, as well as in external applications, such as those included with the Android operating system (a common example would be to use an intent to launch the default web browser).
To begin developing Android applications, head over to the Android Studio
page to download the new Android Studio IDE and the Android SDK bundle:http://developer.android.com/sdk/index.html.
Activities and other application components, such as services, are declared in the AndroidManifest.xml
file. Declaring an activity node is how we tell the OS about our Activity class and how it can be requested. For example, an application will usually indicate that at least one activity should be visible as a desktop icon and serve as the main entry point to the application.
Android Studio, now at version 3.2, is used for all the code samples shown in this book. If you have not already installed it, visit the Android Studio website (see the link in the previous tip) to install the IDE and the SDK bundle for your platform.
For this first example, we'll guide you through creating a new project. Android Studio provides a Quick Start
wizard, which makes the process extremely easy. Follow these steps to get started:
Welcome to Android Studio
dialog:Start a new Android Studio project
option.DeclareAnActivity
. Click on Next
:
Target Android Devices
dialog, you can leave the Phone and Tablet
checkbox selected with the default API 21: Android 5.0 (Lollipop)
selection for the minimum SDK (for this example, it really doesn't matter which API level you choose, as activities have existed since API level 1). Click on Next
:Add an
Activity to Mobile
dialog, select the Empty Activity
option. Click on Next
:Configure Activity
dialog, you can leave the defaults as provided, but note that the default activity name is MainActivity
. Click onFinish
:After finishing the wizard, Android Studio will create the project files. For this recipe, the two files that we will examine are MainActivity.java
(which corresponds to the activity name mentioned in step 6) and AndroidManifest.xml
.
If you take a look at the MainActivity.java
file, you will realize that it's pretty basic. This is because we chose the Empty Activity
option (in step 5). Now, look at the AndroidManifest.xml
file. This is where we actually declare the activity. Within the <application>
element is the <activity>
element:
<activity android:name=".MainActivity" android:label="@string/app_name"> <intent-filter> <action android:name="android.intent.action.MAIN"/> <category android:name= "android.intent.category.LAUNCHER"/> </intent-filter> </activity>
Declaring an activity is a simple matter of declaring the <activity>
element and specifying the name of the activity class with the android:name
attribute. By adding the <activity>
element to the Android Manifest, we are specifying our intention to include this component in our application. Any activities (or any other component for that matter) that are not declared in the manifest will not be available to the application. Attempting to access or utilize an undeclared component will result in an exception being thrown at runtime.
In the preceding code, there is another attribute: android:label
. This attribute indicates the title shown on the screen, as well as the icon if this is the Launcher activity.
For a complete list of available Activity attributes, take a look at this resource:http://developer.android.com/guide/topics/manifest/activity-element.html.
The Android application model can be seen as a service-oriented one, with activities as components and intents as the messages sent between them. Here, an intent is used to start an activity that displays the user's call log, but intents can be used to do many things and we will encounter them throughout this book.
To keep things simple, we are going to use an intent object to start one of Android's built-in applications rather than create a new one. This only requires a very basic application, so start a new Android project with Android Studio and call it ActivityStarter
.
Again, to keep the example simple so that we can focus on the task at hand, we will create a function to show an intent in action and call this function from a button on our activity.
Once your new project is created in Android Studio, follow these steps:
MainActivity.java
class and add the following function:public void launchIntent(View view) { Intent intent = new Intent(Intent.ACTION_VIEW); intent.setData(Uri.parse("https://www.packtpub.com/")); startActivity(intent); }
Cannot resolve symbol 'Intent'
.import
section:import android.content.Intent; import android.net.Uri; import android.support.v7.app.AppCompatActivity; import android.os.Bundle; import android.view.View;
Alternatively, let Android Studio add the library reference for you: just click on the code highlighted with a red font and press Alt + Enter.
activity_main.xml
file and replace the <TextView />
block with the following XML:<Button
android:layout_width="wrap_content"
android:layout_height="wrap_content"
android:text="Launch Browser"
android:id="@+id/button"
android:onClick="launchIntent"
app:layout_constraintBottom_toBottomOf="parent"
app:layout_constraintLeft_toLeftOf="parent"
app:layout_constraintRight_toRightOf="parent"
app:layout_constraintTop_toTopOf="parent"/>
Tools
| Android
| AVD
Manager
) or connect a physical device to your computer.Launch Browser
button, you will see the default web browser open with the URL specified.Though simple, this app demonstrates much of the power behind the Android OS. An intent is a message object. Intents can be used to communicate across your application's components (such as services and broadcast receivers) as well as with other applications on the device. In this recipe, we asked the OS to start any app that could handle the data we specified with the setData()
method. (If the user has multiple browsers installed and no default set, the OS will show a list of apps for the user to choose from.)
To test this on a physical device, you may need to install drivers for your device (the drivers are specific to the hardware manufacturer). You will also need to enable Developer Mode on your device. Enabling Developer Mode varies according to the Android OS version. If you do not see the Developer Mode option in your device settings, open the About Phone
option and begin tapping Build Number
. After three taps, you should see a Toast message telling you that you are on your way to being a developer. Four more taps will enable the option.
In this recipe, we created an intent object with the ACTION_VIEW
. as what we want to do (our intention). You may have noticed that when you typed Intent
and the period, Android Studio provided a pop-up list of possibilities (this is the autocomplete feature), like this:
ACTION_VIEW
, along with a URL in the data, indicates that the intention is to view the website, so the default browser is launched (different data could launch different apps). In this example, we just want to open a browser with the specified URL, so we call the startActivity()
method. There are other ways to call the intent depending on our needs. In the Returning a result from an activity recipe, we will use the startActivityForResult()
method.
It's very common for Android users to download their favorite apps for web browsing, taking photos, text messaging, and so on. Using Intents, you allow your users to use their favorite apps instead of trying to reinvent all of this functionality.
To start an activity from a menu selection, refer to the Handling menu selections recipe in Chapter 4, Menus and Action Mode.
Often, we will want to activate one activity from within another activity. Although this is not a difficult task, it will require a little more setting up to be done than the previous recipes as it requires two activities. We will create two activity classes and declare them both in the manifest. We'll also create a button, as we did in the previous recipe, to switch to the activity.
We'll create a new project in Android Studio, just as we did in the previous recipes, and call this one ActivitySwitcher
. Android Studio will create the first activity, ActivityMain
, and automatically declare it in the manifest.
ActivitySwitcher
project and navigate to File
| New
| Activity
| Empty
Activity
, as shown in this screenshot:New Android Activity
dialog, you can leave the default Activity Name
as is, or change it to SecondActivity
, as follows:public void onClickSwitchActivity(View view) { Intent intent = new Intent(this, SecondActivity.class); startActivity(intent); }
activity_main.xml
file located in the res/layout
folder and replace the <TextView />
with the following XML to create the button:<Button android:id="@+id/button" android:layout_width="wrap_content" android:layout_height="wrap_content" android:layout_centerVertical="true" android:layout_centerHorizontal="true" android:text="Launch Second Activity" android:onClick="onClickSwitchActivity" app:layout_constraintBottom_toBottomOf="parent" app:layout_constraintLeft_toLeftOf="parent" app:layout_constraintRight_toRightOf="parent" app:layout_constraintTop_toTopOf="parent"/>
SecondActivity
to close it, which will bring us back to the first activity. Open the SecondActivity.java
file and
add this function:public void onClickClose(View view) { finish(); }
Close
button to the SecondActivity
layout. Open the activity_second.xml
file and add the following <Button>
element to the auto-generated ConstraintLayout
: <Button android:id="@+id/buttonClose" android:layout_width="wrap_content" android:layout_height="wrap_content" android:text="Close" android:layout_centerVertical="true" android:layout_centerHorizontal="true" android:onClick="onClickClose" app:layout_constraintBottom_toBottomOf="parent" app:layout_constraintLeft_toLeftOf="parent" app:layout_constraintRight_toRightOf="parent" app:layout_constraintTop_toTopOf="parent"/>
The real work of this exercise is in the onClickSwitchActivity()
method from step 3. This is where we declare the second activity for the Intent using SecondActivity.class
. We went one step further by adding the close button to the second activity to show a common real-world situation: launching a new activity, then returning to the original calling activity. This behavior is accomplished in the onClickClose()
function. All it does is call finish()
, but that tells the OS that we're done with the activity. Finish doesn't actually return us to the calling activity (or any specific activity for that matter); it just closes the current activity and relies on the application's back stack to show the last activity. If we want a specific activity, we can again use the Intent object and specify the activity class name when creating the Intent.
This activity switching does not make a very exciting application. Our activity does nothing but demonstrates how to switch from one activity to another, which of course will form a fundamental aspect of almost any application that we develop.
If we had manually created the activities, we would need to add them to the manifest. Using the New Android Activity wizard will automatically add the necessary elements to the Android Manifest file. To see what Android Studio did for you, open the AndroidManifest.xml
file and look at the <application>
element:
<activity android:name=".MainActivity"> <intent-filter> <action android:name="android.intent.action.MAIN" /> <category android:name="android.intent.category.LAUNCHER" /> </intent-filter> </activity> <activity android:name=".SecondActivity"></activity>
One thing to note in the preceding auto-generated code is that the second activity does not have the <intent-filter>
element. The main activity is generally the entry point when starting the application. That's why MAIN
and LAUNCHER
are defined so that the system will know which activity to launch when the application starts.
The intent object is defined as a messaging object. As a message object, its purpose is to communicate with other components of the application. In this recipe, we'll show you how to pass information with the intent and how to get it out again.
This recipe will pick up from where the previous one ended. We will call this project SendData
.
Since this recipe is building on the previous recipe, most of the work is already done. We'll add an EditText
element to the main activity so that we have something to send to SecondActivity
. We'll use the (auto-generated) TextView
view to display the message. The following are the complete steps:
activity_main.xml
and add the following <EditText>
element above the button:<EditText android:id="@+id/editTextData" android:layout_width="match_parent" android:layout_height="wrap_content" app:layout_constraintLeft_toLeftOf="parent" app:layout_constraintRight_toRightOf="parent" app:layout_constraintTop_toTopOf="parent" app:layout_constraintBottom_toTopOf="@+id/button" />
The <Button>
element that we created in the previous recipe doesn't change.
MainActivity.java
file and change the onClickSwitchActivity()
method as follows:public void onClickSwitchActivity(View view) { EditText editText = (EditText)findViewById(R.id.editTextData); String text = editText.getText().toString(); Intent intent = new Intent(this, SecondActivity.class); intent.putExtra(Intent.EXTRA_TEXT,text); startActivity(intent); }
activity_second.xml
file and add the following <TextView>
element:<TextView android:id="@+id/textViewText" android:layout_width="wrap_content" android:layout_height="wrap_content" app:layout_constraintLeft_toLeftOf="parent" app:layout_constraintRight_toRightOf="parent" app:layout_constraintTop_toTopOf="parent" app:layout_constraintBottom_toTopOf="@id/buttonClose"/>
SecondActivity.java
and edit onCreate()
as follows:protected void onCreate(Bundle savedInstanceState) { super.onCreate(savedInstanceState); setContentView(R.layout.activity_second); TextView textView = (TextView) findViewById(R.id.textViewText); if (getIntent() != null && getIntent().hasExtra(Intent.EXTRA_TEXT)) { textView.setText(getIntent().getStringExtra(Intent.EXTRA_TEXT)); } }
Launch Second Activity
to see it send the data.As expected, the Intent object is doing all the work. We created an intent just as in the previous recipe and then added some extra data. Did you notice the putExtra()
method call? In our example, we used the already defined Intent.EXTRA_TEXT
as the identifier, but we didn't have to. We can use any key we want (you've seen this concept before if you're familiar with name/value pairs).
The key point about using name/value pairs is that you have to use the same name to get the data back out. That's why we used the same key identifier when we read the extra data with getStringExtra()
.
The second activity was launched with the intent that we created, so it's simply a matter of getting the intent and checking for the data sent along with it. We do this in onCreate()
:
textView.setText(getIntent().getStringExtra(Intent.EXTRA_TEXT));
We aren't limited to just sending String
data. The intent object is very flexible and already supports basic data types. Go back to Android Studio and click on the putExtra
method. Then, hit Ctrl and the spacebar. Android Studio will bring up the auto-complete list so that you can see the different data types that you can store.
Being able to start one activity from another is very useful and commonly used, but there are times when we need to know the result from the called activity. The startActivityForResult()
method provides the solution.
Returning a result from an activity is not very different from the way we just called the activity in the previous recipes. You can either use the project from the previous recipe or start a new project and call it GettingResults
. Either way, once you have a project with two activities and the code needed to call the second activity, you're ready to begin.
There are only a few changes needed to get the results:
MainActivity.java
and add the following constant to the class:public static final String REQUEST_RESULT="REQUEST_RESULT";
onClickSwitchActivity()
method to expect a result:public void onClickSwitchActivity(View view) { EditText editText = (EditText)findViewById(R.id.editTextData); String text = editText.getText().toString(); Intent intent = new Intent(this, SecondActivity.class); intent.putExtra(Intent.EXTRA_TEXT,text); startActivityForResult(intent,1); }
@Override protected void onActivityResult(int requestCode, int resultCode, Intent data) { super.onActivityResult(requestCode, resultCode, data); if (resultCode==RESULT_OK) { Toast.makeText(this, Integer.toString(data.getIntExtra(REQUEST_RESULT, 0)), Toast.LENGTH_LONG).show(); } }
onClickClose
in SecondActivity.java
to set the return value as follows:public void onClickClose(View view) { Intent returnIntent = new Intent(); returnIntent.putExtra(MainActivity.REQUEST_RESULT,42); setResult(RESULT_OK, returnIntent); finish(); }
As you can see, getting the results back is relatively straightforward. We just call the intent with startActivityForResult
, indicating we want a result back. We set up the onActivityResult()
callback handler to receive the results. Finally, we make sure that the second activity returns a result with setResult()
before closing the activity. In this example, we are just setting a result with a static value. We use a simple Toast to display the result back to the user.
It's good practice to check the result code to make sure that the user didn't cancel the action. It's technically an integer, but the system uses it as a Boolean value. Check for either RESULT_OK
or RESULT_CANCEL
and proceed accordingly. In our example, the second activity doesn't have a cancel button, so why bother to check? What if the user hits the back button? Android will set the result code to RESULT_CANCEL
and the intent to null, which would cause our code to throw an exception if we attempt to access the null result.
We made use of the Toast object, which displays a convenient pop-up message to unobtrusively notify the user. It also functions as a handy method for debugging as it doesn't need a special layout or screen space.
Besides the result code, onActivityResults()
also includes a Request Code. Are you wondering where that came from? It is simply the integer value that was passed with the startActivityForResult()
call, which takes this form:
startActivityForResult(Intent intent, int requestCode);
We didn't check the request code because we knew we had only one result to handle, but in non-trivial applications with several activities, this value can be used to identify which Activity is returning a result.
The mobile environment is very dynamic, with users changing tasks much more often than on desktops. With generally fewer resources on a mobile device, it should be expected that your application will be interrupted at some point. It's also very possible that the system will shut down your app completely to give additional resources to the task at hand. It's the nature of mobiles.
A user might start typing something in your app, be interrupted by a phone call, or switch over to send a text message, and by the time they get back to your app, the OS may have closed your app completely to free up the memory. To provide the best user experience, you need to expect such behavior and make it easier for your user to resume from where they left off. The good thing is that the Android OS makes this easier by providing callbacks to notify your app of state changes.
Simply rotating your device will cause the OS to destroy and recreate your activity. This might seem a bit heavy-handed, but it's done for a good reason: it's very common to have different layouts for portrait and landscape, so this ensures that your app is using the correct resources.
In this recipe, you'll see how to handle the onSaveInstanceState()
and onRestoreInstanceState()
callbacks to save your application's state. We will demonstrate this by creating a counter variable and increment it each time the Count
button is pressed. We will also have an EditText
and a TextView
widget to see their default behavior.
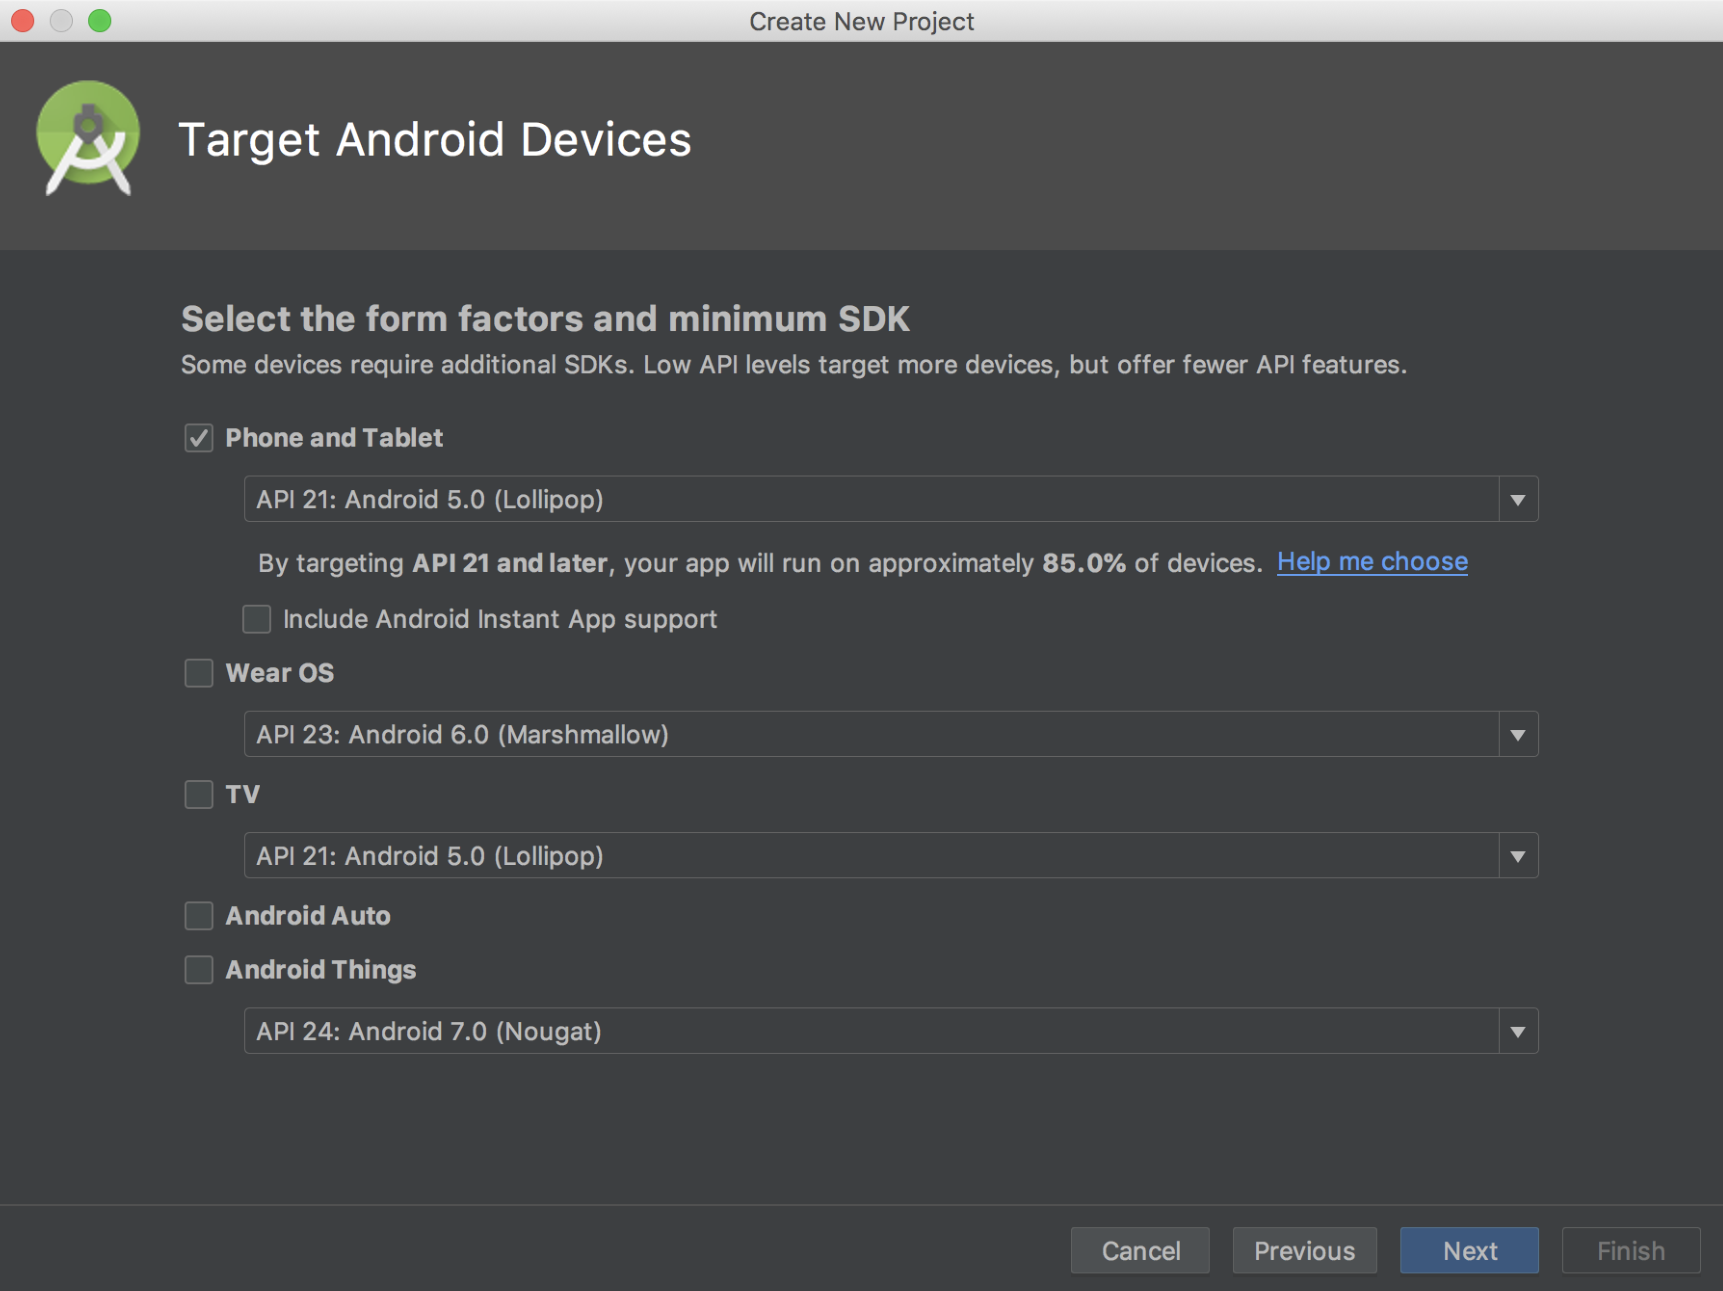
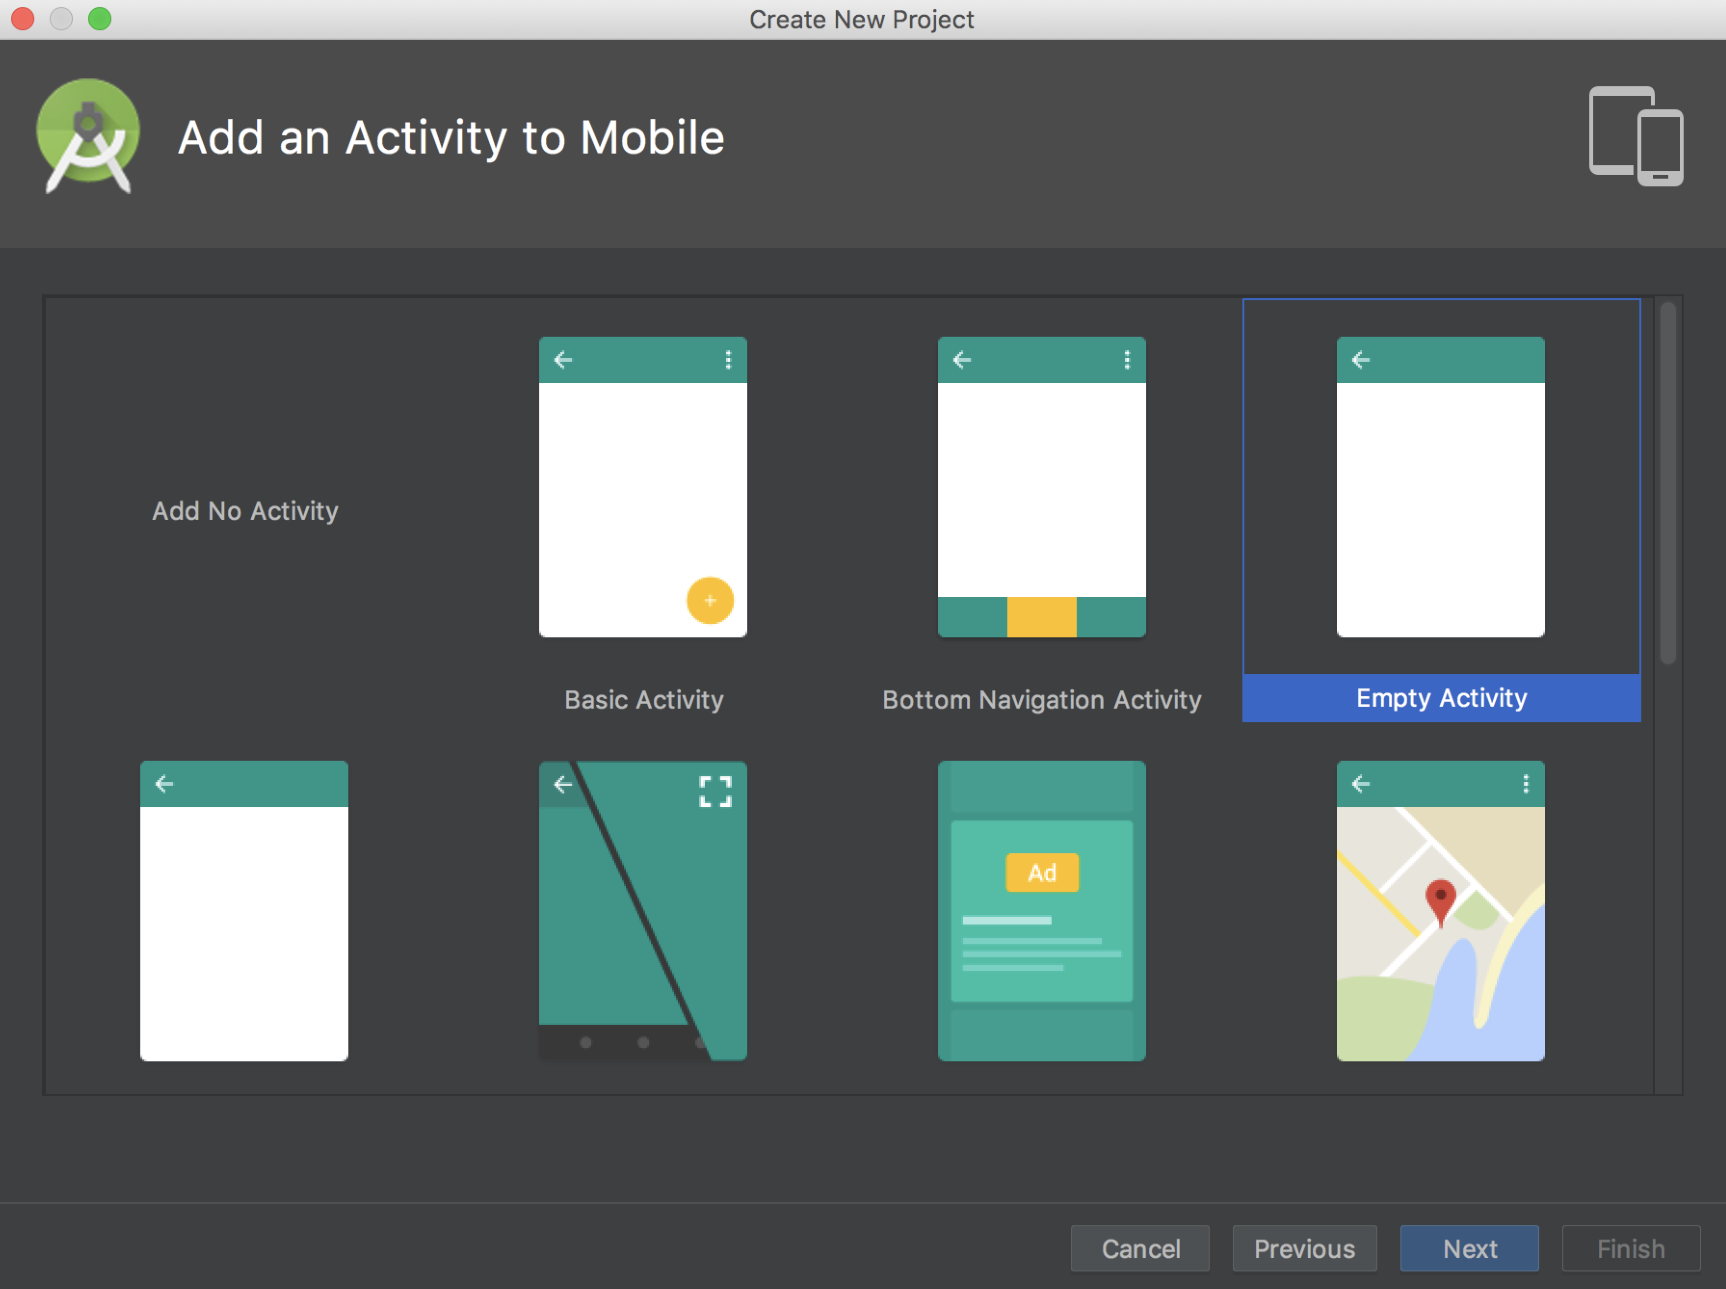
Create a new project in Android Studio and name it StateSaver
. We need only a single activity, so the auto-generated main activity is sufficient. However, we will need a few widgets, including EditText
, Button
, and TextView
. Their layout (in activity_main.xml
) will be as follows:
<EditText android:id="@+id/editText" android:layout_width="match_parent" android:layout_height="wrap_content" android:layout_alignParentTop="true" android:layout_alignParentStart="true" app:layout_constraintLeft_toLeftOf="parent" app:layout_constraintRight_toRightOf="parent" app:layout_constraintTop_toTopOf="parent" app:layout_constraintBottom_toTopOf="@+id/button"/> <Button android:id="@+id/button" android:layout_width="wrap_content" android:layout_height="wrap_content" android:layout_centerInParent="true" android:text="Count" android:onClick="onClickCounter" app:layout_constraintLeft_toLeftOf="parent" app:layout_constraintRight_toRightOf="parent" app:layout_constraintTop_toTopOf="parent" app:layout_constraintBottom_toBottomOf="parent"/> <TextView android:id="@+id/textViewCounter" android:layout_width="wrap_content" android:layout_height="wrap_content" android:layout_below="@id/button" app:layout_constraintLeft_toLeftOf="parent" app:layout_constraintRight_toRightOf="parent" app:layout_constraintTop_toBottomOf="@id/button" app:layout_constraintBottom_toBottomOf="parent"/>
Perform the following set of steps:
MainActivity.java
class:static final String KEY_COUNTER = "COUNTER"; private int mCounter=0;
TextView
widget:public void onClickCounter(View view) { mCounter++; ((TextView)findViewById(R.id.textViewCounter)) .setText("Counter: " + Integer.toString(mCounter)); }
@Override protected void onSaveInstanceState(Bundle outState) { super.onSaveInstanceState(outState); outState.putInt(KEY_COUNTER,mCounter); } @Override protected void onRestoreInstanceState(Bundle savedInstanceState) { super.onRestoreInstanceState(savedInstanceState); mCounter=savedInstanceState.getInt(KEY_COUNTER); }
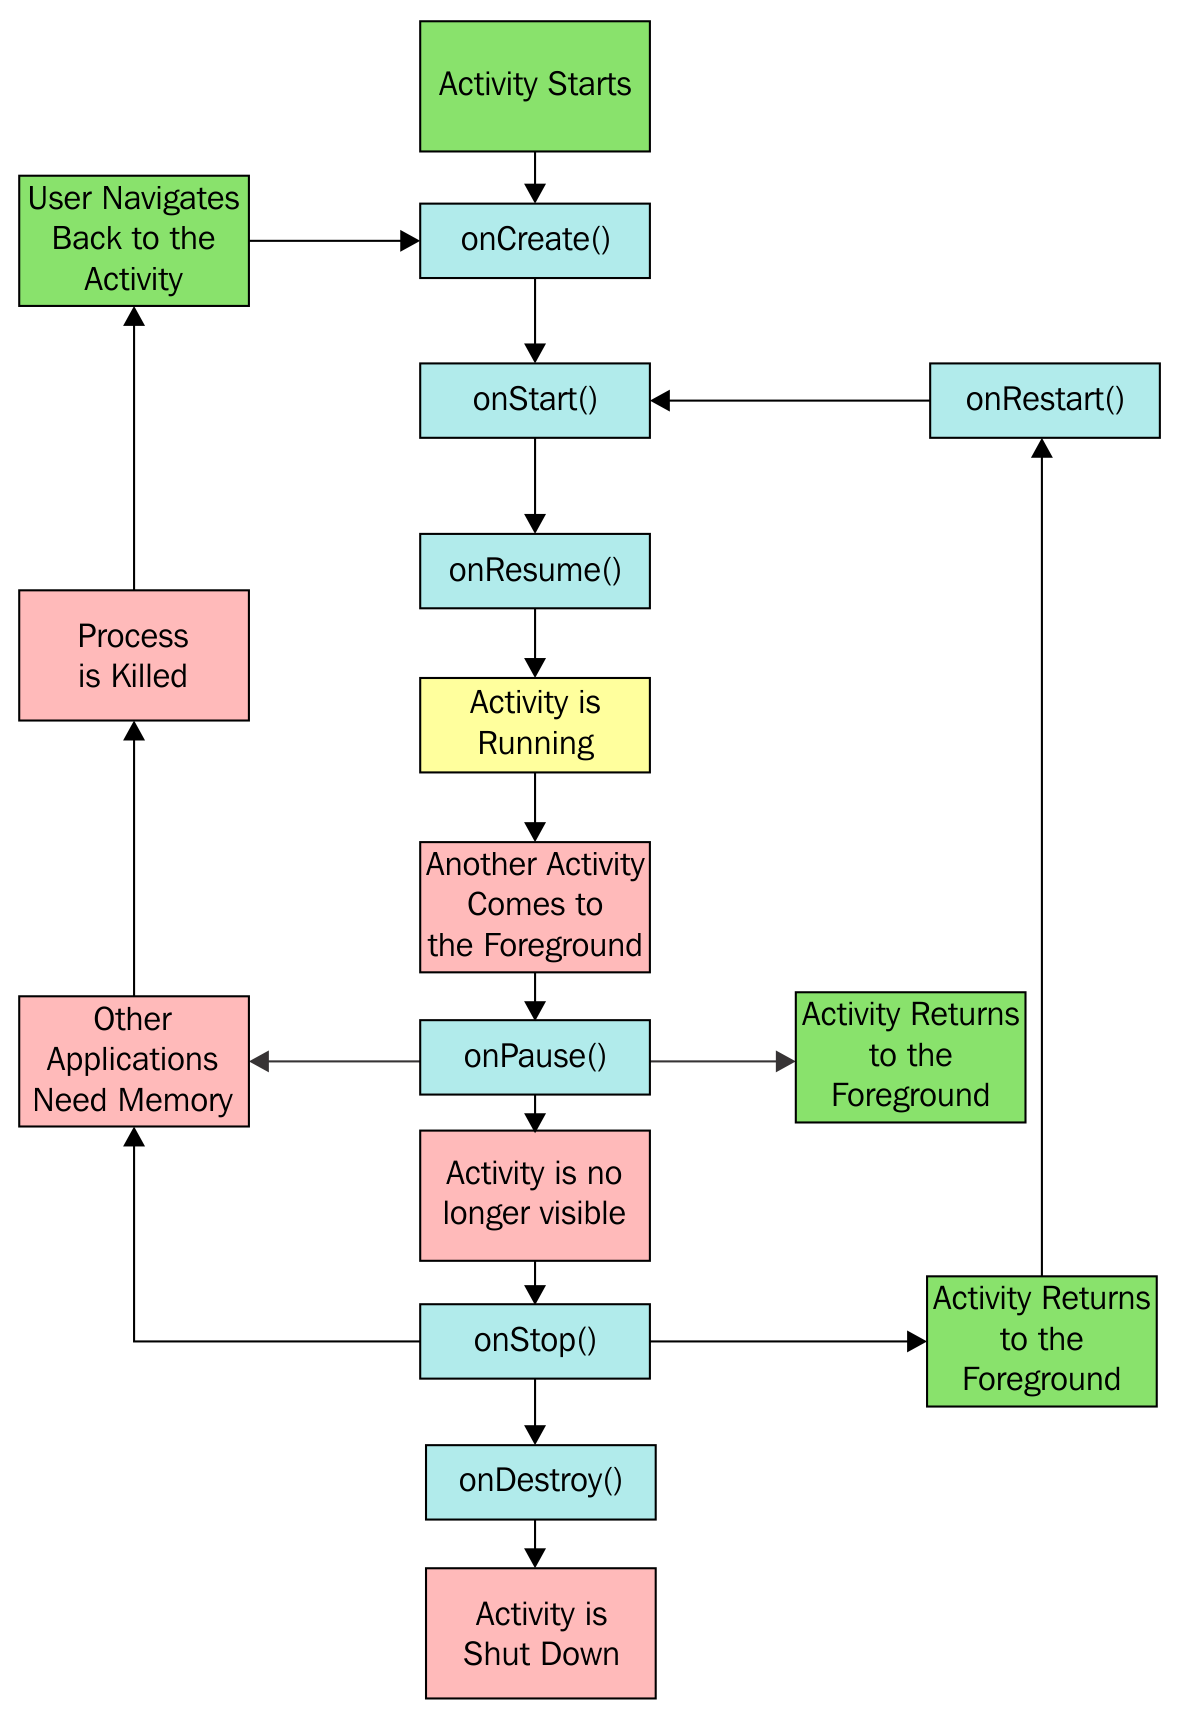
All activities go through multiple states during their lifetime. By setting up callbacks to handle the events, we can have our code save important information before the activity is destroyed.
Step 3 is where the actual saving and restoring occurs. The OS sends a Bundle (a data object that also uses name/value pairs) to the methods. We use the onSaveInstanceState()
callback to save the data and pull it out in the onRestoreInstanceState()
callback.
But wait! Did you try typing text in the EditText
view before rotating the device? If so, you'd have noticed that the text was also restored, but we don't have any code to handle that view. By default, the system will automatically save the state, provided it has a unique ID.
The onRestoreInstanceState()
callback is not the only place where the state can be restored. Look at the signature of onCreate()
:
onCreate(Bundle savedInstanceState)
Both methods receive the same Bundle
instance named savedInstanceState
. You could move the restore code to the onCreate()
method and it would work the same. But one catch is that the savedInstanceState
bundle will be null if there is no data, such as during the initial creation of the activity. If you want to move the code from the onRestoreInstanceState()
callback, just check to make sure that the data is not null. Here's how that code would look:
if (savedInstanceState!=null) { mCounter = savedInstanceState.getInt(KEY_COUNTER); }
Being able to store information about our activities on a temporary basis is very useful, but more often than not, we will want our application to remember information across multiple sessions.
Android supports SQLite, but that could be a lot of overhead for simple data, such as the user's name or a high score. Fortunately, Android also provides a lightweight option for these scenarios with SharedPreferences
. (In a real-world application, you'll likely use both options for saving data.)
You can either use the project from the previous recipe or start a new project and call it PersistentData
. In the previous recipe, we saved mCounter
in the session state. In this recipe, we'll add a new method to handle onPause()
and save mCounter
to SharedPreferences
. We'll restore the value in onCreate()
.
We have only two changes to make, and both are in MainActivity.java
:
onPause()
method to save the data before the activity closes:@Override protected void onPause() { super.onPause(); SharedPreferences settings = getPreferences(MODE_PRIVATE); SharedPreferences.Editor editor = settings.edit(); editor.putInt(KEY_COUNTER, mCounter); editor.commit(); }
onCreate()
to restore the counter:SharedPreferences settings = getPreferences(MODE_PRIVATE); int defaultCounter = 0; mCounter = settings.getInt(KEY_COUNTER, defaultCounter); ((TextView)findViewById(R.id.textViewCounter)) .setText("Counter: " + Integer.toString(mCounter));
As you can see, this is very similar to saving state data, because it also uses name/value pairs. Here, we just stored an int
, but we can just as easily store one of the other primitive data types. Each data type has equivalent getters and setters, for example, SharedPreferences.getBoolean()
or SharedPreferences.setString()
.
Saving our data requires the services of SharedPreferences.Editor
. This is evoked with edit()
and accepts remove()
and clear()
procedures, as well as setters such as putInt()
. Note that we must conclude any changes with the commit()
statement.
There is a slightly more sophisticated variant of the getPreferences()
accessor: getSharedPreferences()
. It can be used to store multiple preference sets.
Using getSharedPreferences()
is no different from using its counterpart, but it allows for more than one preference file. It takes the following form:
getSharedPreferences(String name, int mode)
Here, name
is the file. The mode
can be either MODE_PRIVATE
, MODE_WORLD_READABLE
, or MODE_WORLD_WRITABLE
and describes the file's access levels.
As mobile hardware continues to improve, so too does the demand placed on that hardware. With increasingly more powerful applications and user multi-tasking, the already limited resources can be quite challenging. The Android OS has many features built in to help the user get the best performance from their device, such as limiting background processes, disabling application notifications, and allowing data limits. The OS will also manage application lifetime based on foreground tasks. If your application is in the foreground, the life cycle is straightforward. But as soon as your user switches tasks and your application is moved to the background, understanding the Android application life cycle becomes very important.
The following diagram shows the stages through which an activity passes during its lifetime:
Along with the stages, the diagram also shows the methods that can be overridden. As you can see, we've already utilized most of these methods in the preceding recipes. Hopefully, getting the big picture will help your understanding.
Create a new project in Android Studio with a Blank Activity
, and call it ActivityLifecycle
. We will use the (auto-generated) TextView
method to display the state information.
To see the application move through the various stages, we will create methods for all the stages:
activity_main.xml
and add an ID to the auto-generated TextView
:android:id="@+id/textViewState"
MainActivity.java
. Modify the onCreate()
method to set the initial text:((TextView)findViewById(R.id.textViewState)).setText("onCreate()n");
@Override protected void onStart() { super.onStart(); ((TextView)findViewById(R.id.textViewState)).append("onStart()\n"); } @Override protected void onResume() { super.onResume(); ((TextView)findViewById(R.id.textViewState)).append("onResume()\n"); } @Override protected void onPause() { super.onPause(); ((TextView)findViewById(R.id.textViewState)).append("onPause()\n"); } @Override protected void onStop() { super.onStop(); ((TextView)findViewById(R.id.textViewState)).append("onStop()\n"); } @Override protected void onRestart() { super.onRestart(); ((TextView)findViewById(R.id.textViewState)).append("onRestart()\n"); } @Override protected void onDestroy() { super.onDestroy(); ((TextView)findViewById(R.id.textViewState)).append("onDestroy()\n"); }
Our activity can exist in one of these three states: active, paused, or stopped. There is also a fourth state, destroyed (but there's no guarantee the OS will ever call it):
active
state when its interface is available for the user. It persists from onResume()
until onPause()
, which is brought about when another activity comes to the foreground. If this new activity does not entirely obscure our activity, then ours will remain in the paused
state until the new activity is finished or dismissed. It will then immediately call onResume()
and continue.stopped
state, and resumption will always invoke a call to onRestart()
.paused
or stopped
state, the operating system can (and will) remove it from the memory when the memory is low or when other applications demand it.
onDestroy()
method, as the activity is removed by this point. If you want to explore these methods further, then it is well worth employing Activity.isFinishing()
to see whether the activity is really finishing before onDestroy()
is executed, as seen in the following snippet:@Override public void onPause() { super.onPause(); ((TextView)findViewById(R.id.textViewState)).append("onPause()\n"); if (isFinishing()){ ((TextView)findViewById(R.id.textViewState)).append(" ... finishing"); } }
To shut down an activity, directly call its finish()
method, which in turn calls onDestroy()
. To perform the same action from a child activity, use finishFromChild(Activity child)
, where child
is the calling subactivity.
It is often useful to know whether an activity is being shut down or merely paused, and the isFinishing(boolean)
method returns a value that indicates which of these two states the activity is in.
Where there is an eBook version of a title available, you can buy it from the book details for that title. Add either the standalone eBook or the eBook and print book bundle to your shopping cart. Your eBook will show in your cart as a product on its own. After completing checkout and payment in the normal way, you will receive your receipt on the screen containing a link to a personalised PDF download file. This link will remain active for 30 days. You can download backup copies of the file by logging in to your account at any time.
If you already have Adobe reader installed, then clicking on the link will download and open the PDF file directly. If you don't, then save the PDF file on your machine and download the Reader to view it.
Please Note: Packt eBooks are non-returnable and non-refundable.
Packt eBook and Licensing When you buy an eBook from Packt Publishing, completing your purchase means you accept the terms of our licence agreement. Please read the full text of the agreement. In it we have tried to balance the need for the ebook to be usable for you the reader with our needs to protect the rights of us as Publishers and of our authors. In summary, the agreement says:
If you want to purchase a video course, eBook or Bundle (Print+eBook) please follow below steps:
Our eBooks are currently available in a variety of formats such as PDF and ePubs. In the future, this may well change with trends and development in technology, but please note that our PDFs are not Adobe eBook Reader format, which has greater restrictions on security.
You will need to use Adobe Reader v9 or later in order to read Packt's PDF eBooks.
Packt eBooks are a complete electronic version of the print edition, available in PDF and ePub formats. Every piece of content down to the page numbering is the same. Because we save the costs of printing and shipping the book to you, we are able to offer eBooks at a lower cost than print editions.
When you have purchased an eBook, simply login to your account and click on the link in Your Download Area. We recommend you saving the file to your hard drive before opening it.
For optimal viewing of our eBooks, we recommend you download and install the free Adobe Reader version 9.