Chapter 8. Alerts and Notifications
In this chapter, we will cover the following topics:
- Lights, Action, and Sound - getting the user's attention!
- Creating a Toast with a custom layout
- Displaying a message box with AlertDialog
- Displaying a progress dialog
- Lights, Action, and Sound Redux using Notifications
- Creating a Media Player Notification
- Making a Flashlight with a Heads-Up Notification
- Notifications with Direct Reply
Android provides many ways to notify your user, including both visual and non-visual methods. Keep in mind, notifications distract your user, so it's a good idea to be very judicious when using any notification. Users like to be in control of their device (it is theirs, after all), so give them the option to enable and disable notifications as they desire. Otherwise, your user might get annoyed and uninstall your app altogether.
We'll start by reviewing the following non-UI-based notification options:
- Flash LED
- Vibrate phone
- Play ringtone
Then, we'll move on to visual notifications, including the following:
- Toasts
- AlertDialog
- ProgressDialog
- Status Bar Notifications
The recipes that follow will show you how to implement each of these notifications in your own applications. It's worth reading the following link to understand best practices when using notifications:
Lights, Action, and Sound – getting the user's attention!
Most of the recipes in this chapter use the Notification object to alert your users, so this recipe will show an alternative approach for when you don't actually need a notification.
As the recipe title implies, we're going to use lights, action, and sound:
- Lights: Normally, you'd use the LED device, but that is only available through the
Notification object, which we'll demonstrate later in the chapter. Instead, we'll take this opportunity to use setTorchMode() (added in API 23-Android 6.0), to use the camera flash as a flashlight. (Note: as you'll see in the code, this feature will only work on an Android 6.0 device with a camera flash.) - Action: We'll vibrate the phone.
- Sound: We'll use the
RingtoneManager to play the default notification sound.
As you'll see, the code for each of these is quite simple.
As demonstrated in the following Lights, Action, and Sound Redux using Notifications recipe, all three options, LED, vibrate, and sounds...
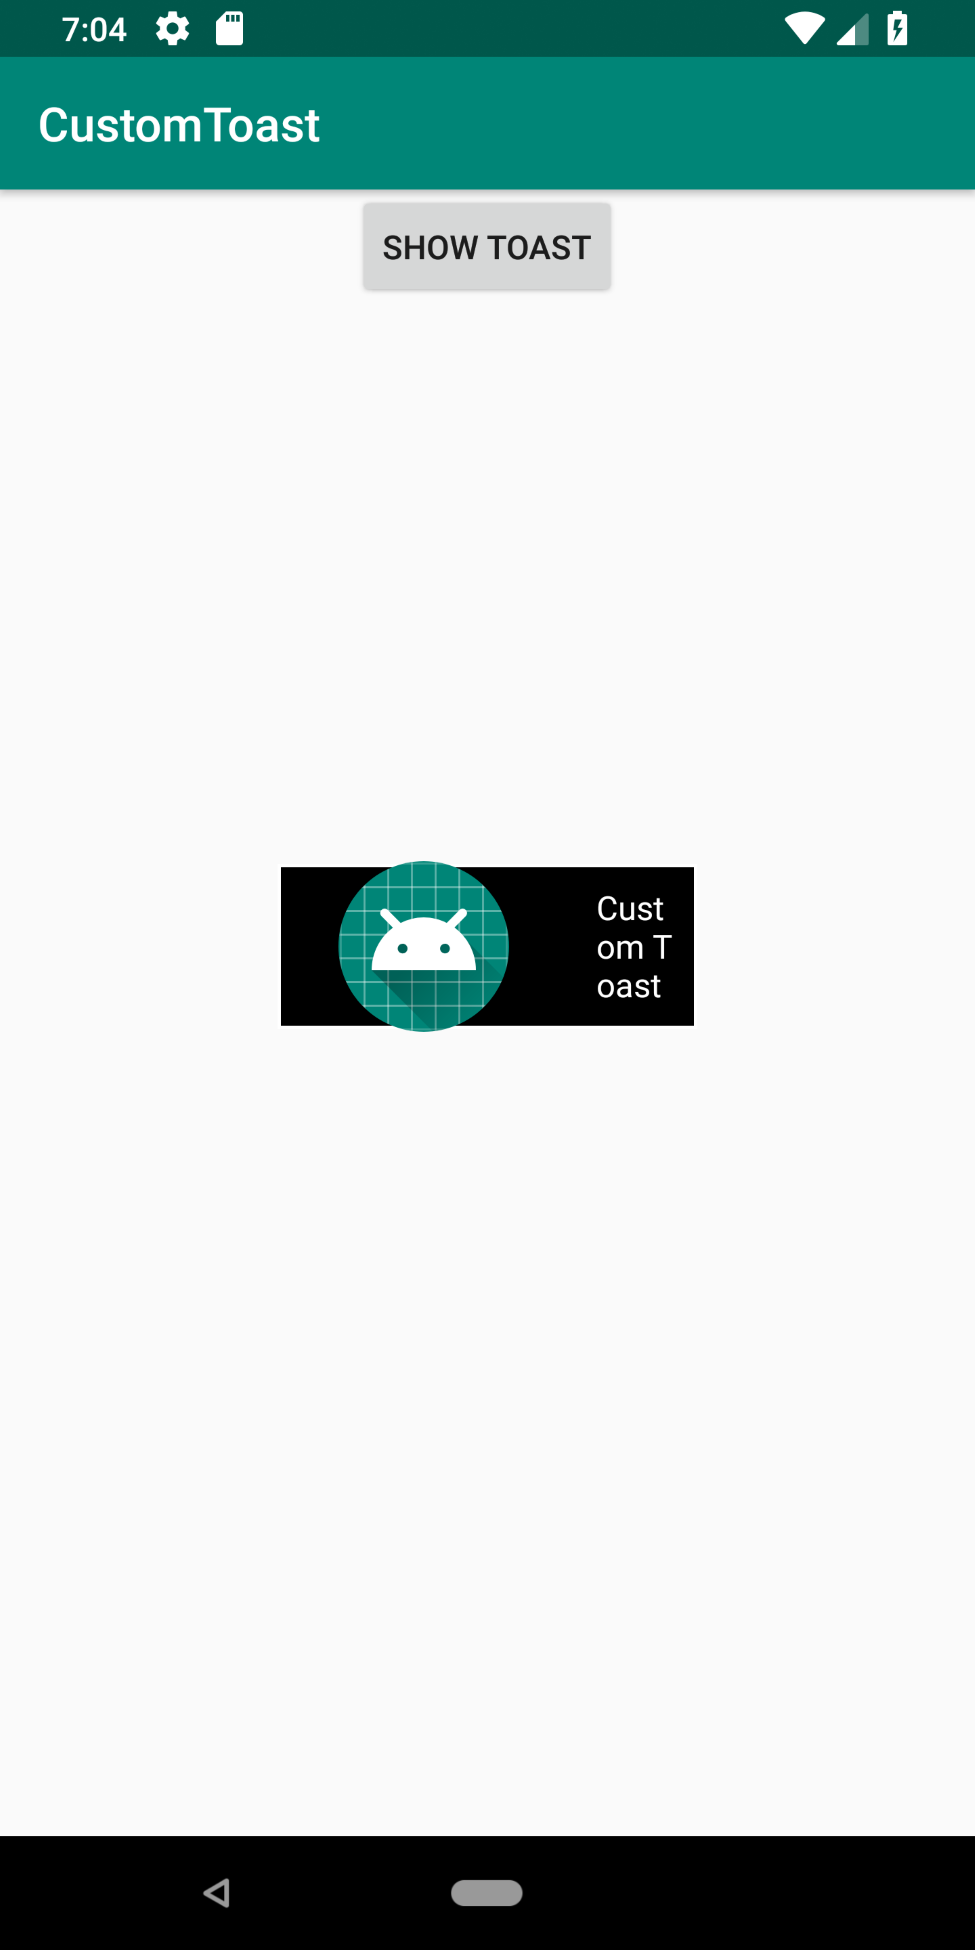
Creating a Toast with a custom layout
We've used Toasts quite a bit already in previous chapters as they provide a quick and easy way to display information, both for user notification and for ourselves when debugging.
The previous examples have all used the simple one-line syntax, but Toasts aren't limited to this. Toasts, like most components in Android, can be customized, as we'll demonstrate in this recipe.
Android Studio offers a shortcut for making a simple Toast statement. As you start to type the Toast command, you'll see the following:
Press Enter to auto-complete. Then, press Ctrl + spacebar and you'll see the following:
When you press Enter again, it will auto-complete with the following:
Toast.makeText(this, "", Toast.LENGTH_SHORT).show();
In this recipe, we'll use the Toast Builder to change the default layout, and gravity to create a custom Toast, as shown in the following screenshot:
Create a new project in Android Studio and call it CustomToast. Use the default Phone...
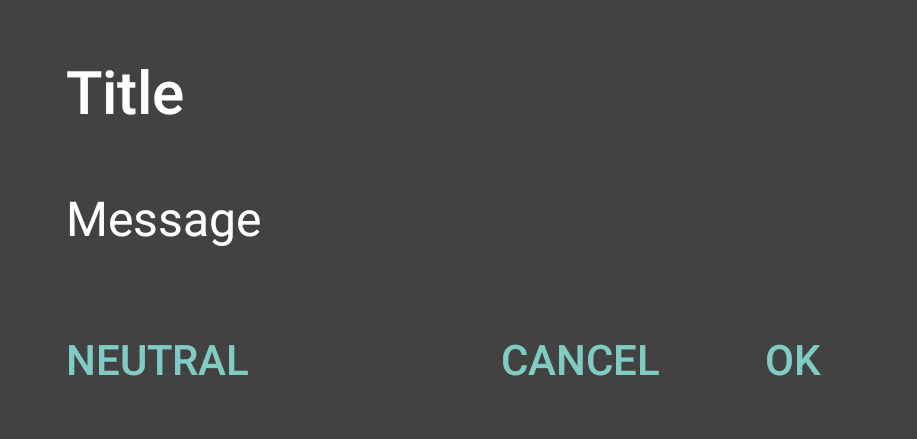
Displaying a message box with AlertDialog
In Chapter 4, Menus, we created a theme to make an Activity look like a dialog. In this recipe, we'll demonstrate how to create a dialog using the AlertDialog class. AlertDialog offers a Title, up to three buttons, and a list or custom layout area, as shown in the following example:
Note
The button arrangement can vary depending on the OS version.
Create a new project in Android Studio and call it AlertDialog. Use the default Phone & Tablet options and select the Empty Activity option when prompted for the Activity Type.
To demonstrate, we'll create a Confirm Delete dialog to prompt the user for confirmation after pressing the Delete button. Start by opening the main_activity.xml layout file and follow these steps:
- Add the following
<Button>:
<Button
android:id="@+id/buttonDelete"
android:layout_width="wrap_content"
android:layout_height="wrap_content"
android:text="Delete"
android:onClick="confirmDelete...
Displaying a progress dialog
ProgressDialog has been available since API 1 and is widely used. As we'll demonstrate in this recipe, it's simple to use, but keep this message in mind (posted on the Android Dialog Guidelines site at http://developer.android.com/guide/topics/ui/dialogs.html):
Note
Android includes another dialog class called ProgressDialog that shows a dialog with a progress bar. However, if you need to indicate loading or indeterminate progress, you should instead follow the design guidelines for Progress & Activity and use a ProgressBar in your layout.
This message doesn't mean ProgressDialog is deprecated or is bad code. It's suggesting that the use of ProgressDialog should be avoided since the user cannot interact with your app while the dialog is displayed. If possible, use a layout that includes a progress bar (so other views are still usable), instead of stopping everything with ProgressDialog.
The Google Play app provides a good example. When adding items to download...
Lights, Action, and Sound Redux using Notifications
You're probably already familiar with Notifications as they've become a prominent feature (even making their way to the desktop environment) and for good reason. They provide an excellent way to raise information for your user. They provide the least intrusive option of all the alerts and notification options available.
As we saw in the first recipe, Lights, Action, and Sound - getting the user's attention! Lights, vibration, and sound are all very useful means of getting the user's attention. That's why the Notification object includes support for all three options, as we'll demonstrate in this recipe. Given this ability to get your user's attention, care should still be taken not to abuse your user. Otherwise, they'll likely uninstall your app. It's generally a good idea to give your users the option to enable/disable notifications and even how to present the notification: with sound or without, and so on.
Creating a Media Player Notification
This recipe is going to take a look at the new Media Player style introduced in Android 5.0 (API 21). Unlike the previous recipe, Lights, Action, and Sound Redux using Notifications, which used NotificationCompat, this recipe does not, as this style is not available in the support library.
Here's a screenshot showing how the notification will appear:
This screenshot shows an example of the Media Player Notification on a lock screen:
Create a new project in Android Studio and call it MediaPlayerNotification. In the Target Android Devices dialog, select API 21: Android 5.0 (Lollipop), or higher, for this project. Select Empty Activity on the Add an Activity to Mobile dialog.
We just need a single button to call our code to send the notification. Open activity_main.xml and follow these steps:
- Replace the existing
<TextView> with the following button code:
<Button
android:id="@+id/button"
android:layout_width="wrap_content...
Making a Flashlight with a Heads-Up Notification
Android 5.0-Lollipop (API 21) introduced a new type of notification called the Heads-Up Notification. Many people do not care for this new notification as it can be extremely intrusive, as it forces its way on top of other apps. (See the following screenshot.) Keep this in mind when using this type of notification. We're going to demonstrate the Heads-Up Notification with a Flashlight as this demonstrates a good use case scenario.
Here's a screenshot showing the Heads-Up Notification we'll create further on:
If you have a device running Android 6.0, you may have noticed the new Flashlight settings option. As a demonstration, we're going to create something similar in this recipe.
Create a new project in Android Studio and call it FlashlightWithHeadsUp. When prompted for the API level, we need API 23 (or higher) for this project. Select Empty Activity when prompted for the Activity Type.
Our activity layout will consist...
Notifications with Direct Reply
One of the most exciting new features introduced in Android N was inline reply, called Direct Reply. With Direct Reply, users can respond without leaving the Notification Bar!
In this recipe, we’ll add the ability to create an inline reply by passing a RemoteInput to the addRemoteInput() method.
Create a new project in Android Studio and call it DirectReply. In the Target Android Devices dialog, select the Phone & Tablet option and choose API 24: Android Nougat 7.0 (or later) for the Minimum SDK. Select Empty Activity when prompted for the Activity Type.
Our app will consist of a single button on the main screen to initiate the initial notification. Start by opening activity_main.xml and follow these steps:
- Replace the existing
TextView with the button XML:
<Button
android:layout_width="wrap_content"
android:layout_height="wrap_content"
android:text="Send Notification"
android:id="@+id/buttonSend"
android:onClick="onClickSend...