Search icon
Arrow left icon
All Products
Best Sellers
New Releases
Books
Videos
Audiobooks
Learning Hub
Newsletters
Free Learning
Arrow right icon
Unity for Architectural Visualization

You're reading from  Unity for Architectural Visualization

Product type Book
Published in Sep 2013
Publisher Packt
ISBN-13 9781783559060
Pages 144 pages
Edition 1st Edition
Languages
Author (1):
Stefan Boeykens Stefan Boeykens
Profile icon Stefan Boeykens

Chapter 2. Quick Walk Around Your Design

This chapter will briefly go over the full process of loading a CAD or BIM model in Unity, setting up scaling and colliders, adapt some common materials, and add a general lighting setup. We add a basic navigational control setup to walk around, and hit play to walk around our design.

Further chapters will go into more detail on how to improve the visual quality and how to add more interactivity, but if you have time for only one single chapter, this chapter will at least get your project in a usable state, with only a minor effort.

In this chapter, we will cover:

  • Project setup

  • Loading a model

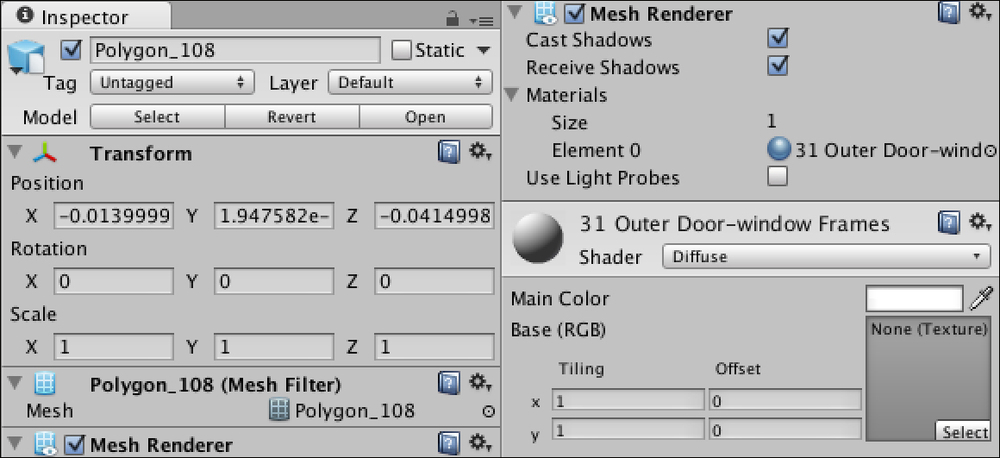
  • Meshes and materials, or shaders

  • Adding sun light

  • Add navigation

Setting up an (almost) empty Unity project


The first thing you need to ensure is that you have a 3D model that you want to explore and you have a way to export it into one of the Unity supported formats. Please revisit Chapter 1, An Integrated Unity Workflow, to get more insight into this workflow.

When you launch Unity, by default it loads the last project you worked on. If this is a fresh install, this is usually the sample project called AngryBots that was installed, but while impressive, it is way too elaborate to use as a starting point. Start this chapter by creating a new, empty project by navigation to File | New Project…, which opens the Project Wizard as shown in the following screenshot. To open this wizard directly, hold the Alt key while launching Unity.

From this dialog, we can import Packages that have been installed with Unity. Packages are compressed files that contain a series of ready-to-use Assets. Check the Character Controller package for this example and skip the others...

Loading up a CAD model


Whatever the program or workflow you use, you need to save a 3D model in a format Unity recognizes. You either save the model directly inside the Assets folder from within your modeling software Save As… or Export… dialog, but you can also drag the file onto the Unity project window. The end result is the same.

Can you show me, please?

We will illustrate this using Graphisoft ArchiCAD and Maxon CINEMA 4D. The workflow when using Autodesk Revit or AutoCAD in combination with 3ds Max is similar.

Since you cannot export from ArchiCAD to the recommended FBX or Collada formats directly, you need conversion software. While many modeling systems, including ArchiCAD, support exporting to 3DS (old 3D Studio for DOS format, before 3ds Max was created) or OBJ (old Alias Wavefront format, before Maya was released), these formats present certain limitations and make the update process cumbersome.

In the particular combination of ArchiCAD and CINEMA 4D, it is advised to use the Exchange...

Meshes and materials, or Shaders


Select the model in the Hierarchy Tab and fold out the small triangle to see the hierarchical outline of parent and child objects. When you select any of the child objects, it usually has a Mesh Filter containing the geometry, a Mesh Renderer, which has shadow settings and a list of assigned materials. For each material there is a separate Materials component, which displays the material properties. This is shown in the following screenshot:

Note

Beware that materials are shared between objects, so adjustments are effective on all objects that reference this material.

Most materials use the basic Diffuse shader or material definition and we will leave them for now. You could tweak the material for glass objects a bit, to emulate something more reflective, but we will look at this in more detail in Chapter 6, Shaders and Textures.

You can adjust the tiling and offset of the material component, but this has effect on every geometric object where this material...

Adding sun light


Without lighting the scene looks quite dark and dull. For architectural scenes and environments, you probably need a sun-like light source. We will add a Directional Light by navigating to GameObject | Create Other | Directional Light. This is a light source that emits light in one particular, parallel direction. Its position does not matter.

Press E to activate the Rotation tool and drag the colored circles of the Rotate Gizmo to point it downward, as direction is very important. This can be seen in the following screenshot:

While we said that position doesn't matter, it often makes sense to place the Directional Light slightly above the scene, with the rays pointing towards your design, as a visual clue for yourself.

You can adjust Color and Intensity to your liking. Slightly yellow with intensity between 0.5 and 1 is a good starting point. You can also activate the Shadow Type, which enables real-time shadows. Beware that this can be computationally expensive. Further setup...

Adding navigation using a first person controller


In most interactive 3D environments, you have a basic choice of two main navigational configurations when you want to walk around: first and third person perspective.

When Unity is installed, it comes with a set of packages that add assets for common tasks. If you forgot to check the Character Controller package when we initiated the game project, you can still do so from the Assets menu by navigating to Assets | Import Package | Character Controller.

In the Project tab, you can find the First Person Controller (FPC) in the Standard Assets | Character Controller folder. Drag it onto the Hierarchy or Scene window. Position it using the Move and Rotate gizmos where you want to start in the scene and ensure the bottom side of the Capsule geometry is slightly above the ground, to avoid falling through into the oblivion.

If there is no ground geometry in your project, you could add a Plane GameObject with Transform Position Y=0, to act as a simple...

Minding the gap


While the above sections are a minimal but complete overview of how to set up an interactive walk around your architectural model, some additional recommendations and tips are valuable, such as:

  • To walk around your model, provide a terrain or at least a slab to walk on. As an alternative, you can use a Plane or Quad GameObject or, even better, a Unity Terrain.

  • When you notice your character cannot get up the stairs or onto a slope, you will have to adjust the properties of the Character Controller component of the FPC, such as Step Offset and Slope Limit.

  • When you can see through the walls when you get too close to it, lower the Near Clipping Plane of the Camera component.

  • If your character cannot pass through a door opening, try lowering the Radius of the Character Controller component.

  • Unity sometimes freezes when characters collide with geometry that is too complex, for example, plants or furniture objects with a full Mesh collider. Replace the collider with a simplified one...

Summary


There we are. We made a complete, free-roaming, real-time environment from a CAD or BIM model. That was not too hard, was it?

When all you need is a quick walk through around a CAD model, this chapter will help you a lot. This chapter explained the basic steps of exporting your model into Unity and adding a sun and a navigation control system.

It is wise to have a fast and predictable recipe, as it usually works out fine, especially when you are pressed by a deadline looming around the corner. This basic setup is the minimum that is required for an interactive scene.

Job done? Not quite. What we have shown in this quick overview might be impressive for your very first project, but if it is needed to sell a design, there is much more to it! The next chapter will start with getting a better lighting setup, including shadows.

lock icon The rest of the chapter is locked
You have been reading a chapter from
Unity for Architectural Visualization
Published in: Sep 2013 Publisher: Packt ISBN-13: 9781783559060
Register for a free Packt account to unlock a world of extra content!
A free Packt account unlocks extra newsletters, articles, discounted offers, and much more. Start advancing your knowledge today.
Unlock this book and the full library FREE for 7 days
Get unlimited access to 7000+ expert-authored eBooks and videos courses covering every tech area you can think of
Renews at AU $19.99/month. Cancel anytime}