Chapter 3. Starting to Develop with Microsoft Azure
So far, we've got everything ready in the Microsoft Azure portal with an account setup, and designed the architecture of our system. Next, we're going to start preparing ourselves to build the case study services by covering the following topics:
Preparing our development environment
Signing up for Visual Studio Online for source version control
Creating the initial sales customer website
Publishing the website to Azure
Setting up continuous deployment
Preparing our development environment
There's a fair chance you've got all the tools you need, and if you're already doing some Microsoft Azure development, you can probably skip most of this. If you want to look at phone development in, it's worth reading the Mobile development section.
Throughout this book, I will be using Visual Studio Professional 2013 as it allows me to work on various project types in one solution. Don't worry if you don't have a premium version such as Professional or Ultimate as you can use multiple versions of Visual Studio Express instead, which are as follows:
Visual Studio Express 2013 for Web: You'll mostly need this, and when I talk about Visual Studio without being specific, this is the one to use if you're sticking to Express versions
Visual Studio Express 2013 for Windows Desktop: If you want to build the WPF apps for the production management system and the Service Bus messaging simulator, you'll need this
Visual Studio Express 2013 for...
Checking for Visual Studio updates
It's worth checking for updates periodically because the toolset is constantly changing to match updates and new features in Azure. We can see notifications in the notifications hub (http://blogs.msdn.com/b/visualstudio/archive/2013/09/16/notifications-in-visual-studio-2013.aspx) and also by going to TOOLS | Extensions and Updates..., as shown in the following screenshot:
Then, update all the extensions and updates you need. There are two important ones for us here, Visual Studio 2013 Update 1 and Windows Azure SDK 2.3:
We're going to create a basic MVC 5 website, which will become our sales customer website for the case study.
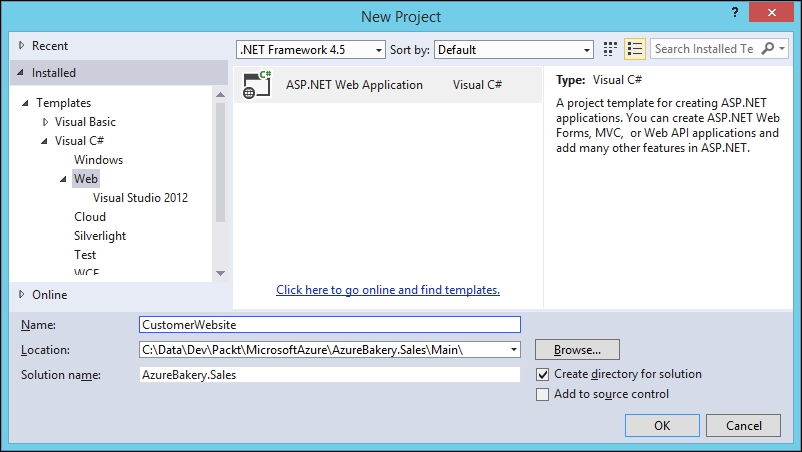
Before you create the project, set up your local development folder with a main subfolder, which is a good practice for Team Foundation Server (TFS) allowing solutions to be branched easily.
Launch Visual Studio and go to create a new project (go to Start | New Project or press Ctrl + Shift + N) and select Web from the categories and enter a project name:
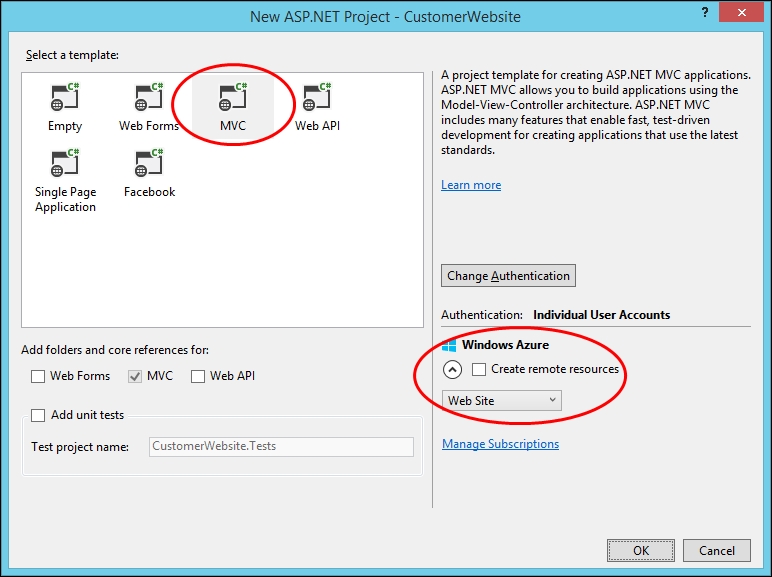
Click on OK and we will see the Web template options dialog; in the previous versions of Visual Studio, templates will be in the Project dialog:
Select MVC from the template options and leave everything as default. You'll notice that there is a Create remote resources option under the Windows Azure section in the bottom-right corner of the screen, which can automatically provision a website (and database, if required) ready for publishing. We're going to do it manually to help explain how everything fits together...
Configuring a website in the portal
Next, we need to create a website in Azure to publish our site on. We'll do this using the following procedure:
From the Create New menu, go to COMPUTE | WEB SITE | QUICK CREATE and pick a name for the website:
Click on CREATE WEBSITE and you should see your new website listed in the portal:
Click on the newly listed website to go to the website's workspace:
We're going to enable staged deployments, so we can deploy to a staged environment for testing, and then swap later for production (in Chapter 2, Designing a System for Microsoft Azure, we covered a section on environments and we're going to use a staging slot for testing). First, we need to put the website in a STANDARD service mode; so click on the SCALE tab and click on STANDARD under the WEB HOSTING PLAN MODE section:
Watch the INSTANCE SIZE field as it may default to a large value incurring the highest cost; I dropped mine down to the smallest instance.
Click on SAVE on the bottom toolbar, and then...
Creating a Visual Studio Online project
Visual Studio Online is a fairly new product, which offers us online application development tools and Application Lifecycle Management (ALM) tools such as team projects, code repositories, bug tracking, task management, and others, depending on your user plan; if you've used Team Foundation Server (TFS), you'll find that Visual Studio Online is pretty much the same.
There are a number of user plans available, which depend on the size of the development team and the specific requirements you may have. You can check out the different options in detail at http://www.visualstudio.com/products/visual-studio-online-overview-vs.
Azure also has good support for Git version control too, allowing Node.js backend mobile services and websites to be pushed to the cloud. It's also possible to set up continuous deployment from a web repository such as GitHub or Bitbucket to an Azure website. The Kudu service built in all Azure websites compiles the website when it...
Setting up continuous deployment
We're now going to check our website into TFS and set up continuous deployment so that our website is built and published to the staging slot whenever we check in code changes.
Adding a solution to source control
To add a solution to source control, perform the following steps:
First of all, we need to add our solution to TFS in our Visual Studio Online account. From the FILE menu, go to Source Control | Add Solution to Source Control...:
Select Team Foundation Version Control (default) from the next dialog and click on OK. In the Connect to Team Foundation Server dialog, click on the Servers... button; then, on the Add/Remove Team Foundation Server dialog, click on Add.... After that, enter the URL of our Visual Studio Online account from the Azure portal:
Sign in when prompted, and then click on Close on the Add/Remove Team Foundation Server dialog.
Select the team project in the Connect to Team Foundation Server dialog and click on Connect:
Next, click on Make...
It can be useful to set up alerts in Visual Studio Online especially if you are working in a team. The following alert types are available:
Work Item Alerts: These are triggered when any work item related to you changes
Checkin Alerts: These occur when various checks on criteria are met
Build Alerts: These are triggered under various build events
Code review Alerts: These occur when a code review you are working on or a code review in the project changes
Setting up alerts allows us to view and edit our alert settings:
In the Visual Studio Online portal, go to the dashboard for your project and click on the settings button in the top-right corner of the screen:
In the admin window that opens, click on the Alerts tab and notice that there are some quick links down on the left-hand side under the CREATE NEW ALERT WHEN title, which we will use to quickly create some alerts:
We want to know when a build fails, so click on the A build fails link, have a quick look at the alert rules...
We've covered quite a lot in this chapter, preparing peripheral things such as setting up version control, continuous deployment, and alerts. This might seem like a lot to do initially, but we will benefit from doing these things now before we get deeper into the development process. Even if you don't want to implement continuous deployment, it's still a good practice to set up a build process to validate the integrity of your code during development, especially if you are working in a team.
Next, we're going to start looking at the data layer of our customer website for the Azure Bakery case study.