Chapter 5. Animating Your Characters
In the previous chapter, we looked at how characters are created in Lumberyard and how they can be imported from other digital content creation tools. We also took an in-depth look at Lumberyard's character tool, Geppetto. In this chapter, we will examine the process of animating our game characters. Our primary tool will be Mannequin, Lumberyard's animation tool. This chapter covers Mannequin's user interface and its functionality.
After reading this chapter, you will:
Understand animation concepts as they apply to 3D games
Understand the Mannequin filesystem
Be able to navigate the Mannequin user interface
Understand the Mannequin workflow
Understand the basics of Flow Graphs
Understand how animations are incorporated into Lumberyard games
Animation is more than the art of motion. The 3D games we play are full of motion, not all of it is animation. It is important to differentiate between the two. Motion is when an object moves or is moved. If an apple falls from a tree, it moved from the tree to the ground. This is an example of motion. Animation is when something moves on its own. The apple's descent to the ground did not occur because the apple was alive and decided to fall to its death; rather, the apple was forced to move either by gravity or other means.
When a player throws a hand grenade into a moving vehicle, the vehicle is likely to explode. The motion involved is the hand grenade's flight, and the vehicle's forward motion. The explosion will cause several particles of the vehicle, and people and things in it, to catapult in various directions. This is an example of physics creating motion. We will explore game physics in Chapter 6, Creating Gameplay. What about the player throwing the hand...
Lumberyard's Mannequin system is a key feature of the game engine and one that sets it apart from other game engines. With Mannequin, we can define movement fragments that are part of a set, or family, of movements. Each movement is given a unique identification so that it can be referenced by code and for grouping. As an example, we might have a power drink in our game that, when consumed, our character exhibits new behaviors. These might be longer strides, faster running, shaky hands, and a widened look of the eyes. Each of these can be crafted as movement fragments and grouped together and employed as needed.
This level of specificity allows us to create realistic animations in reaction to in-game behaviors, other characters, and environmental components. Nearly every character has a walk cycle. Imagine if your character had extreme fatigue based on a lack of water consumption and exposure to desert heat. That character might walk a bit differently. Instead of creating...
Getting familiar with Mannequin's UI
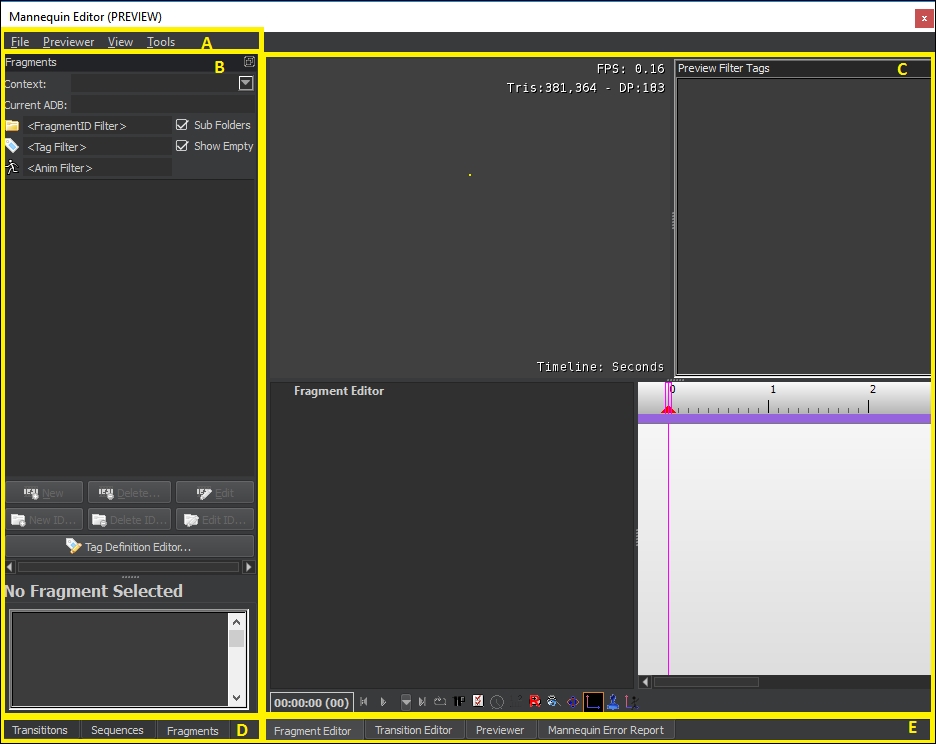
The Mannequin system is accessible using the top menu. Select View | Open View Pane | Mannequin Editor. As you can see in the following screenshot, there are five areas of the Mannequin interface:
Area A – pull-down menus
There are four top-level pull-down menus: File, Previewer, View, and Tools.
The menu options are not always enabled. They are contextual in nature which means they will only be enabled, or available to you, if they are of use based on the current context of your work.
The File menu provides you with the ability to:
Load a Preview Setup file. These files are XML files that were discussed in the previous section.
You can use the Context Editor to edit a Preview Setup file.
The Animation DB Editor is used to create and edit an animation database.
The Tag Definition Editor is where you can add, edit, remove, and manage your fragment tags. The green plus icon in the top-left corner of the Mannequin Tag Definitions Editor dialog window...
Before you can use Mannequin, you must create a Mannequin Entity. This process includes identifying the character model, the action controller, and the animation database. To access this functionality, you will select Entity | Anim | MannequinObject from the RollupBar.
As you can see from the following screenshot, you will next perform the following actions:
Name the Mannequin Object
Assign a material
Edit, as necessary, the entity's parameters
Assign the entity's properties:
Controller
Character model
Animation database
One of the keys to mastering Mannequin is to understand fragments and how they are used. Fragments, as previously mentioned, are snippets of motion also known as animation clips, or simply clips.
Transitions can be created between fragments so that the animations seem more natural. For example, when a person transitions from a walk to a run, they do not stop walking then start running. The transition between the two states (walking and running...
Adding animations to characters
Using the Mannequin Editor provides great control and fidelity with character animations. With Lumberyard, we have options other than just using the Mannequin Editor. We can also use Geppetto, Lumberyard's character tool.
In Chapter 4, Creating 3D Characters, we created a farmer boy character and applied skin and clothing material to it. Next, we will breathe life into it with animations.
To animate characters, you will first use a third-party modeling and animation tool such as Autodesk Maya or Autodesk 3DS Max. Those tools can export animations to compressed Intermediate Character Animation Files. These files have a *.i_caf file extension.
You can download the intermediate character animation files from the book's website. Here is a table with the filename and associated animation description: