

In this recipe, we will improve our GUI by adding drop-down comboboxes that can have initial default values. While we can restrict the user to only certain choices, we can also allow the user to type in whatever they wish.
Creating combobox widgets
Getting ready
This recipe extends the previous recipe, Setting the focus to a widget and disabling widgets.
How to do it...
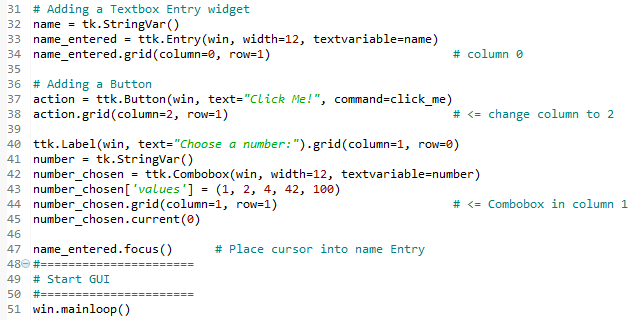
We insert another column between the Entry widget and the Button widget using the grid layout manager. Here is the Python code:
- Start with the GUI_set_focus.py module and save it as GUI_combobox_widget.py.
- Change the button column to 2:
action = ttk.Button(win, text="Click Me!", command=click_me)
action.grid(column=2, row=1)
- Create a new ttk.Label widget:
ttk.Label(win, text="Choose a number:").grid(cloumn=1, row=0)
- Create a new ttk.Combobox widget:
number_chosen = ttk.Combobox(win, width=12, textvariable=number)
- Assign values to the Combobox widget:
number_chosen['value'] = (1, 2, 4, 42, 100)
- Place the Combobox widget into column 1:
number_chosen.grid(column=1, row=1)
number_chosen.current(0)
The preceding steps produce the following code (GUI_combobox_widget.py):
- Run the code.
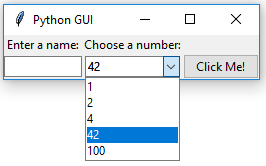
The code, when added to the previous recipes, creates the following GUI. Note how, in line 43 in the preceding code, we assigned a tuple with default values to the combobox. These values then appear in the drop-down box. We can also change them if we like (by typing in different values when the application is running):
Let's go behind the scenes to understand the code better.
How it works...
Line 40 adds a second label to match the newly created combobox (created in line 42). Line 41 assigns the value of the box to a variable of a special tkinter type StringVar, as we did in a previous recipe.
Line 44 aligns the two new controls (label and combobox) within our previous GUI layout, and line 45 assigns a default value to be displayed when the GUI first becomes visible. This is the first value of the number_chosen['values'] tuple, the string "1". We did not place quotes around our tuple of integers in line 43, but they were cast into strings because, in line 41, we declared the values to be of the tk.StringVar type.
The preceding screenshot shows the selection made by the user is 42. This value gets assigned to the number variable.
If 100 is selected in the combobox, the value of the number variable becomes 100.
Line 42 binds the value selected in the combobox to the number variable via the textvariable attribute.
There's more...
If we want to restrict the user to only being able to select the values we have programmed into the Combobox widget, we can do it by passing the state attribute into the constructor. Modify line 42 as follows:
- Start with the GUI_combobox_widget.py module and save it as GUI_combobox_widget_readonly.py.
- Set the state attribute when creating the Combobox widget:
number_chosen = ttk.Combobox(win, width=12, textvariable=number, state='readonly')
The preceding steps produce the following code (GUI_combobox_widget_readonly.py):

- Run the code.
Now, users can no longer type values into the Combobox widget.
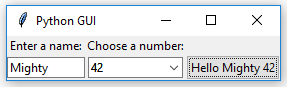
We can display the value chosen by the user by adding the following line of code to our button click event callback function:
- Start with the GUI_combobox_widget_readonly.py module and save it as GUI_combobox_widget_readonly_plus_display_number.py.
- Extend the button click event handler by using the get() method on the name variable, use concatenation (+ ' ' +), and also get the number from the number_chosen variable (also calling the get() method on it):
def click_me():
    action.configure(text='Hello ' + name.get() + ' ' +
    number_chosen.get())
- Run the code.
After choosing a number, entering a name, and then clicking the button, we get the following GUI result, which now also displays the number selected next to the name entered (GUI_combobox_widget_readonly_plus_display_number.py):
We've successfully learned how to add combobox widgets. Now, let's move on to the next recipe.