Reader small image

You're reading from  Designing Purpose-Built Drones for Ardupilot Pixhawk 2.1

Product typeBook
Published inDec 2017
PublisherPackt
ISBN-139781786469168
Edition1st Edition
Concepts
Right arrow
Author (1)
Ty Audronis
Ty Audronis
author image
Ty Audronis

Ty Audronis has been called a "technology-age renaissance man." Hes a professional drone pilot, post-production specialist in the entertainment and media industries, a highly experienced interactive game developer, and an accomplished digital artist. Hes worked for companies ranging from frog Design to California Academy of Sciences in roles where hes worn many hats. Tys been programming software and games since 1981 (when he was 8 years old) professionally. He majored in Computer Generated Animation and Visual Effects in college (where he won Best Animation for the entire CSU system a Rosebud Award). His music and sound design have been the soundtrack on several major productions; he has also served as a visual effects supervisor on feature films and was the supervising editor and animator for award-winning science visualizations. He has been building drones since the days when sensors and components had to be torn out of cell phones and game controllers. Ty is also a mentor, having taught many interns his skills, and speaks regularly at venues including Interdrone. He also serves on the advisory board for the Society of Aerial Cinematographers and for Genarts (now Boris) Sapphire.
Read more about Ty Audronis

Right arrow

Chapter 6. A Simple Multicopter Drone

Multicopters are very complex beasts. An awful lot can be done with Pixhawk and multicopters. Through the programming interface Micro Air Vehicle Link (MAVLink), all sorts of missions can be triggered automatically. From an alarm system trigger sending a drone out to a specific waypoint (based on the sensor triggered), to missions that adjust to varying conditions such as weather, light conditions, or any other number of variables only limited by your imagination—multicopters are the most versatile, yet complex, systems available for your design and concepts.

For the purposes of this book, we're going to keep things simple though. Once you're ready to take the leap into programming full applications for the MAVLink interface, there are great tutorials and a full coding guide at the QgroundControl website (http://www.mavlink.org/dev/mavlink_groundcontrol_integration_tutorial).

What we're going to do is show you how to design one of the most complex machines...

What is 360 VR video, and why make a drone for it?


A 360 VR video is exactly what it sounds like: a camera that shoots video across 360° in every direction (a full sphere). It allows a user wearing VR goggles (such as Oculus Rift) to look in any direction during the playback of the video (rather than being restricted to a single field of view with traditional cameras). Also, phones and other mobile devices can be used to view 360 video by moving the device (like a window into the VR world) in any direction. Pretty cool, huh?

Since early humans looked to the sky and saw their first bird, we've dreamed of flight. From Superman to Jessica Jones, people have capitalized on people's idolization of flight. So, why not us? With 360 VR video in the air, we can take people into the air, and let them fly. With some special software in postproduction, the drone can even be removed from the picture giving the wearer of a VR headset a fully immersive experience in flight without looking out a window.

But...

Spec-ing out the parts


We know we want something stable that can fly for decent periods of time. So it should be easy, right? Wrong. We can't just buy a Phantom and stick a 360 camera on it. The footage will be unstable. So we'll need something that has (what's known as) a gimbal on it. A camera gimbal (usually) uses brushless motors to counteract the tilt of a multirotor vehicle. Multirotors (as we said before) tilt to travel in different directions. We don't want our camera tilting along with it. Otherwise, every course correction will send viewers tilting and twitching in all sorts of ways. We want very smooth footage. You can see what a camera gimbal looks like in the following image:

Of course, our proof of concept gimbal won't be anything near this elaborate but the principle of their operation is the same. We need something to dampen vibration, and counter the constant tilting and rolling of a multicopter.

But we're getting a bit ahead of ourselves. What's a nice, inexpensive camera...

Running the numbers


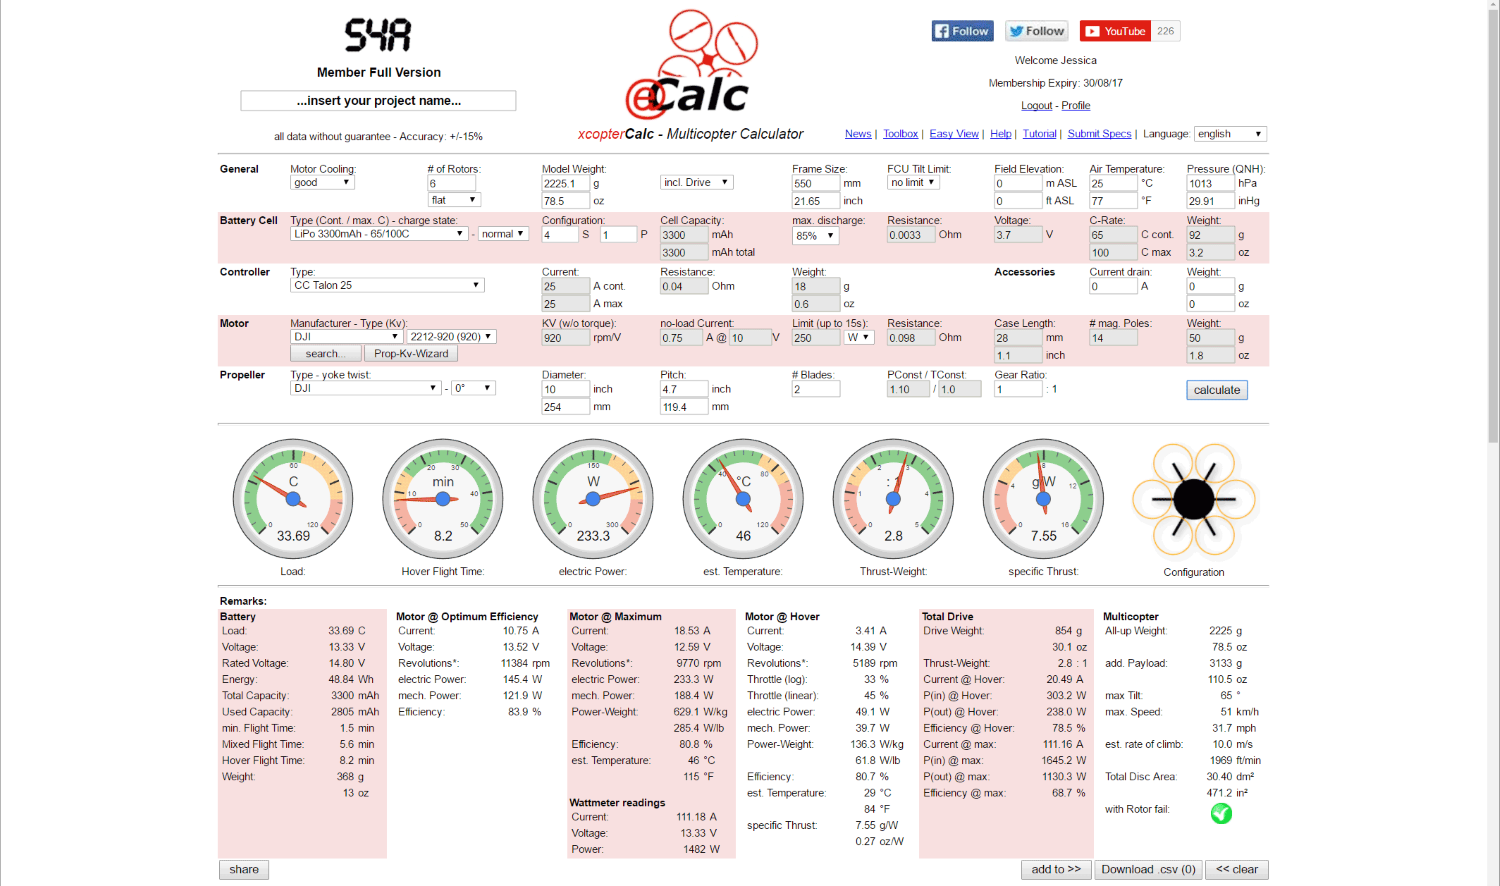
We're not going to bore you with all of the calculations involved in computing your potential flight times. Instead, there's an extremely handy online calculator for helping you with your multicopter designs at https://www.ecalc.ch/xcoptercalc.php.

The results we get with this configuration are shown in the following screenshot:

I know the font is really small to read. The bottom line? We get about 5.5 minutes of flight time. If we were going into a production prototype, we'd spend a ton of time (and probably a lot more money) tweaking our parts until we reach just the right balance of flight time and payload. But this is certainly not a production prototype. Not with the camera we'd want to eventually carry, and nowhere near the size we'd eventually want to go for. For a simple proof of concept, we can deal with 5-minute flights. If we really want, we can bump that up to just over 7 minutes with a 5,000 mAh battery. But that may overload our motors if we ever go full throttle...

Assembling the drone


As predicted, our retractable landing gear has not arrived yet. Not only that, they are having issues in customs. Good for us! We thought ahead and bought temporary landing gear; $20.99 well spent!

So, here's a glimpse of what our assembled drone looks like (with temporary landing gear):

Let's take a quick look at the building techniques on a multicopter drone.

Too many freakin' wires!

That thing looks like a mess, doesn't it? It's not. Cable management is the key. You don't want any wires in danger of obstructing (or even breaking) propellers. That spells instant crash. The following image shows how the wires to the ESCs and motors are routed under the airframe and bundled:

Not only that, but electromagnetic (EM) interference is your enemy in the air. It can completely disrupt your video, telemetry, GPS, or even control signals. So never wrap your cables in circles. Instead, notice that they're wrapped up in figure-eights (especially power leads).

Since we're on this angle...

Configuring Pixhawk and Mission Planner


We're going to set this up in several very cool ways. Here are our goals:

  1. Get the basic configuration of Pixhawk installed for multicopter operation.
  2. Hook up our FPV camera so that we receive the signal on the ground, and put it up in the Mission Planner interface. This way, we can watch one screen to get all our information.


  1. Set up a set of joysticks so that we can fly the multicopter with traditional helicopter-style (real-world) controls.

So, without further delay let's get started on this!

The initial configuration of Pixhawk

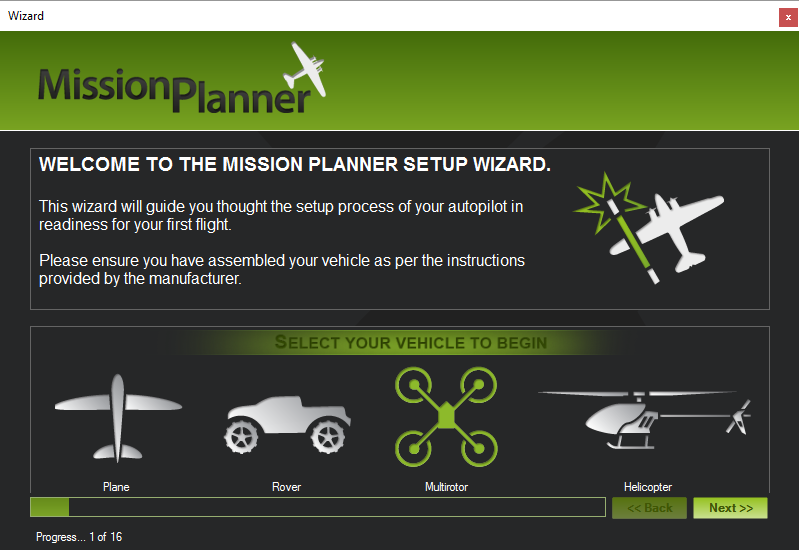
Obviously, plug in your Pixhawk to your computer via USB, connect to it in Mission Planner, and start up the wizard. First, let's run through the multirotor version of the setup wizard, and then we'll tweak things:

We're going to walk through each screen. By now, a lot of this will just be old hat. But still, information is better said and not needed than needed and not said.

Of course, select Multirotor as our vehicle type. Then...

Final configuration before test flights


Before trying to fly this thing, we need to make sure that every motor is hooked up to the right spot and is turning in the right direction. Remember our chart from before? Here's just the Hex-X from it as well as the Pixhawk with the six-motor servo ports highlighted:

Back in Mission Planner (while connected to your powered-on drone), go into Initial Setup, and under the Option Hardware section you'll find Motor Test. It looks like the following screenshot:

And here's the weird part. This test does not test the motors in number sequence. Not the same numbers as in the graph on the previous page. That number sequence only represents which motors are plugged into which port. Instead, these motor test buttons start with motor number 5, and then go in sequence around the aircraft in a clockwise fashion. This means they go in this order for a Hex-X:

  • Button A = Motor #5
  • Button B = Motor #1
  • Button C = Motor #4
  • Button D = Motor #6
  • Button E = Motor #2
  • Button F = Motor...

Summary


In this chapter, we learned a bit more on the philosophy of prototyping, kitbashing, and altering prefab parts for our purposes. We also learned how to configure Pixhawk for a multicopter, include a video feed in our laptop display, and use joysticks to control a drone. If that wasn't enough, we also learned how to balance power to weight on a multicopter. Now, you can see just what complicated beasts they are.

In the next chapter, we're going to take on the Holy Grail of dronery: a fixed wing drone. In a lot of ways, they're simpler than multicopters. But in reality they're not.

lock icon
The rest of the chapter is locked
You have been reading a chapter from
Designing Purpose-Built Drones for Ardupilot Pixhawk 2.1
Published in: Dec 2017Publisher: PacktISBN-13: 9781786469168
Register for a free Packt account to unlock a world of extra content!
A free Packt account unlocks extra newsletters, articles, discounted offers, and much more. Start advancing your knowledge today.
undefined
Unlock this book and the full library FREE for 7 days
Get unlimited access to 7000+ expert-authored eBooks and videos courses covering every tech area you can think of
Renews at $15.99/month. Cancel anytime

Author (1)

author image
Ty Audronis

Ty Audronis has been called a "technology-age renaissance man." Hes a professional drone pilot, post-production specialist in the entertainment and media industries, a highly experienced interactive game developer, and an accomplished digital artist. Hes worked for companies ranging from frog Design to California Academy of Sciences in roles where hes worn many hats. Tys been programming software and games since 1981 (when he was 8 years old) professionally. He majored in Computer Generated Animation and Visual Effects in college (where he won Best Animation for the entire CSU system a Rosebud Award). His music and sound design have been the soundtrack on several major productions; he has also served as a visual effects supervisor on feature films and was the supervising editor and animator for award-winning science visualizations. He has been building drones since the days when sensors and components had to be torn out of cell phones and game controllers. Ty is also a mentor, having taught many interns his skills, and speaks regularly at venues including Interdrone. He also serves on the advisory board for the Society of Aerial Cinematographers and for Genarts (now Boris) Sapphire.
Read more about Ty Audronis