Reader small image

You're reading from  Blender 3D By Example. - Second Edition

Product typeBook
Published inMay 2020
Reading LevelIntermediate
PublisherPackt
ISBN-139781789612561
Edition2nd Edition
Languages
Tools
Right arrow
Authors (2):
Oscar Baechler
Oscar Baechler
author image
Oscar Baechler

Oscar Baechler is a CG generalist, professor, painter, photographer, open source advocate, and community organizer who teaches at Lake Washington Institute of Technology. He's published a number of mobile games with a Blender pipeline and created animation for clients both big and small. Oscar runs the Seattle Blender User Group and Ballard Life Drawing Co-op and has presented on CGI at SIGGRAPH, LinuxFest Northwest, the Blender Conference, OSCON, Usenix LISA, SeaGL, SIX, WACC, and others.
Read more about Oscar Baechler

Xury Greer
Xury Greer
author image
Xury Greer

Xury is a digital media generalist and educator in the Greater Seattle Area. He earned his bachelor's degree in game design from Lake Washington Institute of Technology. He specializes in 3D characters, and technical art, and loves to share his knowledge. Xury is an avid member and Co-Organizer of the Seattle Blender User Group and aims to help others by teaching Blender, as well as other 3D content creation tools. He is always excited to get new users started on their digital media production journey.
Read more about Xury Greer

View More author details
Right arrow

Modeling a Time Machine - Part 1

In this chapter, we are going to begin building a time machine! So far, we've seen a little bit of the 3D workflow by editing an existing model, but now it's time to use some of those skills to build a model from scratch. This first part of the project will introduce you to the main modeling methods we will be using to build the time machine: box modeling and modeling with modifiers.

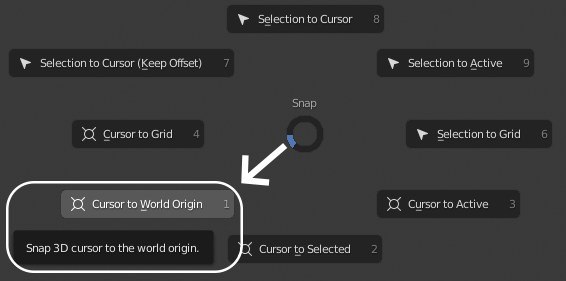
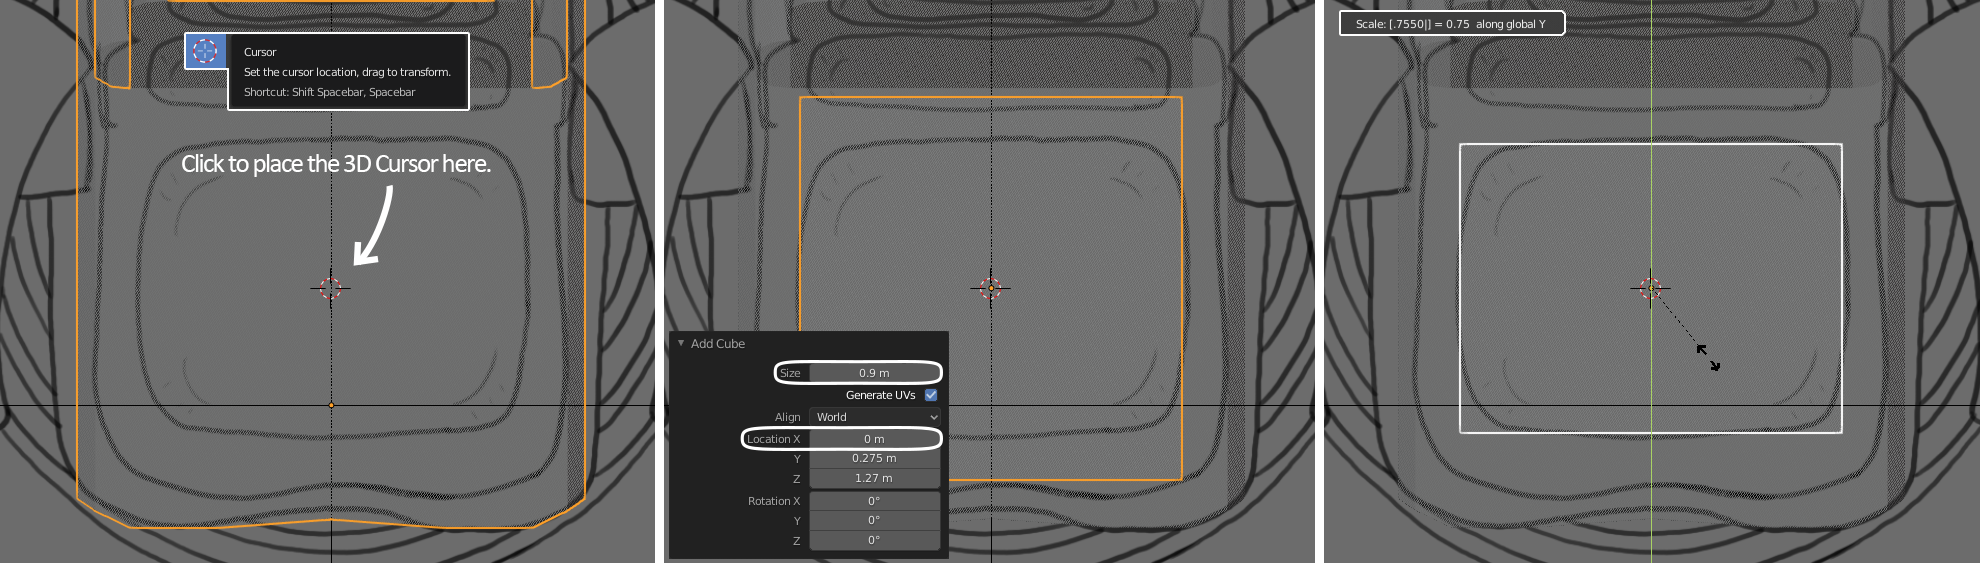
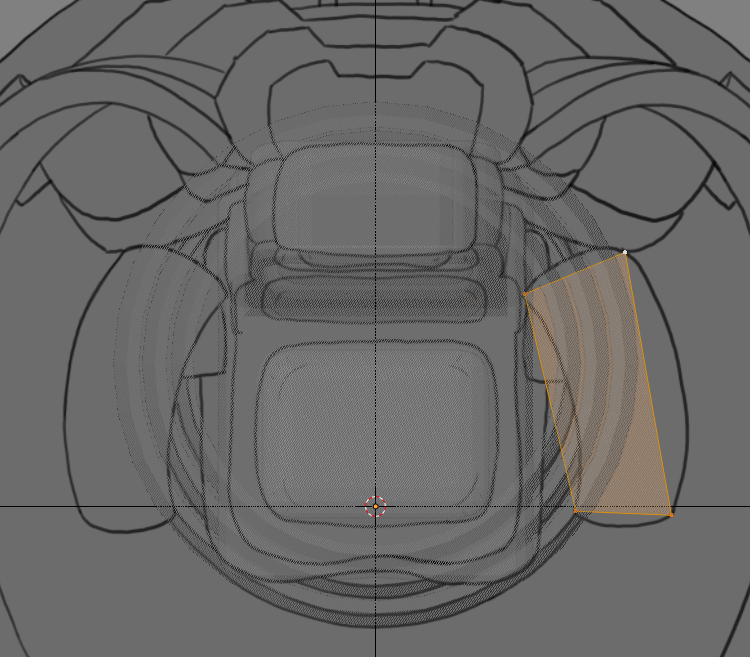
Box modeling is one of the oldest methods of modeling in the 3D industry; it uses primitives and extrusions to build up the major forms of a model before refining them into the final form. Primitives are standard geometrical shapes that we can use as a starting point for our models— a plane, cube, sphere, cylinder, cone, and torus.

Modeling with modifiers is somewhat unique to Blender. Modifiers are a very powerful set of non-destructive tools that...

Using transformation hotkeys

Unlike the previous chapter, we're going to start this project from scratch, so open Blender, and if you don't already have a fresh scene, go to File | New | General. The default scene has a default cube, a point light, and a camera.

Before we get started on the time machine, let's introduce a few important hotkeys. As stated in the previous chapter, Blender is full of hotkeys. To take full advantage of the software, you'll want to memorize several of them.

Hotkeys are especially useful for things that you will be doing over and over again, in particular, switching between the three transformation tools (move, scale, and rotate), so let's go over how to use these hotkeys so we can work faster:

  • G: Grab (Translate / Move)
  • R: Rotate
  • S: Scale
As always, remember to hover your mouse inside the 3D Viewport before pressing any of...

Setting up the reference images for the time machine

For this workflow, our first step is to get our reference images set up. Download the reference images for the time machine from the Blender3DByExample_Chapter03-04 folder from https://github.com/PacktPublishing/Blender-3D-By-Example-Second-Edition. If you would like to learn how to set up these reference images for yourself, keep reading this section. If you would rather dive right into modeling, open the TimeMachine_Start.blend file and skip to the Box modeling the main section of the chair section. There are six reference images:

  • Back_Exterior.png
  • Back_Interior.png
  • Front_Exterior.png
  • Front_Interior.png
  • Side.png
  • Top.png

The two "Interior" images will be helpful in modeling the inner parts of the time machine such as the chair and the clock, while the "Exterior" images will be more useful for everything...

Box modeling the main section of the chair

The main section of the chair is a fairly simple shape, so it's the perfect place to practice box modeling. As mentioned before, we start this style of modeling with a primitive shape (in this case, we'll use a cube). and then we use extrusions, edge loops, and other simple modeling tools to block out the major forms of the model.

First, let's create a cube. When we create new objects in Blender, they will spawn at the location of the 3D Cursor. It's best to reset the position of the cursor before adding new objects so that they spawn at the center of the grid:

  1. Press the Shift + S hotkey to bring up the Snap pie menu.
  2. Choose Cursor to World Origin:
The Snap pie menu, with the Cursor to World Origin option in the bottom-left corner

Excellent, the 3D Cursor has been reset to the center position. Later in this chapter...

Destructive editing versus non-destructive editing

Unlike some 3D software, Blender doesn't keep any construction history for objects or operations. This has the upside that our objects are always ready for the next operation to be performed, but it also has the downside that previous operations will be final as soon as we move on to the next operation. This is known as destructive editing.

Even performing small adjustments, such as transforming or deselecting, will apply the previous operation. All of the settings will be committed to the object and can no longer be adjusted. When working with destructive operators, you must set the settings correctly in-the-moment since you will be unable to change them after-the-fact.

Up to this point, we have modeled the chair with destructive editing methods, but in the next step, we can use some non-destructive editing methods for a...

Modeling the cushions of the chair

Let's model the cushions:

  1. Go to the Top view.
  2. Choose the Cursor tool from the Toolbar.
  3. Click on the center of the cushion in the reference image.
  4. Choose the Select Box tool from the Toolbar to go back to the tool we were using before.
  5. Press the Shift + A hotkey to bring up the Add menu.
  6. Choose Mesh | Cube.
  7. Set the Size to 0.9 m.
  8. Set the Location X to 0 m.
  9. Rename the cube object Chair_Cushion.
  10. Scale down the cube along the y-axis to match the size of the cushion in the reference image (refer to the following screenshot):
Placing the 3D Cursor, making a cube, and scaling it to match the reference
You can see the precise transformation values while you are performing the operation in the top-left corner of the 3D Viewport. In this case, you should see Scale: 0.7550 along global Y.

Excellent! Now that the cushion aligns nicely to the x and...

Modeling the sci-fi rings with modifiers

Let's dive in deeper with modifiers. These fictional levitation rings can be made entirely with modifiers (after we add the initial primitive shape); we won't even have to enter Edit Mode! First off, let's create a cylinder:

  1. Press the Shift + A hotkey to bring up the Add menu.
  2. Choose Mesh | Cylinder.
  3. Click the little arrow to expand the Adjust Last Operation panel.
  4. Set Radius to 0.97 m.
  5. Set Depth to 0.09 m.
  6. Set Cap Fill Type to Nothing.
  7. Set Location X to 0.0 m.
  8. Set Location Y to 0.54 m.
  9. Set Location Z to 0.45 m.
  10. Rename the cylinder Chair_Rings.

These settings will create and align a new cylinder perfectly to the bottom ring below the chair.

Remember, creating a primitive object is a destructive operation. You will not be able to adjust these Add Cylinder settings later. Once we move on, they are final.

Now that we have...

Modeling the armrests

The last pieces of the chair we need to make are the armrests. We're mostly going to use box modeling, but we'll introduce one more very useful modifier before we're done.

We're going to start with a plane, and cut in the details we need to match the curvature of the armrests:

  1. Go to the Top view.
  2. Press the Shift + S hotkey to bring up the Snap pie menu.
  3. Choose Cursor to World Origin.
  4. Find the Add menu at the top of the 3D Viewport or press the Shift + A hotkey.
  5. Choose Mesh | Plane.
  6. Rename the plane Chair_Armrests.
  7. Tab into Edit Mode.
  8. Press the 1 key on the home row to switch to vertex select mode.
  9. Grab the top-right corner vertex of the plane and move it up to the top-right corner of the armrest in the reference image.
  1. Move the other three vertices into their respective corners as well:
Placing the four verts on the armrest's...

Summary

That was a lot to take in just to build a chair, but we've covered a lot of useful things for modeling just about any object. We learned how to set up reference images in our 3D scene. We went over some of the most important hotkeys for the transformation of objects and components. We got a lot of practice with box modeling using extrusions and inserting edge loops. We also learned some of the benefits of destructive versus non-destructive modeling. We took our first steps with Blender's powerful modifier system. And we used all of these new techniques to get a good start on the time machine modelhow exciting!

In the next chapter, we will continue practicing these modeling techniques, introduce a few new modeling methods, and finish the rest of the time machine!

Questions

  1. What are the differences between destructive and non-destructive modeling?
  2. What is the hotkey for grabbing/translating/moving an object?
  3. What is the hotkey for rotating an object?
  4. What is the hotkey for scaling an object?
  5. How can you make a blocky model look more round?
  6. What are primitives?
  7. How does box modeling work?
  8. What is Blender's most popular modifier?
  9. Can you use more than one modifier on a single object?
  10. How do you enable the quad-view feature?
lock icon
The rest of the chapter is locked
You have been reading a chapter from
Blender 3D By Example. - Second Edition
Published in: May 2020Publisher: PacktISBN-13: 9781789612561
Register for a free Packt account to unlock a world of extra content!
A free Packt account unlocks extra newsletters, articles, discounted offers, and much more. Start advancing your knowledge today.
undefined
Unlock this book and the full library FREE for 7 days
Get unlimited access to 7000+ expert-authored eBooks and videos courses covering every tech area you can think of
Renews at $15.99/month. Cancel anytime

Authors (2)

author image
Oscar Baechler

Oscar Baechler is a CG generalist, professor, painter, photographer, open source advocate, and community organizer who teaches at Lake Washington Institute of Technology. He's published a number of mobile games with a Blender pipeline and created animation for clients both big and small. Oscar runs the Seattle Blender User Group and Ballard Life Drawing Co-op and has presented on CGI at SIGGRAPH, LinuxFest Northwest, the Blender Conference, OSCON, Usenix LISA, SeaGL, SIX, WACC, and others.
Read more about Oscar Baechler

author image
Xury Greer

Xury is a digital media generalist and educator in the Greater Seattle Area. He earned his bachelor's degree in game design from Lake Washington Institute of Technology. He specializes in 3D characters, and technical art, and loves to share his knowledge. Xury is an avid member and Co-Organizer of the Seattle Blender User Group and aims to help others by teaching Blender, as well as other 3D content creation tools. He is always excited to get new users started on their digital media production journey.
Read more about Xury Greer