Reader small image

You're reading from  Creating an RTS Game in Unity 2023

Product typeBook
Published inOct 2023
Reading LevelN/a
PublisherPackt
ISBN-139781804613245
Edition1st Edition
Languages
Tools
Right arrow
Author (1)
Bruno Cicanci
Bruno Cicanci
author image
Bruno Cicanci

Bruno Cicanci is a software engineer and game developer with professional experience on different technologies and platforms. Since 2009, Bruno helped to develop and publish many games, mainly using Unity for mobile devices. He writes about game development on his personal blog, which led him to present many talks at universities and events. Bruno holds a Computer Science BS. Degree and a specialization and Game Production and Programming. In the last decade, he worked at prestigious game studios such as Glu Mobile, Electronic Arts, and Aquiris. He is currently developing games and reusable technologies at Ubisoft. Originally from Sao Paulo, Brazil, Bruno currently resides in London, UK with his wife and two adorable cats.
Read more about Bruno Cicanci

Right arrow

Getting Started with Our Level Design

RTS games have a few characteristics and requirements that are very specific to them – the camera setup and movement have an industry standard to follow with some variations; the levels have many assets that are used to set the mood and predefine the available paths for the player to explore; and also, due to the high quantity of maps and variations, a map editor tool is required to speed up the level design, matching the rules defined by the game design and the gameplay mechanics.

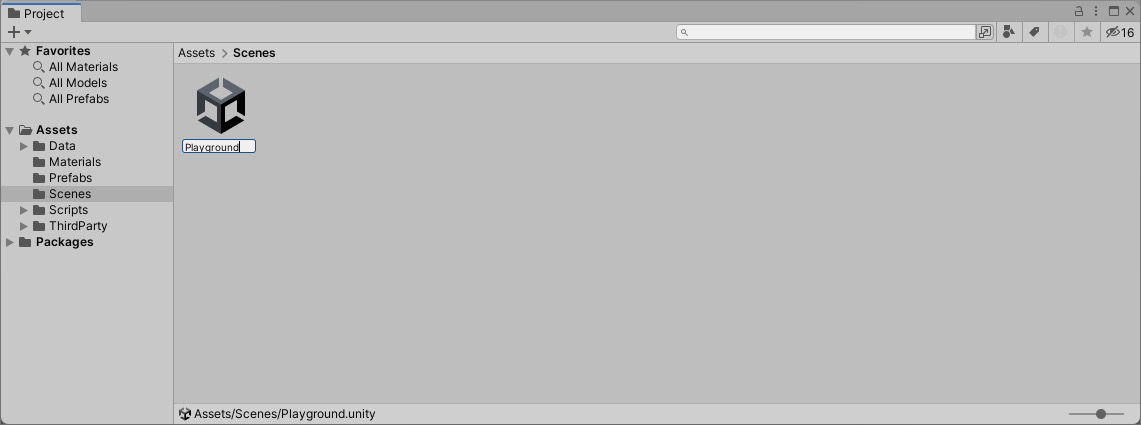
This chapter will introduce you to the first scripts that will be required to write C# code to achieve the features and requirements of our game as defined in the previous chapter. You will learn how to set up a game scene with the proper light and camera settings for an RTS game, as well as how to create and use Prefabs, which are reusable assets that act as a template, to develop maps for the game. We are also going to explore one of the most flexible and...

Technical requirements

The project setup in this chapter with the imported assets can be found on GitHub at https://github.com/PacktPublishing/Creating-an-RTS-game-in-Unity-2023/tree/main/Dragoncraft/Assets/Chapter03.

All scripts and scenes created in this chapter are available there, but we are also going to use the assets imported in the previous chapter, which are in the Chapter02 folder.

Setting up our base scene

Before we create our first level, we need to set up the base scene of the project, which will be used by our map editor to populate the map with the assets we are going to define in the configuration for each level. In addition to the base scene for every new level, we will also create a Playground scene, which, as the name suggests, will be used a lot during the game production so we can develop and test features freely without breaking our levels or being limited to the configuration we have.

Scenes

When we created the new Unity project following the instructions from the previous chapter, Unity automatically created a first scene for us called Sample Scene inside the Scenes folder, which is basically an empty scene with a standard main camera and directional light. Right-click on the scene and select Rename – we’ll change it to Playground, as you can see here:

Figure 3.1 – Renaming the scene to Playground

Figure 3.1 – Renaming the scene to Playground...

Creating the first map layout using Prefabs

Using Level01, we are going to add a few Prefabs from the RPGPP_LT package imported into the project in the previous chapter. For now, we are not going to use the Dragon package nor any of the Mini Legion packages because they are not part of the level design; they are part of the design of the gameplay that will come in the next chapters of the book.

In the Project view, expand the ThirdParty folder, and then the RPGPP_LT folder:

Figure 3.8 – The Prefabs structure inside the RPGPP_LT assets package

Figure 3.8 – The Prefabs structure inside the RPGPP_LT assets package

Here, you will find a well-organized structure with many assets that we are going to use to create our levels. You can ignore all internal folders and just focus on the Prefabs folder – it is divided into categories and subcategories, which contain everything we need. Moving forward, Prefabs will be mentioned by their location within these folders or the filename.

Some of the Prefabs can be easily...

Using ScriptableObjects to configure the map

ScriptableObjects is a data container created by Unity that can be used to store data and share it across the game, keeping only one instance of the data in memory. Although it has a few limitations – with a lack of dictionary support being one – it is still very flexible, easy to use, and quick to read data. Due to these benefits, it is the recommended way of storing configuration data inside a game, instead of using other data types such as JSON or plain text, for example.

Another great advantage of using ScriptableObjects is that you define the data format as a standard C# class, which makes it quite transparent to read and write data, without having to write code to deal with I/O operations or having to use an external solution.

Here, we are going to create two different ScriptableObjects: one responsible for the game configuration and the other responsible for the level configuration. We will also add a custom editor...

Creating a map editor to speed up map creation

Now, it is time to gather both configuration files – DefaultConfiguration (LevelConfiguration) and Level01 (LevelData) – and put them into use in a script that will initialize and place Prefabs based on the setup we made on each ScriptableObject. The script will be a component that can be attached to any GameObject in the scene and will need a couple of references to work: the LevelData asset we want to use, and the plane used to place the Prefabs in the scene.

So, first, create a script called LevelComponent inside the Scripts | Level folder. Then, open the script and replace the content with the following code:

using UnityEngine;
namespace Dragoncraft
{
    public class LevelComponent : MonoBehaviour
    {
        [SerializeField] private LevelData _levelData;
        [SerializeField] private GameObject...

Controlling the camera

The main camera has two different movements that the player can control: zooming in and out and panning vertically and horizontally. Although the player can perform both actions, there are limits defined by us, so any movement and zoom will display only assets and areas that the player can really see and interact with, hiding the edges of the world.

We are going to write a quite simple, yet flexible script to add a component to the main camera in the scene. The parameters exposed by the component in the Inspector window will make it easier to tweak and find the best values for each attribute.

So, create a new folder inside Scripts called Camera, and create a new script there called CameraController.cs. Now, first, we are going to define all the properties in this class, as shown in the following script (notice that although the properties are private, the [SerializeField] attribute will expose them in the Inspector window so we can easily update the values...

Summary

Congratulations on reaching the end of this chapter; we did a lot of work here, which forms the foundation for our game. In this chapter, we learned how to set up the scene and create a level using Prefabs and how to group Prefabs into a new one.

Our first contact with C# scripts gave us an understanding of how to use ScriptableObjects, and we developed a simple tool to speed up the level creation. We also wrote code to control the camera movement based on the player’s mouse position, considering the size of the plane as the screen limitation.

All of that forms the base of our game, the blocks that we will use and reuse throughout this book until we have our Dragoncraft game done.

In Chapter 4, Creating the User Interface and HUD, we are going to build the game UI and Prefabs that will be used to inform the player of all the actions and outcomes of the strategic decisions made during the game. You will be introduced to the best practices of creating a UI in...

Further reading

We covered a lot of Unity features in this chapter that might be new to you, so remember to always check the official documentation to read more about them:

There is some great documentation provided by Microsoft to learn more about some of the C# features that we used in this chapter, with some more examples of usage...

lock icon
The rest of the chapter is locked
You have been reading a chapter from
Creating an RTS Game in Unity 2023
Published in: Oct 2023Publisher: PacktISBN-13: 9781804613245
Register for a free Packt account to unlock a world of extra content!
A free Packt account unlocks extra newsletters, articles, discounted offers, and much more. Start advancing your knowledge today.
undefined
Unlock this book and the full library FREE for 7 days
Get unlimited access to 7000+ expert-authored eBooks and videos courses covering every tech area you can think of
Renews at €14.99/month. Cancel anytime

Author (1)

author image
Bruno Cicanci

Bruno Cicanci is a software engineer and game developer with professional experience on different technologies and platforms. Since 2009, Bruno helped to develop and publish many games, mainly using Unity for mobile devices. He writes about game development on his personal blog, which led him to present many talks at universities and events. Bruno holds a Computer Science BS. Degree and a specialization and Game Production and Programming. In the last decade, he worked at prestigious game studios such as Glu Mobile, Electronic Arts, and Aquiris. He is currently developing games and reusable technologies at Ubisoft. Originally from Sao Paulo, Brazil, Bruno currently resides in London, UK with his wife and two adorable cats.
Read more about Bruno Cicanci