


Making a top-notch inspector!
Now that we have an example shader to test things on, we have an opportunity to quickly discuss why creating an adapted inspector is important and how to do it. The following sections will explore both of these questions.
Why should I waste time refining an editor inspector?
This is probably a question that popped into your mind if you are not yet used to customizing or creating your own tooling in Unity, and it is a valid inquiry. Given that we’re talking about in-editor displays, who cares if it is a little messy? It won’t impact the quality of the final game!
Well, yes... and no.
It is true that, from a very objective standpoint, the look and feel of your editor interfaces doesn’t directly translate to the ones in your game. Your desk may be untidy, and still, you create amazing drawings.
However, generally speaking, it does hinder your productivity. If your interfaces are not properly designed, finding the right tool at the right time can quickly turn into a treasure hunt – it would be just like a messy in-game UI where players don’t know where to read their health points or where is the information on their current target.
This is even more true with these editor tools actually since the people who use them, your artist teammates or clients, expect them to be work tools. They are not here to have fun and be lenient about a few errors here and there. They want to get to their goal swiftly and without any headaches, so it is crucial that your tools guide them. In particular, your tools should relieve your users of thinking about how to use the interface... they probably already have enough thinking about what they want to make with it!
Your editor tools should thus be clear and, when applicable, aware of the context. In other words, they should possess the following attributes:
- Clarity: A Unity editor tool should not require you to read hundreds of pages in a manual to understand how it works. You should be able to quickly understand what variables you are changing and how they impact the final result just by looking at the interface and trying it out a few times.
Note that this also means tools should usually be quite focused – don’t try to create ultimate swiss-knives that can do everything because those will most probably confuse your users. Instead, narrow down the specific task you want to help them with, or at the very least break down the interfaces into multiple parts for each important subtask, which brings us to our next point.
- Context-awareness: When building a Unity editor tool, you have an amazing advantage compared to someone who makes real-world drills or screwdrivers – your interface can adapt dynamically! This can be via the use of tabs or sections or even with an auto-generation of a different layout based on what is currently selected, the preferences of the users, and so on. This is key in presenting all the information you want to the user in a readable manner.
If your tool is supposed to cover a variety of use cases, always try your best not to flood your users with too much data and take advantage of these context-adapted layout mechanics. Otherwise, the users will end up throwing away your tool before they understand all of its power.
This may seem like it is a bit of overkill in our case – after all, we just want to show some variables in an inspector to better configure our shader, right?
However, there are numerous ways of displaying those variables, and some will instinctively feel more in sync with the way they actually behave behind the scenes. So, time to dive in and see some easy examples of how to guide users who are discovering our shader via the interface!
Faking Booleans?
To begin with, we can look at a simple option in our shader – whether or not we should use ambient lighting. We’ve said that there are many cases where this is useful, but there are still other examples where you could want your shadows to be really dark and mysterious.
Ideally, this option should be available as a toggle with an on/off value, like a Boolean variable. However, we know that shaders cannot use Boolean variables – this is why, rather, we need to use Unity’s additional ShaderLab attributes to adapt our interface and fake these discrete values.
First of all, we will implement the logic. We just need to add an _UseAmbient float property and then check its value to use or ignore the ambientLight value, as we did in the Doing a quick study of the Blinn-Phong shading model section, with the lambertian to cut off the unwanted specular highlights:
Shader "Custom/BlinnPhong" {
    Properties {
        ...
        _UseAmbient ("Use Ambient", Float) = 1
    }
    SubShader {
        Tags { "RenderType" = "Opaque" }
        Pass {
            ...
            float _UseAmbient;
            float4 frag (v2f i) : SV_Target {
                ...
                // ambient lighting (direct from Unity
                   settings)
                float3 ambientLight =
                    UNITY_LIGHTMODEL_AMBIENT.xyz;
                ambientLight = ambientLight *
                    (_UseAmbient > 0);
                ...
            }
        }
    }
}
In this code snippet, I used a float variable for _UseAmbient and then checked whether it is strictly positive to use it as a Boolean in my computation. From a logical point of view, this trick solves our issue and hides the fact that this was initially a float. However, in the UI... we get a number input that accepts any values! Figure 1.24 shows how, for a random negative value, we do have the toggling of the ambient light, but we also have a very unintuitive interface:
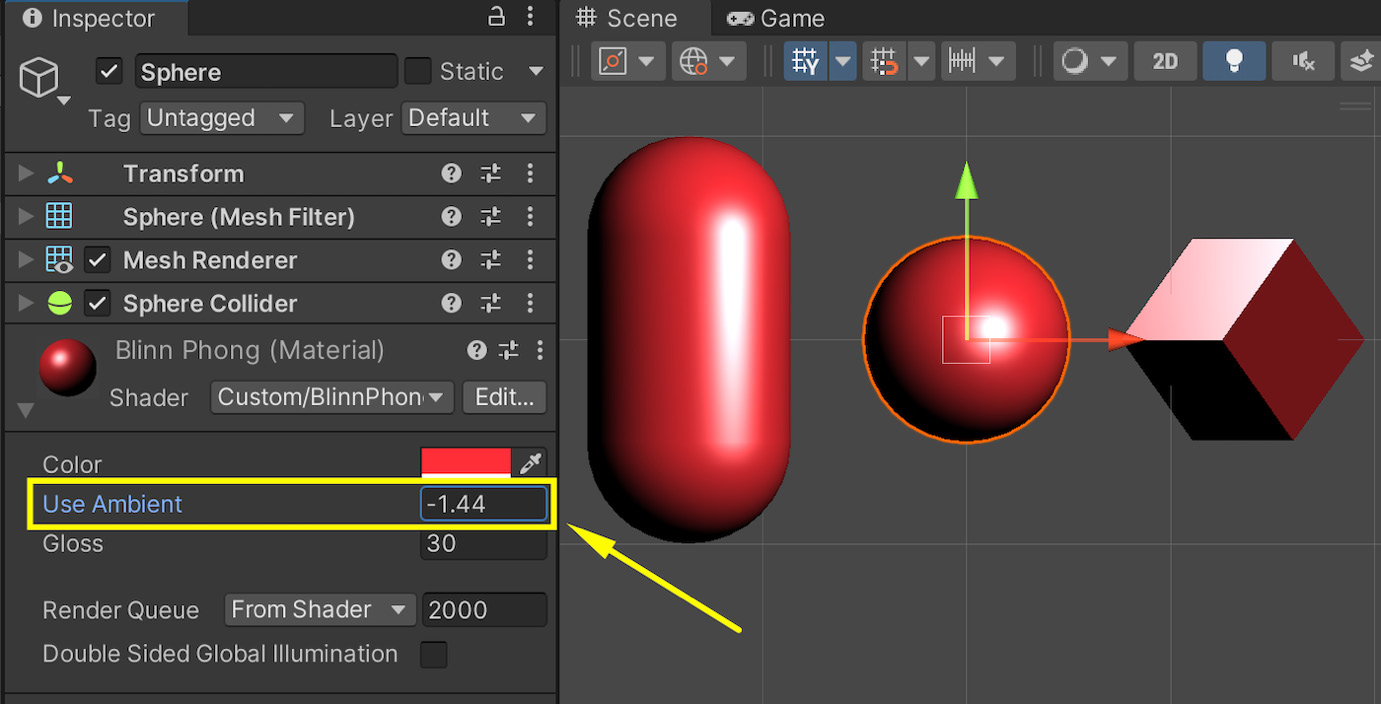
Figure 1.23 – Default display of a float input as a free value
To turn it into a checkbox and make it more straightforward to use, we’ll just go back to our shader code and, at the very top, add a [Toggle] attribute to our _UseAmbient property:
[Toggle] _UseAmbient ("Use Ambient", Float) = 1
This means that this float variable, although it could technically still take an infinite number of values, will only be editable via an on/off toggle in the inspector (and thus take the values 0 or 1), like this:
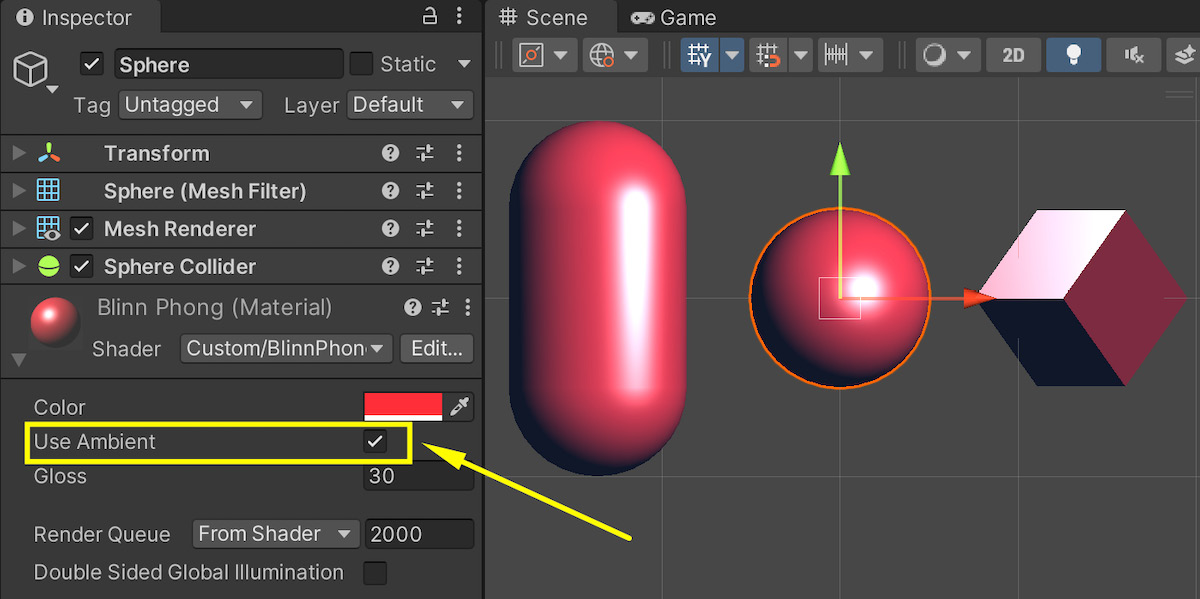
Figure 1.24 – Customized display of our float as an on/off toggle
This is already a nice improvement on our previous interface, but we can do more!
Improving our glossiness display
Another annoying part of our interface is that the _Gloss variable is currently a number that can range from one to the hundreds. Even worse, this large value range is non-linear – as the glossiness increases, you need to crank it higher and higher to actually see a difference. In many reference Unity materials, however, this setting is displayed as a linear slider that goes from 0 to 1, so how come our value doesn’t work this way?
The trick to getting this more intuitive display is to remap our _Gloss value to an exponential curve – this way, we can keep it in the [0, 1] range and keep the exponential behavior under wraps. For the user, glossiness will just be a normalized float that goes from a fixed low value of 0 (a very rough surface) to a fixed high value of 1 (a very mirror-like surface).
There are various ways of remapping the value, but often multiplying our input by a small coefficient and putting it in an exp2 function (meaning we compute 2 to the power of our input) gives a good result. We can also avoid the low values of glossiness that cause strange visual artifacts by artificially increasing our specular exponent value with a base minimum.
The exact formula, suggested by Freya Holmér in one of her videos (see https://www.youtube.com/watch?v=mL8U8tIiRRg&t=11892s) and wildly adopted since then, contains a few magic numbers that are not completely intuitive, but it works really well:
float specExponent = exp2(_Gloss * 8) + 2;
specularLight = pow(specularLight, specExponent) * _LightColor0.xyz;
With these modifications, our shader now works fine with a _Gloss value between 0 and 1. For the cherry on top, let’s actually convert our float to a slider with this range so that users directly know the minimum and maximum value they can use.
To do this, we simply have to change the type of our _Gloss property from Float to Range(0, 1):
_Gloss ("Gloss", Range(0, 1)) = 1
Unity will know that this property is a float that can only take its values in the [0, 1] range, and that should be displayed as a slider in the inspector. Figure 1.25 shows us the final result:
![Figure 1.25 – Customized display of our glossiness property as a slider in the [0, 1] range](https://static.packt-cdn.com/products/9781837636747/graphics/image/Figure_1.25_B19397.jpg)
Figure 1.25 – Customized display of our glossiness property as a slider in the [0, 1] range
Note that we could also use the same toggle or slider trick if we wanted to switch between the “plastic-like” and “metal-like” speculars. You could define another _Metalness float value in the [0,1] range, use it to tint the specular component and show it with one or the other type of display, depending on whether you want a continuous or discrete value.
These various modifications to our UI make it way more intuitive and quicker to use than our previous insanely diverse float values. We are now gently guiding the users to pick the proper settings and tweak our shader in a viable way.
A few additional tricks
To wrap up this focus on the customization of our property displays, here are some other interesting attributes that can help you improve your material inspectors:
[HideInInspector]: This attribute will hide the property that follows it in the inspector. This can be interesting if you are still in the development phase and want to keep some alternative property in your code for posterity without it polluting your inspector.[NoScaleOffset]: This attribute will remove the Tiling and Offset fields that appear by default next to texture slots in the inspector. This can be useful if your texture should be used as-is, and users should be prevented from changing its scale or its offset.[MainColor]and[MainTexture]: By default, Unity will consider that the property called_Coloris the main color, and the property called_MainTexis the main texture. Those are the values you will access in your C# scripts if you getMaterial.colororMaterial.mainTexture. The[MainColor]and[MainTexture]attributes let you define the properties that follow as the main color and the main texture in your material, even when they are not named_Colorand_MainTex.[Normal]: This attribute tells Unity that only normal maps are accepted for this texture property. If you try to use a texture asset that has not been marked as a normal map in its import settings into the slot matching this texture property, you will get a warning in the inspector, which can help with debugging.
With all these examples, we now have various techniques and tools for improving our material inspectors and making them clear to use for our users. We also know why it is important to devote time to these improvements and how even a simple UI such as our shader options here can be improved with some additional steps.