


Adding the ambient and specular components
Our shader now handles the diffuse lighting. However, we know that this is just part of a real Blinn-Phong model – we also need to have some specular reflections, and we should handle ambient lighting to better integrate it into the scene.
In the following sections, we will add both components one by one, starting with the ambient lighting since, as we will see, it is quick to do in Unity before taking care of the speculars.
Injecting the ambient lighting
Do you remember how, in the Setting up our Unity shader section, we managed to get our light direction just by calling a Unity built-in variable? Well, guess what – adding ambient lighting is just easy!
All we have to do for this step is get the UNITY_LIGHTMODEL_AMBIENT variable, and this will directly give us the ambient light to add to our previously computed diffuse component, which means we simply have to update our fragment shader function like this:
float4 frag (v2f i) : SV_Target {
    float3 N = normalize(i.normal);
    float3 L = _WorldSpaceLightPos0.xyz;
    float lambert = saturate(dot(N, L));
    float3 diffuseLight = lambert * _LightColor0.xyz;
    float3 ambientLight = UNITY_LIGHTMODEL_AMBIENT.xyz;
    return float4(diffuseLight * _Color + ambientLight, 1);
}
And with these quick modifications, we added ambient lighting to our diffuse shader. If you recompile the file, you should see that the shape is now slightly illuminated everywhere:
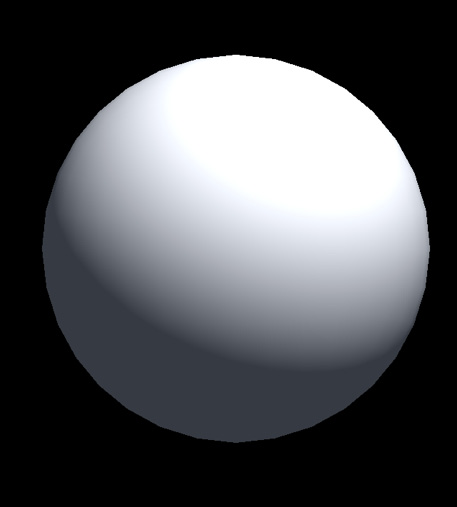
Figure 1.19 – Compositing of the diffuse and ambient lighting components
If you want to change the color of the ambient light, you can change this in the environment parameters of the scene. These settings are located in the Lighting window. To access them, follow these steps:
- Go to the Window | Rendering | Lighting menu.
- Switch over to the Environment tab at the top of the Lighting window.
- In the inspector, you will see the ambient lighting in the Environment Lighting group.
Unity offers us three ways of setting the ambient color – either with a single source color, a gradient, or a skybox, which are discussed here:
- If you use the Color mode, then all ambient light will have the flat color you define in the color picker, as shown in Figure 1.20:
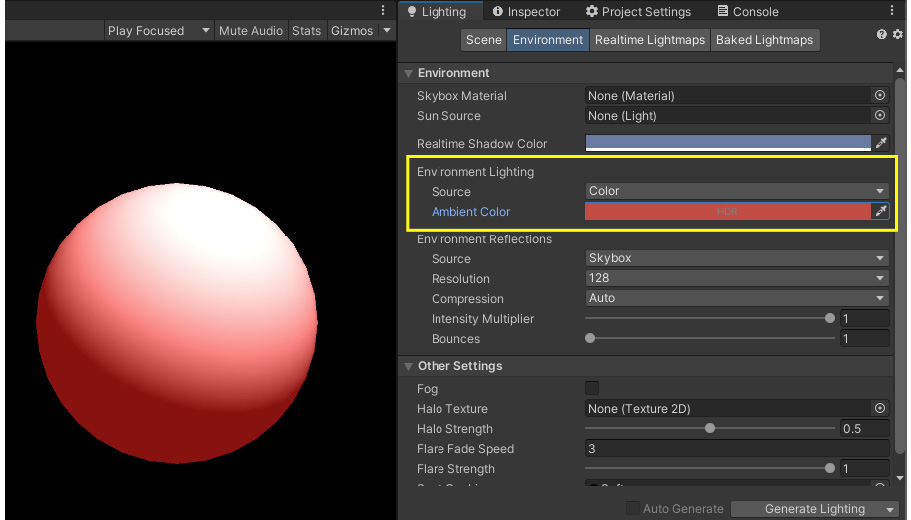
Figure 1.20 – Configuration of the ambient color for the Unity scene in the Color mode
- If you use the Gradient mode, you will be able to define separate colors for ambient lighting coming from the sky, the horizon, and the ground. You will have three pickers for each of those important marks, as shown in Figure 1.21, and the rest of the levels will blend between those references:
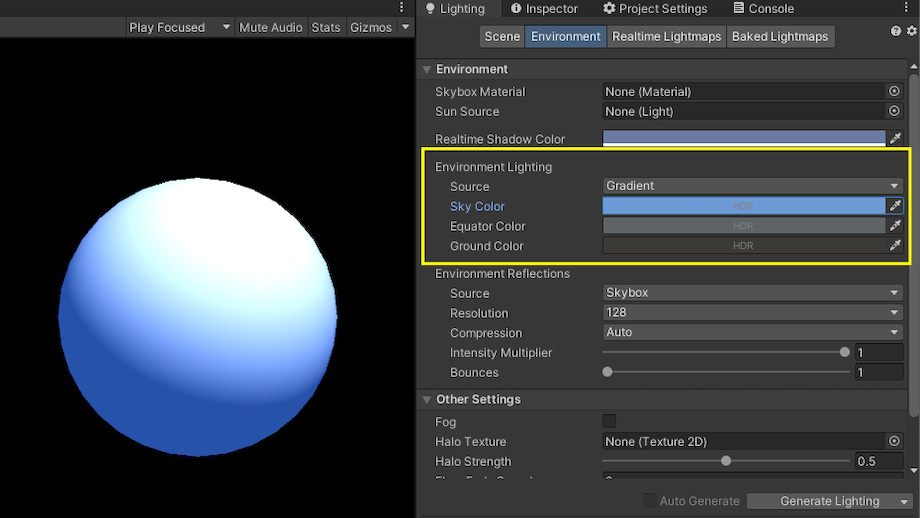
Figure 1.21 – Configuration of the ambient color for the Unity scene in the Gradient mode
Note that if you use Gradient, our UNITY_LIGHTMODEL_AMBIENT variable will use the sky color by default. But you can use one of the three defined color marks by replacing UNITY_LIGHTMODEL_AMBIENT with unity_AmbientSky, unity_AmbientEquator, or unity_AmbientGround.
- If you use the Skybox mode, then the ambient light will be computed based on the Skybox Material resource you pass in. This can help do more detailed lighting, but it requires a bit more setup. If you want to learn more about this, check out this documentation page from Unity at https://docs.unity3d.com/Manual/skyboxes-using.html.
We now have a shader with both the diffuse and ambient components, and we even know how to change the color of our ambient light to create a custom feel for our scene. However, this material is visually quite basic and very matte – so it is time to implement the final part of our shader: the specular.
Computing the specular lighting
As we discussed in the Doing a quick study of the Blinn-Phong shading model section, the only additional vector we need to prepare for computing the specular highlights with the Blinn-Phong reflection model is the view vector, V.
Remember that this is a vector that goes from the surface to the rendering eye position. To compute it, we therefore need to get the position of our main camera and the position of the fragment we are currently calculating the output value for, both in world space coordinates.
As usual, the camera position is readily available in the UnityCG.cging library. The _WorldSpaceCameraPos variable directly gives us the 3D world position of the main camera.
The world position of the vertices can be found using the vertex position in object space and the handy unity_ObjectToWorld matrix. Multiplying this matrix by the local vertex position converts the local coordinates to world coordinates and gives us its equivalent as a world position. We then simply need to pass it in the v2f data structure as our second UV set to have it interpolated and re-inputted into the fragment shader. Here are the updated parts of our shader code:
struct v2f {
    float4 vertex : SV_POSITION;
    float3 normal : TEXCOORD0;
    float3 worldPos : TEXCOORD1;
};
v2f vert (appdata v) {
    v2f o;
    o.vertex = UnityObjectToClipPos(v.vertex);
    o.normal = v.normal;
    o.worldPos = mul(unity_ObjectToWorld, v.vertex);
    return o;
}
float4 frag (v2f i) : SV_Target {
    float3 V = normalize(_WorldSpaceCameraPos –
        i.worldPos);
    ...
}
Here, we use the normalize function to transform our position offset into a direction.
Then, we will define our _Gloss property for the surface smoothness:
Shader "Custom/BlinnPhong" {
    Properties {
        ...
        _Gloss ("Gloss", Float) = 1
    }
    SubShader {
        Tags { "RenderType" = "Opaque" }
        Pass {
            ...
            float _Gloss;
        }
    }
}
Finally, we simply need to copy back the formulas we prepared during the theoretical analysis to first get the halfway vector, H, get the specular, apply glossiness, and use the light source color. We eventually composite all three components in the final return with a simple sum. Our following fragment shader function, therefore, looks as follows:
float4 frag (v2f i) : SV_Target {
    float3 N = normalize(i.normal);
    float3 L = _WorldSpaceLightPos0.xyz;
    float3 V = normalize(_WorldSpaceCameraPos –
        i.worldPos);
    // diffuse lighting (lambertian)
    float lambert = saturate(dot(N, L));
    float3 diffuseLight = lambert * _LightColor0.xyz;
    float3 diffuseColor = diffuseLight * _Color;
    // ambient lighting (direct from Unity settings)
    float3 ambientLight = UNITY_LIGHTMODEL_AMBIENT.xyz;
    // specular lighting (Blinn-Phong)
    float3 H = normalize(L + V);
    float3 specularLight = saturate(dot(N, H)) *
        (lambert > 0);
    specularLight = pow(specularLight, _Gloss) *
        _LightColor0.xyz;
    return float4(diffuseColor + ambientLight +
        specularLight, 1);
}
At the very top, we get the three vectors we require for the diffuse and specular lighting, then we compute each component, and finally, we composite them. The following diagram shows how different primitive objects look with our associated material applied to them:
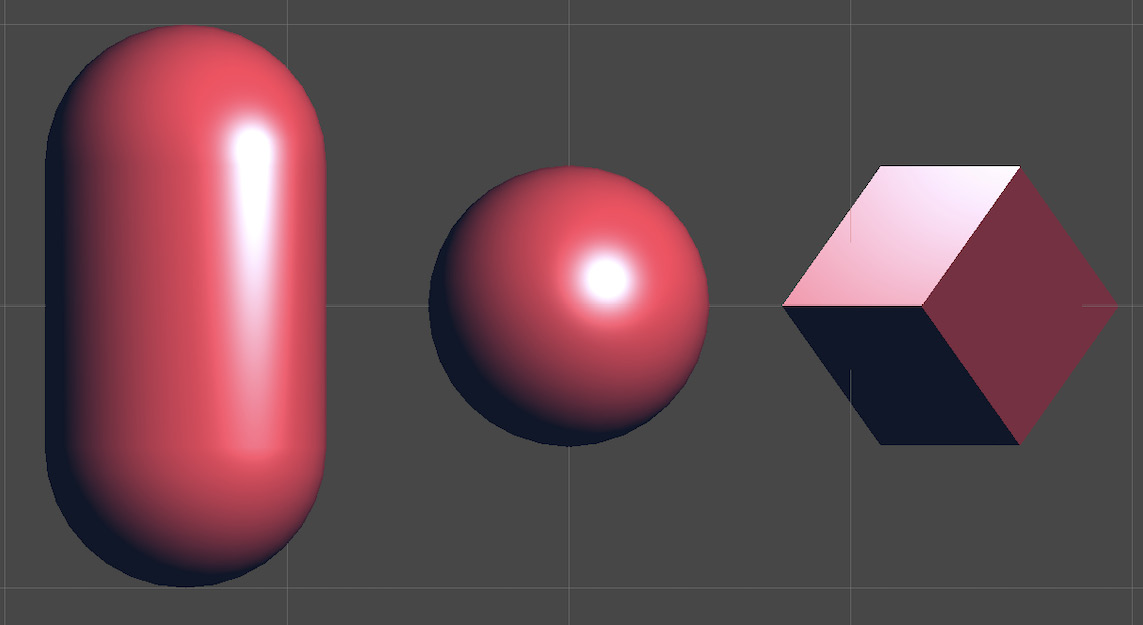
Figure 1.22 – Some applications of our final shader with the diffuse, ambient, and specular lighting components
We have successfully implemented the model we wanted with the following components:
- The diffuse component uses the color of the surface and the light to create a base lighting that is the same no matter where the camera is
- The ambient component slightly impacts all the shapes in the render and brings out the shadows
- The specular component varies depending on the position of the rendering camera, and it simply reflects the color of the light to make this shiny plastic-like effect
There are, of course, an infinite number of ways to tweak and modify all of our settings and simulate other types of materials. Even if Blinn-Phong is a crude lighting model, we know that changing the size of the specular highlights or tinting them with the surface color can already give quite a different feel, and we also said that ambient lighting is optional.
So, to further improve this shader, let’s take a bit of time to review Unity’s tool for creating easy-to-use and well-controlled material inspectors.


