Flutter Cookbook, Second Edition: 100+ step-by-step recipes for building cross-platform, professional-grade apps with Flutter 3.10.x and Dart 3.x, Second Edition
One of the greatest Flutter features is that it makes app development easy, or at least as easy as is possible today. It provides several pre-built components that can be easily customized to fit your needs.
One of the key elements of a Flutter project is the lib folder, which contains the main Dart code for your app. This is where you will be writing most of your code, including both layout and logic. Flutter projects also contain a file called pubspec.yaml, where you’ll find the project’s dependencies and other important configuration information.
In this chapter, you will see how to create the default “Hello World” app, and understand the structure of a Flutter project. By understanding a Flutter project’s structure, you will be able to easily navigate and understand the code for your own apps.
In this chapter, you will learn:
How to create a Flutter app
How Flutter projects are structured
How to run a Flutter app
Hot reload—refresh your app without recompiling
How to create a simple unit test
How to create a Flutter app
There are two main ways to create a Flutter app: either via the command line or in your preferred IDE. We’re going to start by using the command line to get a clear understanding of what is going on when you create a new app.
For later apps, it’s perfectly fine to use your IDE, but just be aware that all it is doing is calling the command line under the hood.
Before you begin, it’s helpful to have an organized place on your computer to save your projects. This could be anywhere you like, as long as it’s consistent. While there are no strict rules for folder names, there are a few conventions you should follow. For directories:
Use lowercase letters and separate words with underscores: for example, project_name.
Avoid spaces and special characters in your folders and file names.
When choosing a folder for a Flutter project, you should avoid synchronized spaces like Google Drive or OneDrive, as they might decrease performance and create conflicts when working in teams.
As such, before creating your apps, make sure you have created a directory where your projects will be saved.
How to do it...
Flutter provides a tool called flutter create that will be used to generate projects. There are a whole bunch of flags that we can use to configure the app, but for this recipe, we’re going to stick to the basics.
If you are curious about what’s available for any Flutter command-line tool, in your Terminal simply type flutter <command> --help. In this case, it would be flutter create --help. This will print a list of all the available options and examples of how to use them.
In the directory you have chosen to create your Flutter projects, type this command to generate your first project:
flutter create hello_flutter
This command assumes you have an internet connection since it will automatically reach out to the official repositories to download the project’s dependencies.
If you don’t currently have an internet connection, type the following instead:
flutter create --offline hello_flutter
You will eventually need an internet connection to synchronize your packages, so it is recommended to check your network connection before creating a new Flutter project.
Now that a project has been created, let’s run it and take a look. You have several options for your target:
Connecting a device to your computer
Starting an emulator/simulator
Running the app on a Chrome or Edge web browser
Running the app on your desktop
Type this command to see the devices currently available on your computer:
flutter devices
To specifically see the emulators you have installed on your system, type:
flutter emulators
You should see a list of the available emulators/simulators. Now, to boot an emulator on your system:
On Windows/Linux, type the command:
flutter emulators --launch [your device name, like: Nexus_5X_API_30]
cd hello_flutter
flutter run
On a Mac, type the command:
flutter emulators --launch apple_ios_simulator
cd hello_flutter
flutter run
To run your app on one of the available devices, type the following command:
flutter run -d [your_device_name]
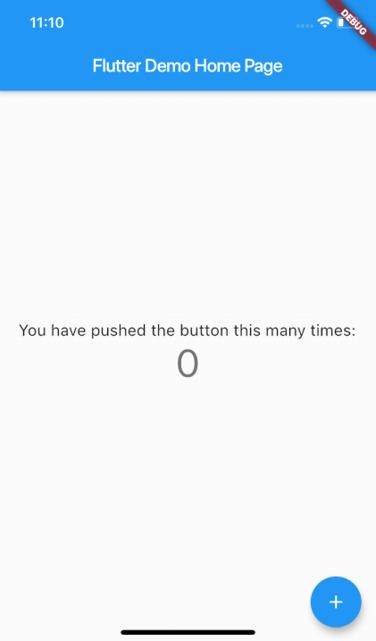
After your app has finished building, you should see a demo Flutter project running in your emulator:
Figure 2.1: Flutter’s default “Hello World” app in an iOS Simulator
Go ahead and play around with it. The circular button at the bottom right of the screen is called a Floating Action Button, and it’s a widget (much, much more about that in the remainder of this book, starting from Chapter 4, Introduction to Widgets!).
When you are done, type q in the terminal to close your app.
How to choose a platform language for your app
Both iOS and Android are currently in the middle of a revolution of sorts. When both platforms started over 10 years ago, they used the Objective-C programming language for iOS, and Java for Android. These are great languages, but sometimes can be a little long and complex to work with.
To solve this, Apple has introduced Swift for iOS, and Google has adopted Kotlin for Android.
These languages are currently automatically selected for new apps.
If you want to use the older languages (for compatibility reasons) when creating an app, enter this command into your Terminal:
In this way, Objective-C and Java will be chosen. You are also never locked into this decision; if later down the road you want to add some Kotlin or Swift code, there is nothing stopping you from doing so.
It’s important to keep in mind that the majority of your time will be spent writing Dart code. Whether you choose Objective-C or Kotlin, this won’t change much.
Where do you place your code?
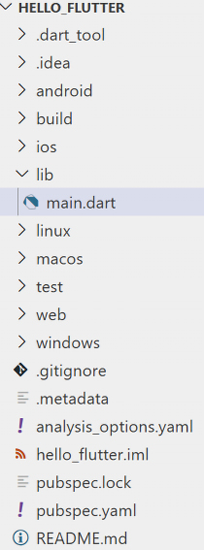
The files that Flutter generates when you build a project should look something like this:
Figure 2.2: A Flutter project structure
The main folders in your projects are listed here:
android
build
ios
lib
linux
macos
test
web
windows
The android, ios, linux, web, and windows folders contain the platform shell projects that host our Flutter code. You can open the Runner.xcworkspace file in Xcode or the android folder in Android Studio, and they should run just like normal native apps. Any platform-specific code or configurations will be placed in these folders. While Flutter uses a single code base for all platforms, when you build your app, it generates the specific code for each platform using these folders.
To increase performance when you build your app, Dart and Flutter support both Just-In-Time (JIT) and Ahead-Of-Time (AOT) compilation.
JIT compiling takes the source code of an app and translates it into machine code during execution. This means faster development, as the code can be tested while updating, and your code can be recompiled while the app is running.
With AOT compilation, the code is compiled before the program execution. This builds a machine code executable that can then be run on your target machine. This means better performance for your apps.
Simplifying things a little, Flutter uses JIT for debug builds and AOT for release builds, taking the best of the two worlds.
The build directory contains all the artifacts that are generated when you compile your app. The contents of this folder should be treated as temporary files since they change every time you run a build. You should also add this folder to your gitignore file so that it won’t bloat your repository.
The gitignore file contains a list of files and folders that Git should ignore when tracking changes in a project. As soon as you initialize a project with Git, this file will be added to your project’s root directory.
The lib folder is the heart and soul of your Flutter app. This is where you put all your Dart code. When a project is created for the first time, there is only one file in this directory: main.dart. Since this is the main folder for the project, you should keep it organized. We’ll be creating plenty of subfolders and recommending a few different architectural styles throughout this book.
The next file, pubspec.yaml, holds the configuration for your app. This configuration file uses a markup language called YAML Ain’t Markup Language (YAML), which you can read more about at https://yaml.org. In the pubspec.yaml file, you’ll declare your app’s name, version number, dependencies, and assets. pubspec.lock is a file that gets generated based on the contents of your pubspec.yaml file. It can be added to your Git repository, but it shouldn’t be edited manually.
Finally, the last folder is test. Here, you can put your unit and widget tests, which are also just Dart code. As your app expands, automated testing will become an increasingly important technique to ensure the stability of your project. You will create a test in the Creating a unit test recipe later in this chapter.
Hot reload—refresh your app without recompiling
Probably one of the most important features in Flutter is stateful hot reload. Flutter has the ability to inject new code into your app while it’s running, without losing your position (state) in the app. The time it takes to update code and see the results in an app programmed in a platform language could take up to several minutes. In Flutter, this edit/update cycle is down to seconds. This feature alone gives Flutter developers a competitive edge.
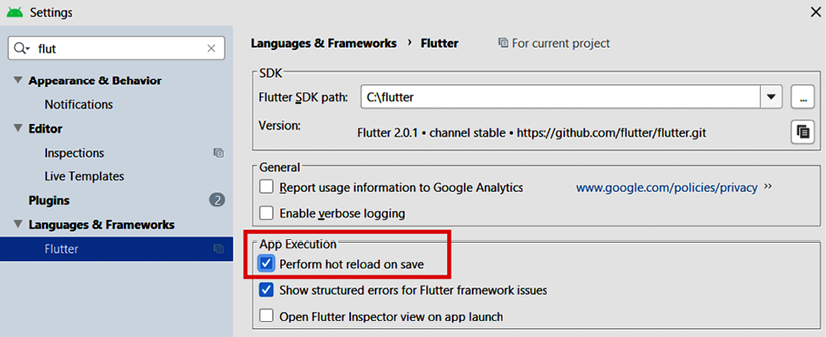
There is a configuration that allows executing a hot reload every time you save your code, causing the whole feature to become almost invisible.
In Android Studio/IntelliJ IDEA, open the Preferences window and type hot into the search field. This should quickly jump you to the correct setting:
Figure 2.3: Android Studio Flutter hot reload configuration
Verify that the Perform hot reload on save setting is checked. While you are there, double-check that Format code on save is also checked.
In VS Code, open your Settings from File > Preferences > Settings. Type flutter hot reload in the search field. Here you can specify the Flutter Hot Reload On Save option with one of the available values:
never: No hot reload executed when saving
all: Hot reload triggered for both manual save and autosave
allDirty: Hot reload triggered for both manual save and autosave only if the saved file had changes
manual: Hot reload for manual save only
manualDirty: Hot reload for manual save only if the saved file had changes
I would choose the all option if performance on your machine does not degrade, as it frees you from having to save manually when you make changes.
Let’s see this in action:
In Android Studio or IntelliJ IDEA, open the Flutter project you created earlier by selecting File > Open. Then, select the hello_flutter folder.
After the project loads, you should see a toolbar in the top-right corner of the screen with a green play button. Press that button to run your project:
Figure 2.4: Android Studio toolbox
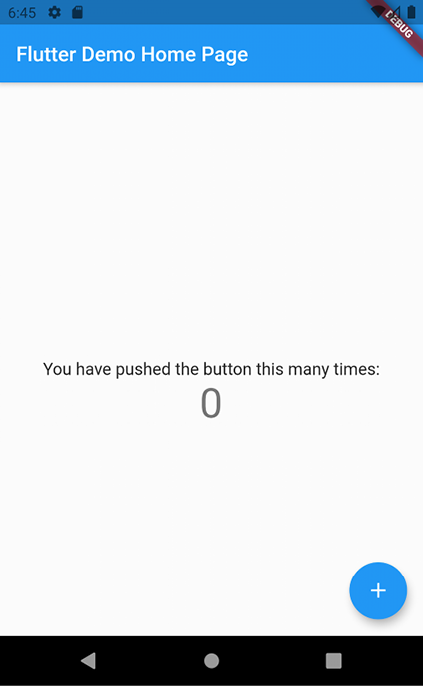
When the build finishes, you should see the app running in the emulator/simulator. For the best effect, adjust the windows on your computer so you can see both, side by side:
Figure 2.5: The Flutter default project on an Android emulator
In the main.dart file in the lib folder, update the primary swatch to green, as shown in the following code snippet, and hit Save:
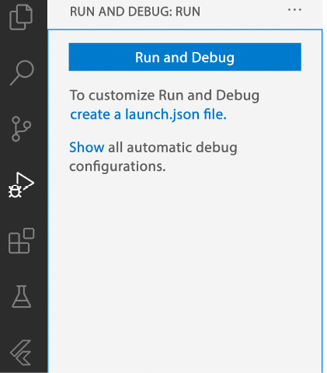
Only if your app does not update, click on the Hot reload button (denoted by a lightning bolt) from the debug toolbar or press F5. This will update the color of your app to green:
Figure 2.8: Visual Studio Code debug toolbar
It may seem simple now, but this small feature will save you hours of development time in the future!
Creating a unit test
There are several advantages of using unit tests in Flutter, including improving the overall quality of your code, ease of debugging, and better design. When writing good tests, you may also reduce the time required to maintain your code in the long run. Writing unit tests requires some practice, but it’s well worth your time and effort.
In this recipe, you’ll see how to write a simple unit test.
Getting ready
You should have created the default Flutter app as shown in the previous recipe before writing a unit test.
How to do it...
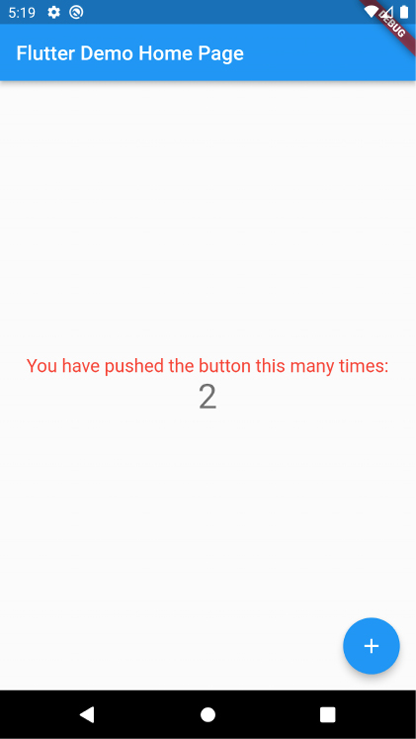
You will now update the default Flutter app: you will change the color of You have pushed the button this many times:. The text will be red for even numbers, and green for odd numbers, as shown in Figure 2.9:
Figure 2.9: Red text for even numbers
In the main.dart file in the lib folder, at the bottom of the file, and out of any class, create a method that returns true when the number passed is even, and false when the number is odd:
At the top of the _MyHomePageState class, under the int _counter = 0; declaration, declare Color, and set it to red:
Color color = Colors.red;
In the _incrementCounter method, edit the setState call, so that it changes the color value:
void _incrementCounter() {
    setState(() {
      _counter++;
      if (isEven(_counter)) {
        color = Colors.red;
      } else {
        color = Colors.green;
      }
    });
  }
In the build method, edit the text containing You have pushed the button this many times:, so that you change its color and size, and remove its const keyword, as shown below:
Text(
  'You have pushed the button this many times:',
  style: TextStyle(
     color: color,
     fontSize: 18,
  )
),
Run the app; you should see the color of the text changing each time you press the button.
Now that the app is ready, let’s test whether the isEven function works as expected.
In the tests folder, create a new file, called unit_test.dart.
At the top of the new file, import the flutter_test.dart library and your project’s main.dart file (note that you may have to change hello_flutter to your package name if you named your app differently):
Probably there isn’t much need to test a function as simple as this one, but as your business logic evolves and gets more complex, testing your units of code becomes important.
When you create a new project, you’ll find a test directory in your project’s root folder. This is where you should place your test files, including unit tests.
In this recipe, you created a new file, called unit_test.dart. When you choose the name for a file containing tests, you might want to add test as a prefix or suffix to follow the naming convention for tests. For example, if you are testing functions that deal with parsing JSON, you might call your file test_json.dart.
In your test files, you need to import the flutter_test.dart package, which contains the methods and classes that you use to run your tests:
import'package:flutter_test/flutter_test.dart';
You also need to import the files where the methods and classes you want to test are written. In this recipe’s example, the isEven method is contained in the main.dart file, so this is what you imported:
import'package:hello_flutter/main.dart';
Like in any Flutter app, the main method is the entry point of your tests. When you execute the flutter test command in a Terminal, Flutter will look for this method to start executing your tests.
You write a unit test using the test function, which takes two arguments: a string to describe the test, and a callback function that contains the test itself:
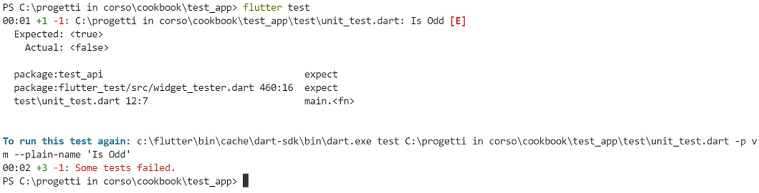
In this case, we are running a test in the isEven() function. When you pass an even number to isEven(), like 12, you expect true to be the return value. This is where you use the expect() method. The expect() method takes two arguments: the actual value and the expected value. It compares the two values, and if they don’t match it throws an exception and the test fails.
In our example, the instruction:
expect(result, true);
succeeds when result is true, and fails when result is false.
To run the tests, you can type the flutter test command in your terminal. This will run all tests in your project. You can also run your tests from your editor, like any other Flutter app. If your tests succeed, you get a success message, otherwise, you will see which specific test failed.
When you have several tests, you can group related tests together, using the group method:
Like the test method, the group method takes two arguments. The first is a String containing the group description, and the second is a callback function, which in turn contains one or more test() functions. You use the group() function to better organize your test code, making it easier to read, maintain, and debug.
In general, the goal of unit testing is to test single units of code, like individual functions, to ensure that they are working as expected.
See also
In addition to unit tests, there are other types of tests that you can create for your Flutter application. In particular, widget tests are used to test the functionality of widgets, and integration tests test the integration of different parts of your application. See the official documentation at https://docs.flutter.dev/testing for more information about writing tests in Flutter.
Summary
In this chapter, you’ve seen how to create a Flutter app and your first unit test. You’ve seen how directories are organized in a Flutter project: in particular, the lib directory contains the main.dart file for your app, which is the entry point for your app. Its main() method is executed when you run the app.
The pubspec.yaml file is the Flutter project’s main configuration file. Flutter creates specific target operating system directories in your project, like android and ios. You’ve seen how Flutter needs those to compile to different targets, with the same code base.
You’ve learned how to run the app from the Terminal by using flutter run and from an IDE by running the app from your editor’s interface.
You’ve seen the benefits of writing unit tests, which may help you write reliable code that works as expected, and learned how to import the flutter_test package.
You’ve seen the test(), expect(), and group() methods, which are the main building blocks for creating unit tests in Flutter.
In the next chapter, you’ll see an introduction to the Dart language.
Thoroughly updated to cover the latest features in Flutter 3.10.x and Dart 3.x
Practical recipes to publish responsive, multi-platform apps from a single database
Covers not just the ‘hows’ but the ‘whys’ of Flutter’s features with examples
Description
Are you ready to tap into the immense potential of Flutter?
With over 1,000 new mobile apps published every day on the Apple and Google Play stores, Flutter is transforming the landscape of app development. It's time for you to join the revolution.
Introducing the second edition of Flutter Cookbook, a step-by-step guide designed exclusively for you. Whether you're a seasoned developer or just starting your coding journey, this book is your ultimate companion. Dive into the latest features of Flutter 3.10 and unlock the secrets to building professional-grade, cross-platform applications.
With our recipe-based approach, we'll not only show you how to implement Flutter's features but also explain why they work. Through practical examples and real-world execution, you'll gain a deeper understanding of Flutter's inner workings. From crafting stunning UI/UX with widgets to leveraging hot reload and restart techniques, we'll equip you with best practices and invaluable knowledge.
As you progress, you'll learn to efficiently manage data, add interactivity and animations, and integrate essential Flutter plugins like maps, camera, voice recognition and more. And let's not forget the dedicated chapter on implementing MLkit powered by TensorFlow Lite. We'll guide you through building custom machine learning solutions, expanding the capabilities of your apps.
By the time you reach the end of this comprehensive Flutter book, you'll have the skills and confidence to write and deliver fully functional apps.
What you will learn
Familiarize yourself with Dart fundamentals and set up your development environment
Efficiently track and eliminate code errors with proper tools
Create various screens using multiple widgets to effectively manage data
Craft interactive and responsive apps by incorporating routing, page navigation, and input field text reading
Design and implement a reusable architecture suitable for any app
Maintain control of your codebase through automated testing and developer tooling
Develop engaging animations using the necessary tools
Enhance your apps with ML features using Firebase MLKit and TensorFlow Lite
Successfully publish your app on the Google Play Store and the Apple App Store
What do you get with eBook?
Instant access to your Digital eBook purchase
Download this book in EPUB and PDF formats
Access this title in our online reader with advanced features
DRM FREE - Read whenever, wherever and however you want
Causal Inference and Discovery in Python: Unlock the secrets of modern causal machine learning with DoWhy, EconML, PyTorch and more
May 2023456
Machine Learning with PyTorch and Scikit-Learn: Develop machine learning and deep learning models with Python
Feb 2022774
Machine Learning for Algorithmic Trading: Predictive models to extract signals from market and alternative data for systematic trading strategies with Python, Second Edition
Jul 2020822
Mastering Microsoft Power BI – Second Edition: Expert techniques to create interactive insights for effective data analytics and business intelligence, Second Edition
Jun 2022712
Microsoft Power BI Quick Start Guide: The ultimate beginner's guide to data modeling, visualization, digital storytelling, and more, Third Edition
Nov 2022330
Machine Learning Engineering with Python: Manage the lifecycle of machine learning models using MLOps with practical examples, Second Edition
Aug 2023462
The AI Product Manager's Handbook: Develop a product that takes advantage of machine learning to solve AI problems
Feb 2023250
Et al.: Because not all research deserves a Nobel Prize
Aug 2023230
Python Machine Learning: Machine Learning and Deep Learning with Python, scikit-learn, and TensorFlow 2, Third Edition
Dec 2019772
Data Modeling with Snowflake: A practical guide to accelerating Snowflake development using universal data modeling techniques
May 2023324
Customer reviews
Filter
Rating distribution
5
(1 Ratings)
5 star100%
4 star0%
3 star0%
2 star0%
1 star0%
병옥 김Jan 28, 2024
5
Feefo Verified review
People who bought this also bought
5 Items
Mastering Ubuntu Server: Explore the versatile, powerful Linux Server distribution Ubuntu 22.04 with this comprehensive guide, Fourth Edition
Sep 2022584
Mastering Ansible, 4th Edition: Automate configuration management and overcome deployment challenges with Ansible, Fourth Edition
Dec 2021540
Enterprise DevOps for Architects: Leverage AIOps and DevSecOps for secure digital transformation
Nov 2021288
Ansible for Real-Life Automation: A complete Ansible handbook filled with practical IT automation use cases
Sep 2022480
Kubernetes – An Enterprise Guide: Effectively containerize applications, integrate enterprise systems, and scale applications in your enterprise, Second Edition
Dec 2021578
Authors (1)
Simone Alessandria
Simone Alessandria wrote his first program when he was 12. It was a text-based fantasy game for the Commodore 64. Now, he is a trainer (MCT), author, speaker, passionate software architect, and always a proud coder. He is the founder and owner of Softwarehouse. His mission is to help developers achieve more through training and mentoring. He has authored several books on Flutter, including Flutter Projects, published by Packt, and web courses on Pluralsight and Udemy.
Where there is an eBook version of a title available, you can buy it from the book details for that title. Add either the standalone eBook or the eBook and print book bundle to your shopping cart. Your eBook will show in your cart as a product on its own. After completing checkout and payment in the normal way, you will receive your receipt on the screen containing a link to a personalised PDF download file. This link will remain active for 30 days. You can download backup copies of the file by logging in to your account at any time.
If you already have Adobe reader installed, then clicking on the link will download and open the PDF file directly. If you don't, then save the PDF file on your machine and download the Reader to view it.
Please Note: Packt eBooks are non-returnable and non-refundable.
Packt eBook and Licensing When you buy an eBook from Packt Publishing, completing your purchase means you accept the terms of our licence agreement. Please read the full text of the agreement. In it we have tried to balance the need for the ebook to be usable for you the reader with our needs to protect the rights of us as Publishers and of our authors. In summary, the agreement says:
You may make copies of your eBook for your own use onto any machine
You may not pass copies of the eBook on to anyone else
How can I make a purchase on your website?
If you want to purchase a video course, eBook or Bundle (Print+eBook) please follow below steps:
Register on our website using your email address and the password.
Search for the title by name or ISBN using the search option.
Select the title you want to purchase.
Choose the format you wish to purchase the title in; if you order the Print Book, you get a free eBook copy of the same title.
Proceed with the checkout process (payment to be made using Credit Card, Debit Cart, or PayPal)
Where can I access support around an eBook?
If you experience a problem with using or installing Adobe Reader, the contact Adobe directly.
To view the errata for the book, see www.packtpub.com/support and view the pages for the title you have.
To view your account details or to download a new copy of the book go to www.packtpub.com/account
Our eBooks are currently available in a variety of formats such as PDF and ePubs. In the future, this may well change with trends and development in technology, but please note that our PDFs are not Adobe eBook Reader format, which has greater restrictions on security.
You will need to use Adobe Reader v9 or later in order to read Packt's PDF eBooks.
What are the benefits of eBooks?
You can get the information you need immediately
You can easily take them with you on a laptop
You can download them an unlimited number of times
You can print them out
They are copy-paste enabled
They are searchable
There is no password protection
They are lower price than print
They save resources and space
What is an eBook?
Packt eBooks are a complete electronic version of the print edition, available in PDF and ePub formats. Every piece of content down to the page numbering is the same. Because we save the costs of printing and shipping the book to you, we are able to offer eBooks at a lower cost than print editions.
When you have purchased an eBook, simply login to your account and click on the link in Your Download Area. We recommend you saving the file to your hard drive before opening it.
For optimal viewing of our eBooks, we recommend you download and install the free Adobe Reader version 9.
 Argentina
 Australia
 Austria
 Belgium
 Brazil
 Bulgaria
 Canada
 Chile
Chile
 Colombia
 Cyprus
 Czechia
 Denmark
 Ecuador
 Egypt
Egypt
 Estonia
 Finland
 France
 Germany
 Great Britain
 Greece
 Hungary
 India
India
 Indonesia
 Ireland
 Italy
Italy
 Japan
Japan
 Latvia
 Lithuania
 Luxembourg
 Malaysia
 Malta
Malta
 Mexico
 Netherlands
 New Zealand
 Norway
 Philippines
 Poland
 Portugal
 Romania
 Russia
 Singapore
 Slovakia
 Slovenia
 South Africa
 South Korea
 Spain
Spain
 Sweden
 Switzerland
 Taiwan
 Thailand
 Turkey
 Ukraine
 United States