Reader small image

You're reading from  Intel Galileo Blueprints

Product typeBook
Published inJun 2015
Publisher
ISBN-139781785281426
Edition1st Edition
Tools
Concepts
Right arrow
Author (1)
Marco Schwartz
Marco Schwartz
author image
Marco Schwartz

Marco Schwartz is an electrical engineer, entrepreneur, and blogger. He has a master's degree in electrical engineering and computer science from Supélec, France, and a master's degree in micro engineering from the Ecole Polytechnique Fédérale de Lausanne (EPFL), Switzerland. He has more than five years' experience working in the domain of electrical engineering. Marco's interests center around electronics, home automation, the Arduino and Raspberry Pi platforms, open source hardware projects, and 3D printing. He has several websites about the Arduino, including the Open Home Automation website, which is dedicated to building home automation systems using open source hardware. Marco has written another book on home automation and the Arduino, called Home Automation With Arduino: Automate Your Home Using Open-source Hardware. He has also written a book on how to build Internet of Things projects with the Arduino, called Internet of Things with the Arduino Yun, by Packt Publishing.
Read more about Marco Schwartz

Right arrow

Hardware configuration


We will now build the different boards based on the Arduino Uno, which we will later connect to the Galileo board via Wi-Fi.

Let's start the Arduino module with the LED light:

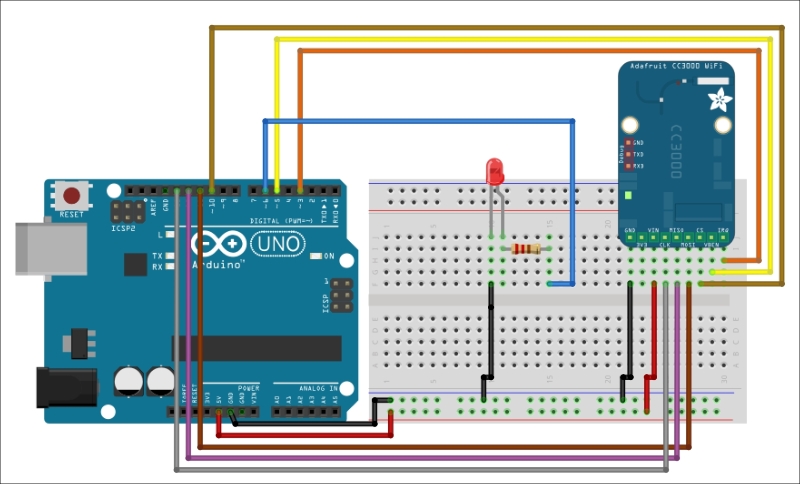
  1. First, we need to connect the IRQ pin of the CC3000 board (that's the rightmost pin when you're facing the board) to pin 3 of the Arduino Uno.

  2. Next, we will connect the VBAT pin to pin 5, and the CS pin to pin 10.

  3. Then, we proceed to connecting the Adafruit SPI pins to the Arduino pins: MOSI, MISO, and CLK pins go to pins 11, 12, and 13, respectively.

  4. Finally, we'll take care of the power supply. Adafruit's Vin should be connected to Arduino's 5V pin, and GND to GND.

  5. The last things that we need to connect are the LED and resistor. Connect the resistor to pin 6 of the Uno.

  6. Then, place the LED in series with the resistor. The negative pin of the LED should connect to the GND node.

You may refer to the following illustration for the entire configuration of the Arduino LED module:

Here is how my module turned...

lock icon
The rest of the page is locked
Previous PageNext Page
You have been reading a chapter from
Intel Galileo Blueprints
Published in: Jun 2015Publisher: ISBN-13: 9781785281426

Author (1)

author image
Marco Schwartz

Marco Schwartz is an electrical engineer, entrepreneur, and blogger. He has a master's degree in electrical engineering and computer science from Supélec, France, and a master's degree in micro engineering from the Ecole Polytechnique Fédérale de Lausanne (EPFL), Switzerland. He has more than five years' experience working in the domain of electrical engineering. Marco's interests center around electronics, home automation, the Arduino and Raspberry Pi platforms, open source hardware projects, and 3D printing. He has several websites about the Arduino, including the Open Home Automation website, which is dedicated to building home automation systems using open source hardware. Marco has written another book on home automation and the Arduino, called Home Automation With Arduino: Automate Your Home Using Open-source Hardware. He has also written a book on how to build Internet of Things projects with the Arduino, called Internet of Things with the Arduino Yun, by Packt Publishing.
Read more about Marco Schwartz