Search icon
Arrow left icon
All Products
Best Sellers
New Releases
Books
Videos
Audiobooks
Learning Hub
Newsletters
Free Learning
Arrow right icon
Intel Galileo Blueprints

You're reading from  Intel Galileo Blueprints

Product type Book
Published in Jun 2015
Publisher
ISBN-13 9781785281426
Pages 192 pages
Edition 1st Edition
Languages
Concepts
Author (1):
Marco Schwartz Marco Schwartz
Profile icon Marco Schwartz

Table of Contents (19) Chapters

Intel Galileo Blueprints
Credits
About the Author
About the Reviewers
www.PacktPub.com
Preface
Setting Up the Galileo Board and the Development Environment Creating a Weather Measurement and Data Logging Station Controlling Outputs Using the Galileo Board Monitoring Data Remotely Interacting with Web APIs Internet of Things with Intel Galileo Controlling Your Galileo Projects from Anywhere Displaying the Number of Unread Gmail E-mails on an LCD Screen Automated Remote Gardening with Intel Galileo Building a Complete Home Automation System Building a Mobile Robot Controlled by the Intel Galileo Board Controlling the Galileo Board from the Web in Real Time Using MQTT Index

Chapter 3. Controlling Outputs Using the Galileo Board

By now we have already familiarized ourselves with the Galileo board. You learned how to set up its development environment and explore configuring its analog inputs, and how to use digital sensors. We will now move on to exploiting the output capabilities of the board.

In this chapter, you will learn how to configure the output of the Galileo board. Specifically, we will play with its precise 12-bit PWM output to integrate and control actuators, such as sensors and servomotors through it. On the software side, we will write code that will control these actuators through push buttons and potentiometers.

This chapter is divided into two parts. In the first part, we will discuss how to control the relay through a push button. In the second part, we will take a look at how to control the servomotor with a potentiometer.

Let's dive in!

Hardware and software requirements


Before we proceed, ensure that you have everything needed to build the two mini projects.

First, we will need the Galileo board. Again, all the projects in this book utilize the Galileo board Gen 2.

We will use two actuators: a relay module and a servomotor. The relay module used in this project is a Pololu 5V single-pole, double-throw (SPDT) relay. The module already includes a basic carrier PCB, terminal blocks for the switch connectors, and a straight male header for the controls.

Meanwhile, the servomotor used is a simple continuous full-rotation servo motor. This servo is rated at 4.8V – 6V. However, you can use any servomotor for this project.

We will also need a potentiometer and a push button to control the actuators. The potentiometer used in this project is a center-tap linear 10k Ohm type. The push button is a single-pole single-throw (SPST) switch rated at 50mA.

The other things that we will need to complete our project are: resistors, a breadboard...

Assembling the relay controller


Let's start with the first part of this chapter—the relay controller. We are using a relay here to be able to control devices using high currents. Indeed, from the Galileo board alone we can only control devices that use low currents, such as LEDs.

We will assemble it (the relay controller) first. The circuit is designed in such a way that the push button will control the relay. Here is a schematic for your reference:

This circuit is easy to build. Following are the steps which will guide you to do this:

  1. First, connect the VCC and GND to the top horizontal rows of the breadboard.

  2. Then, connect one side of the push button to the VCC.

  3. The other side of the switch should be connected to one leg of the resistor.

  4. The other leg of the resistor should be grounded.

  5. Connect the other side of the switch to pin 8 of the Galileo board (you can refer to the switch reference in the list of components if you want to view its internal connections).

  6. As for the relay, connect the VCC...

Using the relay controller


Now that we have assembled the relay controller, we will build the Arduino sketch to make the circuit do as we like. We will create the sketch in such a way that it will be able to control the relay through the push button. To do so, you will need to follow the code given in these steps:

  1. First, we will declare the relay and the button pins. The relay is pin 7, while the button is pin 8. To do this, follow the code:

    int relayPin = 7;
    int buttonPin = 8;
  2. Next, we will create variables for the button states:

    int buttonState;
    int lastButtonState = LOW;   
    int previousButtonState = LOW;
  3. To debounce the button and achieve a stable state for the relay, we will add the following code. We will declare a default last debounce time and debounce delay:

    long lastDebounceTime = 0;
    long debounceDelay = 50;
  4. Then, we will create a variable for the state of the relay:

    int relayState = LOW;

    Inside the setup() function of the sketch, we will set the pins for the relay and the button. The button...

Assembling the servomotor controller


We now proceed to the second part of this project—the servomotor controller. By this time, we have an idea on how to use the output pins of the Galileo board.

We will first assemble the servomotor controller circuit for this project.

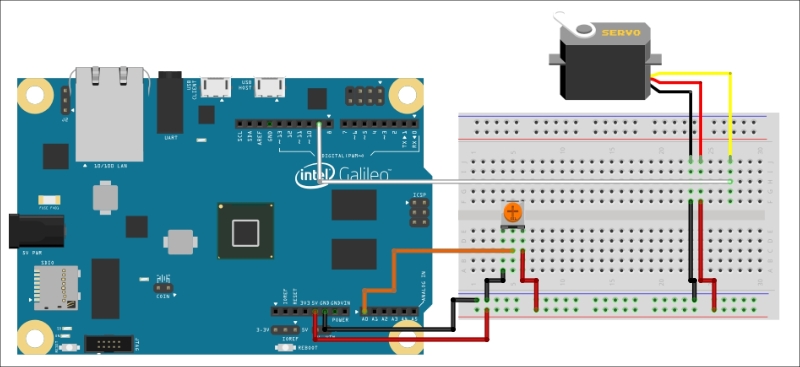
Here is the schematic that you can refer to as your guide:

Aside from the schematic representation, here is a step-by-step guide to make the servomotor controller. The steps are carefully laid out for you to be able to finish the circuit in the easiest way possible:

  1. First, you have to place the potentiometer on the far end of the breadboard. This will be our starting-point.

  2. Then, connect one of the potentiometer's pins to VCC, another pin to GND, and its middle pin to the analog pin A0 of the Galileo board (you can check out the link of the potentiometer in the hardware requirements section portion, to see the internal connections through its datasheet).That's all the connections we need for the potentiometer.

  3. Next, place the servomotor...

Using the servomotor controller


After we have assembled the servomotor controller circuit, we need to work on the Arduino sketch of the servomotor controller.

However, before that, you need to know that we need to match the turn of our potentiometer to the change on the angle of the servomotor. We should be wary of the potentiometer and be extra careful of our precision. We want our servomotor to give a relevant change with the turn that we make on our potentiometer.

Since we are using the Galileo board Gen 2, this wouldn't be a problem. Thanks to its 12-bit PWM output, we can be ensured of precision control.

Galileo Gen 2 makes use of an NXP PCA9685 PWM driver IC with 12-bit resolution. This is what makes a fine-grained control on the PWM duty cycle possible.

At this time, we are ready to write the code which will enable us to control the servomotor through the potentiometer, by following these steps:

  1. The first thing that we should do is include the servo library, so that we will have codes...

Summary


In this chapter we discussed two mini projects, which involved configuring the outputs of the Galileo Board 2. We built a relay controller and a servomotor controller. We also created Arduino sketches for each project and uploaded them into the Galileo board. In the relay controller, we installed a push button, which controlled the relay switch. For the servomotor controller, we installed a linear potentiometer that controlled our servomotor.

To go further in exploring how the output of the Galileo board 2 works, you can make use of other output. For example, you can use a couple of light-emitting diodes (LEDs) or DC motors.

In the next chapter, you will learn how to monitor data remotely using the Ethernet connection of the Galileo Gen 2. It will teach you how to create a measurement station by using an Ethernet port, and how to access it via a network.

lock icon The rest of the chapter is locked
You have been reading a chapter from
Intel Galileo Blueprints
Published in: Jun 2015 Publisher: ISBN-13: 9781785281426
Register for a free Packt account to unlock a world of extra content!
A free Packt account unlocks extra newsletters, articles, discounted offers, and much more. Start advancing your knowledge today.
Unlock this book and the full library FREE for 7 days
Get unlimited access to 7000+ expert-authored eBooks and videos courses covering every tech area you can think of
Renews at $15.99/month. Cancel anytime}