Reader small image

You're reading from  Intel Galileo Blueprints

Product typeBook
Published inJun 2015
Publisher
ISBN-139781785281426
Edition1st Edition
Tools
Concepts
Right arrow
Author (1)
Marco Schwartz
Marco Schwartz
author image
Marco Schwartz

Marco Schwartz is an electrical engineer, entrepreneur, and blogger. He has a master's degree in electrical engineering and computer science from Supélec, France, and a master's degree in micro engineering from the Ecole Polytechnique Fédérale de Lausanne (EPFL), Switzerland. He has more than five years' experience working in the domain of electrical engineering. Marco's interests center around electronics, home automation, the Arduino and Raspberry Pi platforms, open source hardware projects, and 3D printing. He has several websites about the Arduino, including the Open Home Automation website, which is dedicated to building home automation systems using open source hardware. Marco has written another book on home automation and the Arduino, called Home Automation With Arduino: Automate Your Home Using Open-source Hardware. He has also written a book on how to build Internet of Things projects with the Arduino, called Internet of Things with the Arduino Yun, by Packt Publishing.
Read more about Marco Schwartz

Right arrow

Chapter 4. Monitoring Data Remotely

In the previous chapter, we only used the basic functions of the board via the Arduino IDE, and specifically learned how to configure the outputs of the Galileo. You will now learn how to monitor data remotely using the board.

In this chapter, you will learn how to use the onboard Linux machine to get the full power of the board (yes, the board can be configured such that its hardware can be manipulated using the Linux operating system).

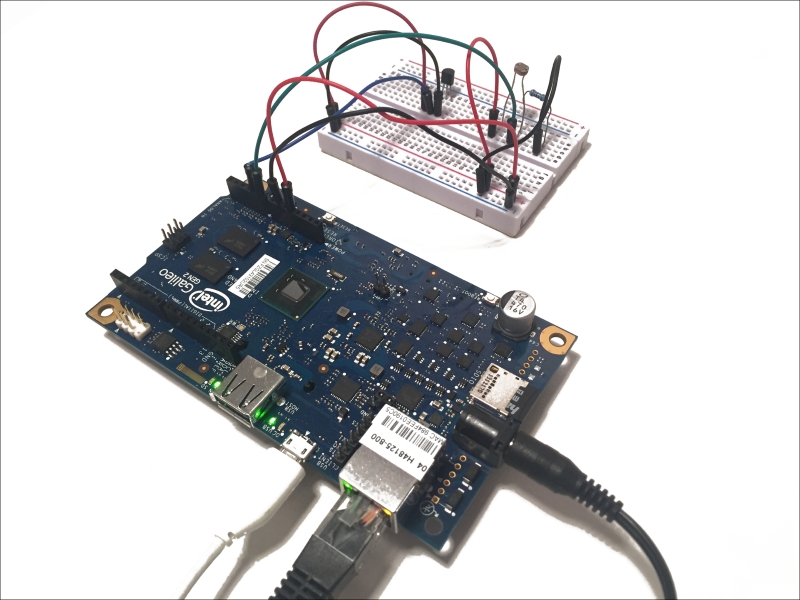
This project will also be the first one in which we will explore the onboard Ethernet port. The port connects the board up to any 10/100 Mbps LAN.

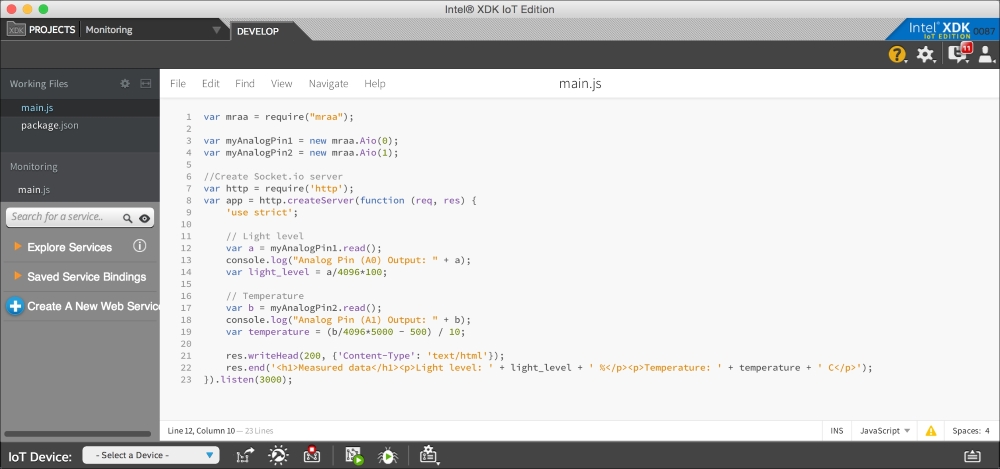
All these may sound complicated, but the steps are easy to follow. We will first configure the Linux machine. Then, we will install the Intel XDK software to configure the board remotely.

Finally, we will put everything in action with a simple data monitoring project. Let's start!

Hardware and software requirements


First, you need to get all the required components for this project.

Here are the details of the different components used in this chapter's project:

  • The Ethernet connection for the Galileo board is made through the RJ45 connector, so ensure that you have a RJ45 cable around.

  • We will also use a TMP36 sensor that is a low voltage (2.7V to 5.5V) precision Centigrade temperature sensor. It has a scale factor of 10mV/ degree Celsius and an accuracy of +/- 2 degree Celsius over temperature.

  • The photocell used in this project has a light resistance of about 1k Ohm and a dark resistance of about 10k Ohm.

  • The other components that we will need are breadboard, male/male jumper wires, and a MicroSD card that is at least 4GB.

Here is a list of all the components used in this chapter:

Installing the Linux image


The first thing that we should work on is the Linux image. We need to install the Linux image to access the board remotely. This is a special distribution to access the Internet of Things (IoT) functions of the board.

To do so, connect the Ethernet cable between the Galileo board and your router, as shown in the following image:

You need to perform the following steps for the installation:

  1. After connecting to the Ethernet, download the Linux image from the following link:

    https://software.intel.com/en-us/iot/downloads

  2. When the download is complete, unzip the files in a folder.

  3. Then, insert the SD card in your computer via a MicroSD adapter.

  4. Follow the instructions on the official Intel page, depending on your operating system:

Configuring the hardware


Now that the required Linux software is in place, we can add sensors to monitor the data that we need.

Here is a schematic to help you out in configuring your own hardware:

  1. First, connect the 5V and GND to the top or bottom horizontal rows of the breadboard.

  2. Then, connect the left pin of the TMP36 sensor to the 5V horizontal slot, the middle pin to the analog pin A1, and the right pin to the GND horizontal slot on the breadboard.

  3. Then, position the photocell in such a way that it is in series with the resistor. The node where the photocell and resistor meet should be connected to the board's analog pin A0.

  4. Next, connect the free leg of the photocell to the 5V line. The free leg of the resistor should be pinned to the GND.

Here is how the hardware configuration looks when everything is connected:

That's it. We are now ready to use the project.

Accessing measurements remotely


What we want to do now is access the measurements via the Ethernet port. We will not use the Arduino IDE here. We will use the Intel XDK IDE, and program the board using Node.js. Node.js makes creating and configuring apps running on these IoT devices very easy. Node.js also enables you to connect IoT sensors through JavaScript programming. You can find more information about Node.js here:

http://nodejs.org/

You can also check out Mastering Node.js by Packt Publishing.

We can now start programming the board with JavaScript.

The Intel XDK IDE lets you create, debug, and deploy Node.js applications on your IoT device. In this case, it's our Galileo board.

This is what you will see on starting the XDK:

First, create a new project. You can use one of the example projects to create all the files that you require, for example, the 'Local Temperature' project.

Then go to the DEVELOP panel. You will see the following main window:

Let's now take a look at the complete code...

Summary


We're done! Congratulations on building your own data monitoring system which can be accessed remotely.

In this chapter, we have made use of Intel's XDK IDE and JavaScript to configure a simple remote data monitoring system. We installed a Linux image on the board, and configured the hardware to include the sensors. We also accessed the data remotely by sending commands through JavaScript. Then, we passed on the data remotely and printed this data inside a web browser.

In the next chapter, we will continue exploring IoT applications by interfacing it with online APIs, such as Twitter. Using such APIs, you will be able to broadcast your measurement results to your social media accounts.

lock icon
The rest of the chapter is locked
You have been reading a chapter from
Intel Galileo Blueprints
Published in: Jun 2015Publisher: ISBN-13: 9781785281426
Register for a free Packt account to unlock a world of extra content!
A free Packt account unlocks extra newsletters, articles, discounted offers, and much more. Start advancing your knowledge today.
undefined
Unlock this book and the full library FREE for 7 days
Get unlimited access to 7000+ expert-authored eBooks and videos courses covering every tech area you can think of
Renews at $15.99/month. Cancel anytime

Author (1)

author image
Marco Schwartz

Marco Schwartz is an electrical engineer, entrepreneur, and blogger. He has a master's degree in electrical engineering and computer science from Supélec, France, and a master's degree in micro engineering from the Ecole Polytechnique Fédérale de Lausanne (EPFL), Switzerland. He has more than five years' experience working in the domain of electrical engineering. Marco's interests center around electronics, home automation, the Arduino and Raspberry Pi platforms, open source hardware projects, and 3D printing. He has several websites about the Arduino, including the Open Home Automation website, which is dedicated to building home automation systems using open source hardware. Marco has written another book on home automation and the Arduino, called Home Automation With Arduino: Automate Your Home Using Open-source Hardware. He has also written a book on how to build Internet of Things projects with the Arduino, called Internet of Things with the Arduino Yun, by Packt Publishing.
Read more about Marco Schwartz