Reader small image

You're reading from  Intel Galileo Blueprints

Product typeBook
Published inJun 2015
Publisher
ISBN-139781785281426
Edition1st Edition
Tools
Concepts
Right arrow
Author (1)
Marco Schwartz
Marco Schwartz
author image
Marco Schwartz

Marco Schwartz is an electrical engineer, entrepreneur, and blogger. He has a master's degree in electrical engineering and computer science from Supélec, France, and a master's degree in micro engineering from the Ecole Polytechnique Fédérale de Lausanne (EPFL), Switzerland. He has more than five years' experience working in the domain of electrical engineering. Marco's interests center around electronics, home automation, the Arduino and Raspberry Pi platforms, open source hardware projects, and 3D printing. He has several websites about the Arduino, including the Open Home Automation website, which is dedicated to building home automation systems using open source hardware. Marco has written another book on home automation and the Arduino, called Home Automation With Arduino: Automate Your Home Using Open-source Hardware. He has also written a book on how to build Internet of Things projects with the Arduino, called Internet of Things with the Arduino Yun, by Packt Publishing.
Read more about Marco Schwartz

Right arrow

Chapter 10. Building a Complete Home Automation System

In the previous chapters, we used the Galileo board in standalone projects only, and sometimes, we connected it to web services to store and display data.

This time around, we will raise the bar to the next level. We will configure our Galileo board to function as a home automation hub, and we will have several devices connected to the Galileo board. We will be able to monitor them all from the Galileo board.

To describe this project further in a home automation context, we will display sensors in different parts of the house: for example, we will place a sensor in one room and a light output in another room.

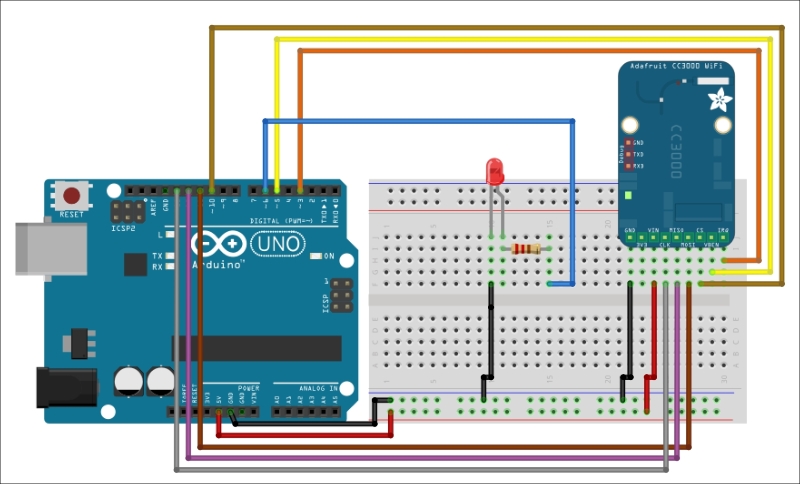
To do this, we will first connect two modules based on Arduino. These modules need to be able to communicate via Wi-Fi so that we can access them remotely.

The first module will control a small LED and the other one will act like a sensor.

With the principles and techniques that you will learn in this project, you can extend the capabilities...

Hardware and software requirements


First, let's see what hardware and software this project calls for.

As discussed, our Galileo boards need to be able to connect to our network. For this, we will need the Intel IoT image that we installed in Chapter 4, Monitoring Data Remotely. You may revisit that chapter to refresh your memory if you wish.

For our Arduino LED module, we will need the following major components:

  1. The first one is the Arduino Uno board. This is the most used Arduino board at the present time, and it is the standard board for many projects.

  2. The second board that we'll need is the Adafruit CC3000 Wi-Fi breakout board. This board utilizes Serial Peripheral Interface (SPI) for communication, so you can expect an easy data transfer and easy control of its data transfer speed. Asynchronous connections are made possible through this board's IRQ pin, providing you with a proper interrupt system.

  3. The third major component is the Red LED with a 220 Ohm resistor.

These are the three major...

Hardware configuration


We will now build the different boards based on the Arduino Uno, which we will later connect to the Galileo board via Wi-Fi.

Let's start the Arduino module with the LED light:

  1. First, we need to connect the IRQ pin of the CC3000 board (that's the rightmost pin when you're facing the board) to pin 3 of the Arduino Uno.

  2. Next, we will connect the VBAT pin to pin 5, and the CS pin to pin 10.

  3. Then, we proceed to connecting the Adafruit SPI pins to the Arduino pins: MOSI, MISO, and CLK pins go to pins 11, 12, and 13, respectively.

  4. Finally, we'll take care of the power supply. Adafruit's Vin should be connected to Arduino's 5V pin, and GND to GND.

  5. The last things that we need to connect are the LED and resistor. Connect the resistor to pin 6 of the Uno.

  6. Then, place the LED in series with the resistor. The negative pin of the LED should connect to the GND node.

You may refer to the following illustration for the entire configuration of the Arduino LED module:

Here is how my module turned...

Testing the Wi-Fi connection


Now that we have finished setting up both modules, we'll proceed to testing them. Let's start with the LED board. If you want to learn more about Arduino first, I recommend this tutorial on the official Arduino website:

http://www.arduino.cc/en/Tutorial/HomePage

Open the Arduino IDE to start the test. Here is the complete code for this part:

// Variables & functions
#define NUMBER_VARIABLES 2
#define NUMBER_FUNCTIONS 0

// Import required libraries
#include <Adafruit_CC3000.h>
#include <SPI.h>
#include <CC3000_MDNS.h>
#include <aREST.h>
#include <avr/wdt.h>

// DHT 11 sensor
#define DHTPIN 7
#define DHTTYPE DHT11

// These are the pins for the CC3000 chip if you are using a breakout board
#define ADAFRUIT_CC3000_IRQ   3
#define ADAFRUIT_CC3000_VBAT  5
#define ADAFRUIT_CC3000_CS    10

// Create CC3000 instance
Adafruit_CC3000 cc3000 = Adafruit_CC3000(ADAFRUIT_CC3000_CS, ADAFRUIT_CC3000_IRQ, ADAFRUIT_CC3000_VBAT);

// Create aREST...

Building the home automation interface


Now, we are ready to build the app that will facilitate the communication between the Galileo and Arduino boards.

We will use the same technique that we used in the previous chapter. We make use of the Node.js server to build a scalable network application, the Jade interface to manage interactions, and finally, JavaScript to link both.

Here is the first main.js file:

// Module
var express = require('express');
var app = express();

// Define port
var port = 3000;

// View engine
app.set('view engine', 'jade');
app.set('views', __dirname + '/views');

// Set public folder
app.use(express.static(__dirname + '/public'));

// Serve interface
app.get('/', function(req, res){
  res.render('interface');
});

// Rest
var rest = require("arest")(app);

// Add devices
rest.addDevice('http','192.168.1.105');
rest.addDevice('http','192.168.1.106');

// Start server
app.listen(port);
console.log("Listening on port " + port);

We will use the Express framework for this...

Summary


Let's summarize what we did in this chapter.

First, we built two Wi-Fi Arduino modules; one for the LED module and the other one for the sensor. Alternatively, you can also replace these Wi-Fi modules with other Galileo boards with Wi-Fi modules, or with Intel Edison boards that have built-in Wi-Fi.

Then, we tested them by pinging the boards and getting their IP addresses.

Finally, we integrated everything into a single interface with the help of the Node.js, a Jade interface, and lastly, JavaScript.

In the next chapter, we will use everything you learned so far for a different and more exciting application—building a mobile robot! You'll learn how to transform the Galileo board into a robot's brain.

lock icon
The rest of the chapter is locked
You have been reading a chapter from
Intel Galileo Blueprints
Published in: Jun 2015Publisher: ISBN-13: 9781785281426
Register for a free Packt account to unlock a world of extra content!
A free Packt account unlocks extra newsletters, articles, discounted offers, and much more. Start advancing your knowledge today.
undefined
Unlock this book and the full library FREE for 7 days
Get unlimited access to 7000+ expert-authored eBooks and videos courses covering every tech area you can think of
Renews at $15.99/month. Cancel anytime

Author (1)

author image
Marco Schwartz

Marco Schwartz is an electrical engineer, entrepreneur, and blogger. He has a master's degree in electrical engineering and computer science from Supélec, France, and a master's degree in micro engineering from the Ecole Polytechnique Fédérale de Lausanne (EPFL), Switzerland. He has more than five years' experience working in the domain of electrical engineering. Marco's interests center around electronics, home automation, the Arduino and Raspberry Pi platforms, open source hardware projects, and 3D printing. He has several websites about the Arduino, including the Open Home Automation website, which is dedicated to building home automation systems using open source hardware. Marco has written another book on home automation and the Arduino, called Home Automation With Arduino: Automate Your Home Using Open-source Hardware. He has also written a book on how to build Internet of Things projects with the Arduino, called Internet of Things with the Arduino Yun, by Packt Publishing.
Read more about Marco Schwartz