Search icon
Arrow left icon
All Products
Best Sellers
New Releases
Books
Videos
Audiobooks
Learning Hub
Newsletters
Free Learning
Arrow right icon
Intel Galileo Blueprints

You're reading from  Intel Galileo Blueprints

Product type Book
Published in Jun 2015
Publisher
ISBN-13 9781785281426
Pages 192 pages
Edition 1st Edition
Languages
Concepts
Author (1):
Marco Schwartz Marco Schwartz
Profile icon Marco Schwartz

Table of Contents (19) Chapters

Intel Galileo Blueprints
Credits
About the Author
About the Reviewers
www.PacktPub.com
Preface
Setting Up the Galileo Board and the Development Environment Creating a Weather Measurement and Data Logging Station Controlling Outputs Using the Galileo Board Monitoring Data Remotely Interacting with Web APIs Internet of Things with Intel Galileo Controlling Your Galileo Projects from Anywhere Displaying the Number of Unread Gmail E-mails on an LCD Screen Automated Remote Gardening with Intel Galileo Building a Complete Home Automation System Building a Mobile Robot Controlled by the Intel Galileo Board Controlling the Galileo Board from the Web in Real Time Using MQTT Index

Chapter 11. Building a Mobile Robot Controlled by the Intel Galileo Board

In this chapter, we will use the Intel Galileo for a completely different application than we have so far. Indeed, we will use the board as be the "brain" of a mobile robot.

We are first going to see how to assemble the robot. We will mount the Galileo board on the robot, and also assemble an ultrasonic sensor on the robot.

Then, we will program the robot to do some basic tasks. First, we will do a complete test of the robot to check whether the Galileo board is correctly wired with the robot. Then, we will program the robot to perform a simple navigation task that is moving around while avoiding obstacles in front of the robot using the ultrasonic sensor. Let's dive in!

Hardware and software requirements


Let's first see what we need in this chapter to get started. Apart from the Galileo board, the most important piece of hardware here is the robot chassis. I used a simple DFRobot MiniQ 2 wheels chassis for this chapter. Here is an image of this chassis that comes with a base, two motors, and two wheels:

In the preceding image, you can see the ultrasonic sensor that was already mounted. Of course, you can use other robot chassis' for this chapter; they simply need to have two wheels with two motors, and you should be able to mount the Galileo board on it.

Then, we need an Arduino motor shield to connect the two DC motors. I used a DFRobot motor shield for this task. Note that I also used a prototyping for this project, but this is only necessary if you want to mount more sensors in the future.

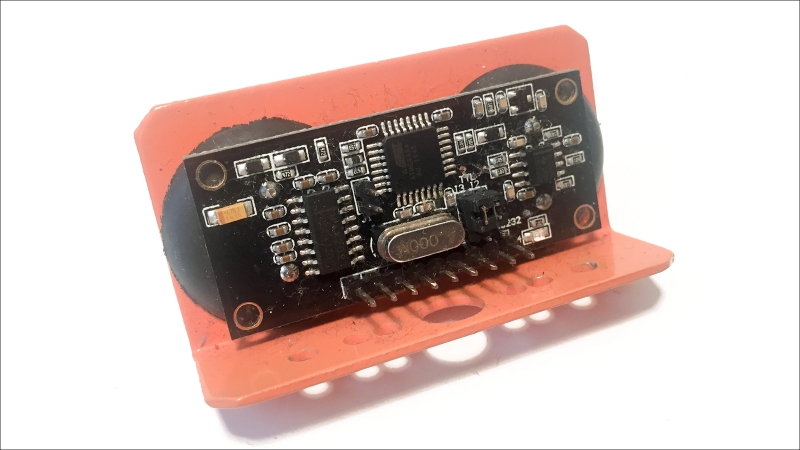
We also need an ultrasonic sensor. I used an URM-37 sensor in this project, which is quite convenient to use:

Finally, you will need a battery to power the robot while...

Hardware configuration


Let's now see how to assemble the robot:

  1. First, I recommend that you mount the ultrasonic sensor directly on the robot chassis using an adapter, if possible. These usually come with the ultrasonic sensor.

  2. Then, mount the Galileo board on top of the robot chassis using metal spacers, which usually come with the robot chassis.

  3. After this, you can mount the motor shield on top of the Galileo board.

  4. Also, connect the motors to the motor shield by ensuring that you connect both motors with the same polarity on the shield.

    This is a view of the front of the robot at this stage:

    At this stage, the back view of the robot is as follows:

  5. Now, it's time to connect the ultrasonic sensor. Note that if you want to use a prototyping shield (so as to connect more sensors in the future), this is the time to do so. For the ultrasonic sensor, you have three pins to connect: VCC, GND, and the signal pin. When looking at the back of the sensor, this signal pin is the fourth pin starting from...

Testing the robot


It's now time to test our robot. In this part, we will simply test all the functionalities of the robot with a simple sketch. We will make the robot go forward, stop, and turn left and right. We will also display the front distance from the sensor on the serial port.

Here is the complete code for this part:

// Motor pins
int speed_motor1 = 6;  
int speed_motor2 = 5;
int direction_motor1 = 7;
int direction_motor2 = 4;

// Sensor pins
int distance_sensor = A0;

// Variable to be exposed to the API
int distance;

void setup(void)
{  
  // Start Serial
  Serial.begin(115200);
}

void loop() {  
  
  forward();
  delay(2000);
  left();
  delay(2000);
  right();
  delay(2000);
  stop();
  delay(2000);
  
  // Measure distance
  distance = measure_distance(distance_sensor);
  Serial.print("Measured distance: ");
  Serial.println(distance);
  
}

// Forward
int forward() {
  
  send_motor_command(speed_motor1,direction_motor1,100,1);
  send_motor_command(speed_motor2,direction_motor2...

Autonomous navigation


Now that we are sure that our robot is correctly wired, it's time to write an application for moving it around while avoiding obstacles in front of the robot. Here is the complete code for this part:

// Motor pins
int speed_motor1 = 6;  
int speed_motor2 = 5;
int direction_motor1 = 7;
int direction_motor2 = 4;

// Sensor pin
int distance_sensor = A0;

void setup(void)
{  
  // Start Serial
  Serial.begin(115200);
  
  // Go forward by default
  forward();
}

void loop() {  
  
  // Measure distance
  int distance = measure_distance(distance_sensor);
  
  // If obstacle in front
  if (distance < 10) {
  
    // Go backward
    backward();
    delay(2000);
    
    // Turn around
    left();
    delay(500);
    
    // Go forward again
    forward();
  }
  
}

// Forward
int forward() {
  
  send_motor_command(speed_motor1,direction_motor1,200,1);
  send_motor_command(speed_motor2,direction_motor2,200,1);
  return 1;
}

// Backward
int backward() {
  
  send_motor_command...

Summary


We used the Intel Galileo board to act as the "brain" of a mobile robot. After building the robot, we tested it with a simple program, to ensure that all the connections were alright. Then, we built a more complex behavior using the Galileo board by making the robot avoid obstacles while moving around.

There are, of course, many ways to improve this project. For example, you can connect more sensors to the robot. One way would be to connect a digital compass to the robot and use it to get the direction that the robot is facing toward. That way, you can program the robot to turn from a given angle, without having to guess the speed of its wheels.

In the next chapter, you will see how to use the MQTT protocol on your Galileo board, which will allow you to control your Galileo projects in real time from anywhere in the world.

lock icon The rest of the chapter is locked
You have been reading a chapter from
Intel Galileo Blueprints
Published in: Jun 2015 Publisher: ISBN-13: 9781785281426
Register for a free Packt account to unlock a world of extra content!
A free Packt account unlocks extra newsletters, articles, discounted offers, and much more. Start advancing your knowledge today.
Unlock this book and the full library FREE for 7 days
Get unlimited access to 7000+ expert-authored eBooks and videos courses covering every tech area you can think of
Renews at $15.99/month. Cancel anytime}