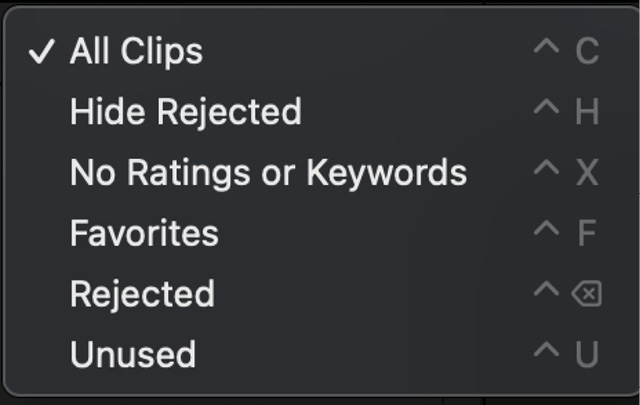
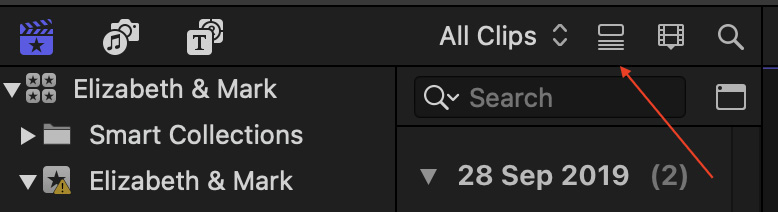
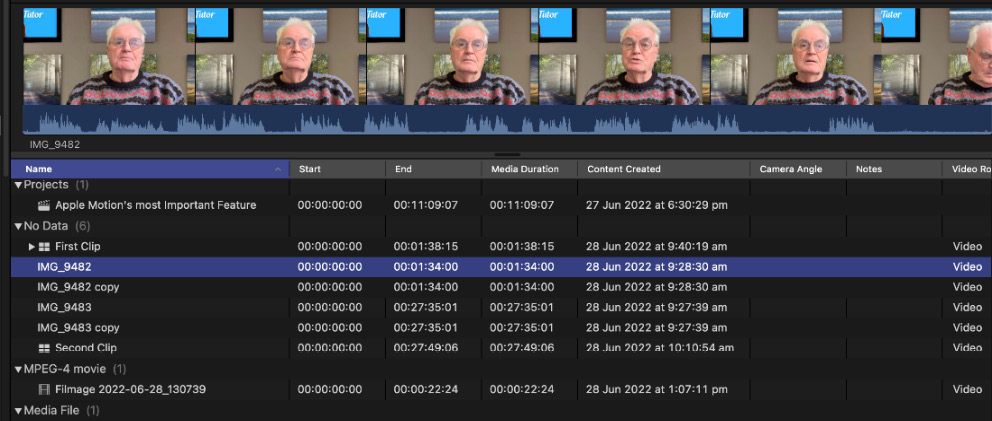
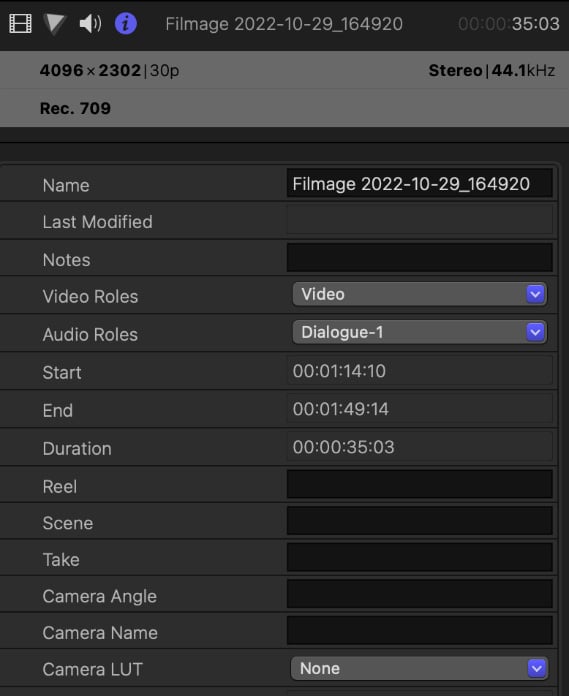
Reader small image

You're reading from  Edit without Tears with Final Cut Pro

Product typeBook
Published inMar 2024
PublisherPackt
ISBN-139781804614921
Edition1st Edition
Right arrow
Author (1)
Bruce G. Macbryde
Bruce G. Macbryde
author image
Bruce G. Macbryde

Bruce G. Macbryde, a Final Cut Pro trainer with 20+ years of experience, spanning from the original release in 1999 to the latest version. He served as a sales manager for Australian Authorized Apple distributors (1998-2004) and later as a training manager for Apple-developed software through 2009. He established Wedding Media Productions in 2004, a wedding video business in Sydney, Australia. Bruce is a YouTube creator for the VideoTutors channel, with 500+ video tutorials. He began teaching marketing at NSW TAFE in the early 1980s, specializing in technology and business software such as Microsoft Office, Adobe Pagemaker, and Photoshop during a 7-year stint in New Zealand.
Read more about Bruce G. Macbryde

Right arrow

Organizing Media

This chapter concentrates on the unique ways in which media is organized within the Final Cut Pro database. Organization within the filming industry's terminology is known as logging. In this chapter, you will learn about the distinctive sub-classifications in which different categories of media are separated to give you quick access during the editing process. The importance of this separation becomes even more apparent as the number of editors that require access to a project increases to share the workload. This chapter is principally about organization, but it is also about how media is sorted and where to find the metadata that refers to the creation of the camera clips. You will be introduced to how Final Cut Pro transcodes media into optimized and proxy media formats that simplify the editing process. You will become familiar with the Settings | Preferences setup and its implications, and you will understand the positioning of the project in the timeline...

Understanding libraries and events

Organization is the key to exceptional video post-production, and Final Cut Pro contains a unique set of tools to ensure that media remains well organized. Traditionally, this organization is known as logging. As you saw in Chapter 1, all media is stored within a Final Cut Pro library. A town’s public library contains many books, magazines, DVDs, and other items. The town library categorizes everything into different sections inside the building – for instance, fiction, non-fiction, sports, and so on. Final Cut Pro uses a similar method of categorization to store all of its contents. It uses events, Favorites, Keyword Collections, and Smart Collections, to which you give appropriate names to gain quick access to the contents when you are editing. The Final Cut Pro library also contains thumbnails representing Final Cut Pro’s projects.

As you saw in Chapter 1, you have the choice of where you create a library. The industry standard...

When and why to log clips

The decision on whether to log clips or not is best taken before ingestion of the footage. It is a simple choice, mostly based on the size and length of the proposed video. The decision will affect how you ingest the footage as well as the amount of time you intend to spend logging and organizing the imported media. Ingestion for a simple video is best done by dragging clips directly into the clip browser. For very basic edits with just one or two clips, the footage can even be dragged directly into a project in the timeline.

The rule of thumb should be, “The smaller and shorter the proposed video, the less need for logging.” After all, logging is carried out so that footage is in an orderly classification, allowing you to access it quickly during the creative part of the editing process.

The more complex the edit, the more you will need to have footage and B roll in categories so that you are not searching through the browser for clips...

Favorites

The first and simplest way to categorize media is to use the Final Cut Pro Favorites feature, using its F keyboard shortcut. Favorites will contain the best clips that you will use in the assembly stage. When you choose a clip with a library selected in the browser sidebar and press the F key, the clip is categorized in a separate section called Favorites. It still remains accessible in the main library but is more easily selected from Favorites. You should think of the Favorites section as an index to quickly locate a clip that is also in the main library.

The rating as a favorite method

First, you need to put some media into an event; either create a new event (Option + N) or use the event that was created with the library.

Select a portion of a clip or group of clips, and press the F key. The clips will have a green line across the top of just the portion of the clip that has been selected:

Figure 2.5 – The green line

Figure 2.5 – The green line

Behind...

Understanding Keyword Collections

Welcome to the concept of keywords. As the term suggests, different words are used to categorize different selections or different indexes. This concept makes it easy because you use the actual word of the item you are separating. The process of establishing a Keyword Collection is not as easy as it is for favorites, which have already been set up for you, but once it is set up, it is easy to add new media to the Keyword Collection.

Keyword Collections are specific to each event and can be created before you need to use them, or on the fly as the need occurs. In most cases, you are much more likely to set them up at the time you need them.

Keyword Collections are at their most useful at the pre-edit stage for storing clips and the B roll. The sorting process ranks the most useful clips for the edit. You will see more about that and the ways to see different views of the media later in this chapter in the Browser filters section, and in much more...

Smart Collections

In the context of the real-world town library analogy, Smart Collection categories don’t exist, as they are a digital process. Because Final Cut Pro is a digital application, it can sort items in a selection based on user-defined search attributes.

At the beginning of this chapter, you saw how to add to Favorites. You will have noticed that Favorites is within a folder called Smart Collections in the browser sidebar. There are five Smart Collections within that Smart Collections folder – All Video, Audio Only, Favorites, Projects, and Stills. These are set up by default and have the following functions:

  • All Video shows no audio and no stills (photos), only video clips (including project thumbnails)
  • Audio Only shows only audio
  • Favorites shows the clips you have favorited
  • Projects shows the project thumbnails only
  • Stills shows still images (photos) only
Figure 2.16 – The default contents of Smart Collections

Figure 2.16 – The default contents...

What are folders?

The Keyword Collections and Smart Collections categories can be further contained in folders, which will avoid confusion in the sidebar, and those folders can, in turn, accommodate other folders.

The added advantage of using folders to organize the other categories is that when you select a folder in the sidebar, all the contents of the Keyword and Smart Collections inside the folder show on the right-hand side of the browser window. Of course, this applies when you select a library and an event as well. All the content inside the hierarchy of groups is displayed, as seen in the following screenshot of a folder with three cameras included:

Figure 2.20 – A folder containing three different cameras

Figure 2.20 – A folder containing three different cameras

Folders, just like Keyword and Smart Collections, are specific to each event. This means that by selecting an event at the top level of your hierarchy, you will see all the contents of the folders and the Keyword Collections within...

Templates

It’s easy and convenient to create templates of a library structure so that they are available for you to use for any future library.

Creating templates

You can create templates for future use by setting up a new library and setting up the structure of events, folders, and Keyword and Smart Collections to suit your workflow. Then, you save the empty library to a location that you will remember. Next time you want to use that empty library structure as a template, right-click on the empty library in the Finder and select Duplicate:

Figure 2.21 – Duplicate in the Finder

Figure 2.21 – Duplicate in the Finder

If there is no media in the template yet, it duplicates immediately. If you were to duplicate a working library containing media, you would need to wait for some time. Select the newly duplicated library, give it a name, and double-click it to launch the template in Final Cut Pro.

This is a brilliant way of separating camera footage shot on your favorite...

Using the Search functionality

The Search feature allows you to quickly access the hierarchy structure discussed previously. You will not likely remember where you have categorized all of your media, especially if you are coming back to an edit after some time. A quick suggestion is to look at the structure of the browser sidebar; noting the different events, folders, and Keyword and Smart Collections will give you a clue as to where you may have stored different categories of clips.

If you are unsure, rather than fumbling through the categories, it is best to use the Search feature. When you search in a library or an event, all the folders within, including Keyword and Smart Collections, are searched as well. You don’t need a hierarchal structure for Search to be effective; it can be used on single events as well.

The Search input field is at the top-right of the main browser window, signified with a magnifying glass. If you don’t see it, click the magnifying glass...

Colored lines on browser clips

This is a short list of what the colored lines represent in the browser clips. The reason for keeping this as a separate section is to give it a heading that you can refer back to when a question is raised about what a certain color represents. Let’s look at the color meanings:

  • Green: The clip has been added to Favorites
  • Blue: The clip has been added to a Keyword Collection
  • Red: The clip has been added to the Rejected category
  • Purple: The clip has been analyzed to find people
  • Orange: The clip has been added to the visible timeline
Figure 2.32 – The colored lines on media clips

Figure 2.32 – The colored lines on media clips

As you saw in the list of colored lines, there is an orange line that tells you whether a browser clip (or a portion of a clip) has been added to the current project being viewed in the timeline. This means that you can quickly see what clips have already been added to your project so that you don’t double...

Removing media from categories

In this section, we will look at some simple steps to remove media from the various categories.

Let’s consider them in order:

  • Favorites: To remove a favorited clip, press the U key – it unrates both Favorites and Rejected categorizations. Unrating means the media is no longer rated as Favorite or Rejected.
  • Keyword Collections: Select the Keyword Collection to remove it in the browser sidebar, and press Command + K. When the Keyword window opens, select the keyword in the top field of the window, shown in blue, and press Delete.
  • Rejected: Press the U key; this is the same method of unrating used for Favorites.
  • Smart Collections: Smart Collections are a little harder to remove because the clips are added automatically, as per their attributes. You would need to change those attributes, such as the name of a clip. If you had a Smart Collection that collected all clips named IMG, you could rename them to remove them from...

Browser filters

Up until now, we have been looking at the media in the browser under the listing of All Clips. You saw that you could change that filter to Favorites. The other filter options are Hide Rejected, No Ratings or Keywords, Rejected, and Unused:

Figure 2.37 – The filter options

Figure 2.37 – The filter options

The filter headings don’t explain a lot about what they do at first glance. Let’s decipher what they do by looking at them in order. Hide Rejected refers to clips that have been hidden by using the Delete key – yes, the Delete key! Let me explain.

You would think that if you deleted a clip in the browser, it would go in the trash. To be clear, deleting from the browser does not trash media. It stores the clip in a hidden category called Rejected. It’s so well hidden that you can’t even access it. Well, that’s not quite true – I’ll show you how to use a filter to view hidden files, as there is no Smart...

Sorting the browser

To understand the principle of sorting, it is first best to consider two methods of viewing media in the browser – the List view or the Thumbnail view. Up until now, I have only discussed the ramifications of using the Thumbnail view. It is highly visual compared to the List view and, as such, is the view that most video editors would prefer to use.

After all, we are visual people. Aren’t lists for people working in databases? Well, let’s get real here – Final Cut Pro is a giant database, so the List view takes advantage of all those database facilities. To select the List view, click to the right of the browser filter selections.

Figure 2.38 – The List view icon

Figure 2.38 – The List view icon

When you look at a List view, the visual part of the clip, which is selected in the list, indicated by a blue horizontal bar, is displayed at the top of the viewer:

Figure 2.39 – The List view

Figure 2.39 – The List view

What...

The Open Clip view

The Open Clip view is something that I suggest you use with real care, as it changes a browser clip before it is used in the project.

Note

The Open Clip view cannot be used to categorize clips in any of the indexes that have just been discussed. It can only be applied to individual whole clips, as it does not recognize portions of clips.

The Open Clip view will let you add and adjust color and audio effects in the browser clip itself. Think of this as a means of changing the color and audio attributes as if this task was done before importing a clip into Final Cut Pro. You can even add more than one video clip to blend multiple clips together.

I frequently use Open Clip to sync video clips with external audio recorders so that the clip is synchronized in the browser before it is added to a project in the timeline.

As I warned previously, be sure you know what you are doing, as once a clip that has been modified with the Open Clip command is added to...

Shortcuts for media actions

Right-clicking on browser clips will offer the following shortcuts. The choices depend on whether one or more clips are selected. Figure 2.47 shows when two clips are selected:

Figure 2.47 – Roles selected when right-clicking media in the browser

Figure 2.47 – Roles selected when right-clicking media in the browser

The first four choices are fairly self-explanatory, and they will be explained in detail in Chapter 4 and Chapter 7.

Roles are unique to Final Cut Pro and are a much-underrated feature that deserves a brief explanation. You have just looked at categorizing media in the browser, and roles are a way of categorizing timeline audio clips in a similar manner to labeling browser clips. As you know, Final Cut Pro does not have independent tracks like other NLEs; it has a main magnetic timeline with clips connected to it.

The Roles feature allows you to apply different categories to audio clips connected to the main magnetic storyline. As of version 10.7 of Final Cut Pro,...

Exploring clip and library information

As previously stated, Final Cut Pro is, at its heart, a database, so there is a vast amount of metadata that you can access from the Inspector. This type of information is different for clips and libraries. Clips show information about how they were created on the camera as well as offering fields where you can add information. Library information has more to do with where and how a library is located on a computer.

Figure 2.49 – Clip information in the Inspector

Figure 2.49 – Clip information in the Inspector

A method of exploring clip information

Select a clip in the browser sidebar, and make sure that the i letter in the circle is active in the Inspector (if the circle is blue, it’s active). At the bottom-left of the Inspector window is a drop-down button. The default selection is Basic; change this to Extended.

The following is the information you will be most interested in. Let’s start at the top of the window. In the gray bar...

Exploring Settings/Preferences

Prior to macOS version 13 and Final Cut Pro 10.6.5, Settings were known as Preferences. They allow you to personalize the way that Final Cut Pro is set up. Settings can be accessed under the Final Cut Pro menu; it’s the second item, called either Settings or Preferences, depending on your version of Final Cut Pro and macOS.

There are five tabs. The first is General, where you can change the time display in the timeline. This is usually set at HH:MM:SS:FF – hours, minutes, seconds, and frames. This is the normal setting; the latter frames are dependent on the frame rate of the project in the timeline. The others are standard, as their words imply. You may need the second choice under the time display option will add subframes when working with audio, where there are many extra frames, known as subframes, of audio within a single frame of video.

The second tab is the Editing tab. You may wish to adjust the default duration of still images...

Summary

As with Chapter 1, this chapter is rich in reference content that you will need to engage with from time to time. You saw that Final Cut Pro’s unique set of tools ensures that media remains well organized, with all of it being stored within a library and then in events, favorites, Keyword Collections, and Smart Collections. You saw how to create templates to ease the setup of future edits, along with searching routines and ways to sort media in a browser. There was information about how and why to transcode media for ease of editing. We discussed options on how the view of the browser can be adjusted to suit your needs. You saw how Final Cut Pro allows you to become very detailed in how you categorize clips and the rating of those selections. You will have realized that it is useful to spend time sorting when working on longer and more complex projects, but for shorter videos, you should let your instincts prevail and start editing as quickly as possible.

We explained...

lock icon
The rest of the chapter is locked
You have been reading a chapter from
Edit without Tears with Final Cut Pro
Published in: Mar 2024Publisher: PacktISBN-13: 9781804614921
Register for a free Packt account to unlock a world of extra content!
A free Packt account unlocks extra newsletters, articles, discounted offers, and much more. Start advancing your knowledge today.
undefined
Unlock this book and the full library FREE for 7 days
Get unlimited access to 7000+ expert-authored eBooks and videos courses covering every tech area you can think of
Renews at €14.99/month. Cancel anytime

Author (1)

author image
Bruce G. Macbryde

Bruce G. Macbryde, a Final Cut Pro trainer with 20+ years of experience, spanning from the original release in 1999 to the latest version. He served as a sales manager for Australian Authorized Apple distributors (1998-2004) and later as a training manager for Apple-developed software through 2009. He established Wedding Media Productions in 2004, a wedding video business in Sydney, Australia. Bruce is a YouTube creator for the VideoTutors channel, with 500+ video tutorials. He began teaching marketing at NSW TAFE in the early 1980s, specializing in technology and business software such as Microsoft Office, Adobe Pagemaker, and Photoshop during a 7-year stint in New Zealand.
Read more about Bruce G. Macbryde