Reader small image

You're reading from  Salesforce for Beginners - Second Edition

Product typeBook
Published inOct 2022
PublisherPackt
ISBN-139781803239101
Edition2nd Edition
Concepts
Right arrow
Authors (2):
Sharif Shaalan
Sharif Shaalan
author image
Sharif Shaalan

Sharif Shaalan was first introduced to Salesforce as an end user in 2007. His range of experience, from a sales rep to technical architect, helped him successfully lead more than 100 implementations including projects that were showcased on the main stage at Dreamforce. In 2013, Sharif was chosen as a Salesforce MVP, and in 2020 he was inducted into the Salesforce MVP Hall of Fame. Sharif is a regular speaker at Salesforce conferences and has obtained more than 10 Salesforce certifications. He is the founder and CEO of Agile Cloud Consulting and continues to be an active Salesforce community contributor
Read more about Sharif Shaalan

Timothy Royer
Timothy Royer
author image
Timothy Royer

Timothy Royer is the VP of Delivery at Agile Cloud Consulting and a Salesforce Certified Application Architect. Timothy began his Salesforce career in 2012 as an accidental administrator and has since participated in a number of implementations in a variety of roles. Timothy has experience as a Salesforce customer, a Salesforce partner, and as a member of the Salesforce.org professional services team.
Read more about Timothy Royer

View More author details
Right arrow

Creating and Managing Leads

Leads are the first step of the sales and marketing cycle—they keep opportunities flowing into your sales funnel. Leads are prospects or people that may be interested in your product or service. The goal of working with them is to move them through the sales cycle and assess them as either unqualified or qualified for workable opportunities. Understanding how leads work is beneficial as it familiarizes you with how a lead starts off the sales cycle and how to move from a lead to the next step in the sales cycle.

The following topics are covered in this chapter:

  • What are leads and what are they used for?
  • What is lead status and how is it used in the sales cycle?
  • What is lead conversion and what happens when you convert a lead?
  • What is Web-to-Lead and how is this feature used?
  • What are lead auto-response rules and how do you set them up?
  • Lead settings and lead processes

In this chapter, we will...

Technical requirements

For this chapter, log in to your development org and follow along as we create and convert a lead.

Understanding leads

Leads comprise anyone that is a potential customer. You can think of leads as the “catch-all” database from which you qualify potential deals. The goal is to convert the lead into a cleaner data set of high-probability sales. Converting leads into opportunities is the key to a successful business. Managing your leads effectively allows you to convert more leads into opportunities, which ultimately results in more business. Leads can be captured in many different ways, such as through conferences, websites, purchasing lists, and any other way you may come into contact with potential customers. Let’s look at a business use case where a lead may need to be created, then we’ll walk through the steps for creating a lead.

Business use case

You are a sales representative for your company, XYZ Widgets, and have been sent to a conference to talk to potential customers. While at the conference, you have a great conversation with Brenda...

Exploring the Lead Status field

The Lead Status field shows you where you are in the life cycle of working this lead. The lead life cycle is important as this is the beginning of the sales process for any organization. The following flowchart simplifies this process a bit:

From the preceding flowchart diagram, we can understand the following:

  1. Once the lead is created, it can be dispositioned in two ways.
  2. You will contact the lead to present your product or service and the lead will either be interested in speaking further or not.
  3. If not, the lead status is changed to Closed - Not Converted, or in some cases, this status is called Unqualified.
  4. If the lead is interested, the status reads Convert.

We will cover conversion in more detail in the next section.

Let's take a look at how these status values appear in Salesforce and what happens when each lead status is chosen. Take a look at the following screenshot:

From the preceding screenshot, we learn the following:

  1. Open - Not...

Understanding how lead conversion takes place

When you call Brenda, she seems very interested, which is a good sign! You decide to convert the lead.

When a lead is converted, something very important happens. The lead disappears from the system (It disappears only on the frontend, it is still available for reporting on the backend) and it turns into three records. It becomes an account, an opportunity, and a contact. All the information about the company goes to the account, the information about the person goes to the contact, and the information about the actual sale goes to the opportunity. This is an important step in the sales process since this is the point where you stop working with a lead and instead start working with an opportunity.

Let's look at how to convert a lead:

  1. To convert a lead, navigate to the lead record you created and click on Converted (see label 1 in the following screenshot), then click on Select Converted Status (see label 2 in the following screenshot...

Working on forms with web-to-lead

Using web-to-lead is an easy way to generate HTML code that you can drop into your website to create a lead capture form. A lead capture form is generated outside of Salesforce but creates a lead directly in Salesforce when the form is saved. This can take the form of a Contact Us page on your website or any other form where you would want the information to be automatically added to Salesforce. Let's see how this is done:

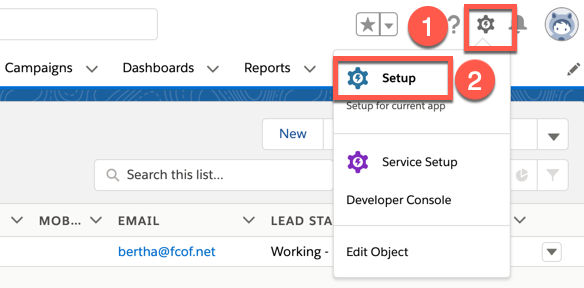
  1. Click on the gear at the top of the page (see label 1 in the following screenshot) and choose Setup (see label 2 in the following screenshot):

Clicking on Setup in the preceding screenshot brings you to the administration section of Salesforce.

  1. Next, type web in the quick-find box (see label 1 in the following screenshot). This will bring up Web-to-Lead. Click on the link (see label 2 in the following screenshot), as in the following screenshot:

  2. Clicking on Web-to-Lead brings you to the Web-to-Lead settings page. On this...

Setting up auto-response rules

Now that we have set up the web-to-lead, an important function to support the submission of a form is auto-response rules. Auto-response rules allow you to automate the email that a user receives when a lead is submitted via a web-to-lead form based on specific criteria on the lead record, such as the lead source. Let's see how auto-response rules are created:

  1. First, navigate to the Home tab of the Setup page (see label 1 in the following screenshot):

  2. From here, we move to Marketing (see label 2 in the preceding screenshot), then click on Lead Auto-Response Rules (see label 3 in the preceding screenshot). The following screenshot shows the auto-response rules creation page:

  3. On the Auto-Response screen, click on New, which leads you to the following screen:

  4. We then move to the Active checkbox (see label 1 in the preceding screenshot), enter the rule name (see label 2 in the preceding screenshot), and click on Save (see label 3 in the preceding...

Lead settings and lead processes

In this section, we will cover some of the configuration options for leads.

Using the lead settings

The lead settings allow you to configure some options for your leads and convert leads into opportunities. Let's take a look at these options.

First, we will navigate to Home (see label 1 in the following screenshot) | Marketing (see label 2 in the following screenshot) | Lead Settings (see label 3 in the following screenshot) from the Setup page, as shown:

This brings us to the following screen:

The preceding screenshot shows you the three sections that contain the lead settings options:

  1. Lead Queue Settings has the following two options:
    • Default Lead Owner: This is the user that owns all the new leads created through the web-to-lead feature and that are not assigned to another user based on criteria.
    • Notify Default Lead Owner: This sends an email to the default lead owner when a lead is assigned to them.
  2. Lead Conversion Settings has the following...

Summary

In this chapter, we learned what a lead is and how it is used to start the sales cycle. We understood what the Lead Status field is used for and how the values drive the process. We also understood how to convert a lead into an opportunity and that we can convert a lead when we think there is further potential for a sale. We saw the use case for web-to-lead and how to generate web-to-lead code in order to capture leads online, as well as setting up auto-response rules for these leads. Finally, we learned about the lead settings and lead processes, as well as how these configuration options can help us optimize the use of leads. These skills will help you organize and work your leads, as well as convert them into opportunities to continue the sales cycle. Understanding this process will result in efficiently working leads, which leads to more sales!

In the next chapter, we will look at accounts and contacts and why these objects are used in Salesforce in more detail.

Questions

  1. What are some ways that leads can be captured?
  2. What determines whether a lead should be converted into an opportunity?
  3. What happens to a Closed/Not-converted (Unqualified) lead?
  4. What happens to a converted lead? Where does it go?
  5. Where does the company information go when a lead is converted?
  6. What is web-to-lead used for?
  7. Once you have generated the HTML code, what do you do with it?
  8. What does the Org-Wide Merge and Delete lead setting allow you to do?

Further reading

lock icon
The rest of the chapter is locked
You have been reading a chapter from
Salesforce for Beginners - Second Edition
Published in: Oct 2022Publisher: PacktISBN-13: 9781803239101
Register for a free Packt account to unlock a world of extra content!
A free Packt account unlocks extra newsletters, articles, discounted offers, and much more. Start advancing your knowledge today.
undefined
Unlock this book and the full library FREE for 7 days
Get unlimited access to 7000+ expert-authored eBooks and videos courses covering every tech area you can think of
Renews at $15.99/month. Cancel anytime

Authors (2)

author image
Sharif Shaalan

Sharif Shaalan was first introduced to Salesforce as an end user in 2007. His range of experience, from a sales rep to technical architect, helped him successfully lead more than 100 implementations including projects that were showcased on the main stage at Dreamforce. In 2013, Sharif was chosen as a Salesforce MVP, and in 2020 he was inducted into the Salesforce MVP Hall of Fame. Sharif is a regular speaker at Salesforce conferences and has obtained more than 10 Salesforce certifications. He is the founder and CEO of Agile Cloud Consulting and continues to be an active Salesforce community contributor
Read more about Sharif Shaalan

author image
Timothy Royer

Timothy Royer is the VP of Delivery at Agile Cloud Consulting and a Salesforce Certified Application Architect. Timothy began his Salesforce career in 2012 as an accidental administrator and has since participated in a number of implementations in a variety of roles. Timothy has experience as a Salesforce customer, a Salesforce partner, and as a member of the Salesforce.org professional services team.
Read more about Timothy Royer