


Using modifiers in Blender
What is a modifier? Essentially, a modifier is like a mode (or function) that acts on a mesh's geometry, while allowing you to keep editing the geometry.
Modifiers are non-destructive, which means that you can toggle the modifier on or off at any time to revert to your original mesh. You can keep on modifying your mesh's geometry with the modeling tools since the modifier effect only acts on the mesh's geometry after you've made your edits.
Modifiers can act on their own or can be placed in a modifier stack in the Properties panel. When more than one modifier has been applied to the geometry, they can be re-arranged in any order to create a different result.
For example, if you put a Bevel Modifier on a 3D cube, and then you extrude some of the faces on that 3D cube, that Bevel Modifier will automatically bevel any new geometry's sharp edges.
In this section, you learned what modifiers are and what they are used for. In the next section, we will explore two of the modifiers that we will use for this book's practical tutorials. We will start with the Mirror modifier.
The Mirror modifier
Use the Mirror modifier to save time when constructing meshes that are symmetrical or have some symmetric parts on them.
With this modifier, you only need to model half of the symmetrical mesh; Blender will mirror it to the opposite side for you.
To use the Mirror modifier, follow these steps:
- Delete half of the mesh (the side that will be mirrored to).
- Make sure all the edges and vertices in the mirror center line of your mesh are in a straight line.
- Now that the mesh has been prepared, let's add the Mirror modifier. Find the spanner icon in the Properties panel. You will see a collapsed drop-down menu, as shown in the following screenshot:

Figure 1.17 – The Add Modifier drop-down menu from the Properties panel
- As soon as you click on Add Modifier in the drop-down menu, it will open and reveal all the modifiers that are available in Blender. Select Mirror from this list, as shown in the following screenshot:
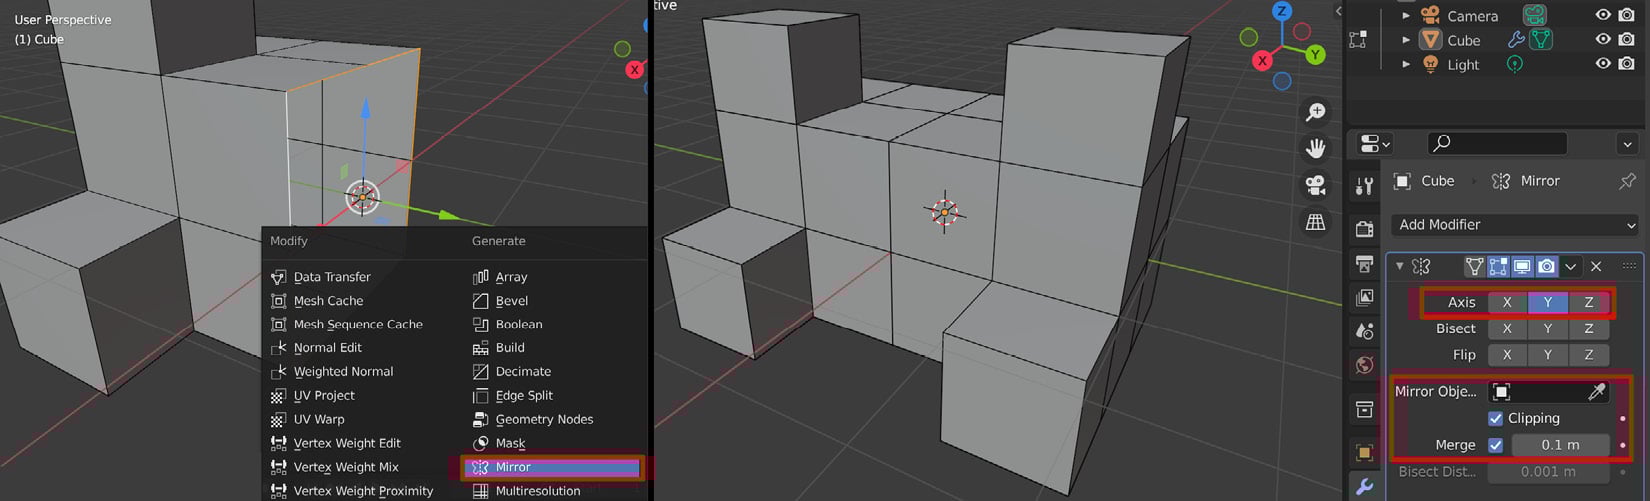
Figure 1.18 – (A) Selecting the Mirror modifier; (B) The settings for the Mirror modifier
- Choose the correct axis to mirror your mesh. Then, turn on Clipping and Merge and change the amount to a number just high enough that it will merge the vertices in the center line.
In this section, you learned how to use the powerful Mirror modifier. You can choose to use it to act on your mesh while you do 3D modeling (to see the mirrored result in real time) or you can choose to apply the Mirror modifier after you complete a model. The choice is yours.
In the next section, we will explore the Subdivision Surface modifier.
Important
Before you use functions in Blender that add new geometry to your mesh (such as Remesh, Dyntopo, Subdivision Surface Modifier, or Multiresolution Modifier), you need to take your computer system's specifications (CPU, video card, and RAM) into account. The denser the geometry of the mesh becomes, the more system resources your computer will need.
Subdivision Surface modifier
This modifier adds a Subdivision Surface function (or mode) over your mesh's geometry to subdivide and smooth out the original shape while keeping the original mesh light in geometry (not having too many faces).
By doing this, you can keep editing the low-resolution mesh while seeing the smoothed shape update with the result. Like all modifiers, it can be toggled on or off:
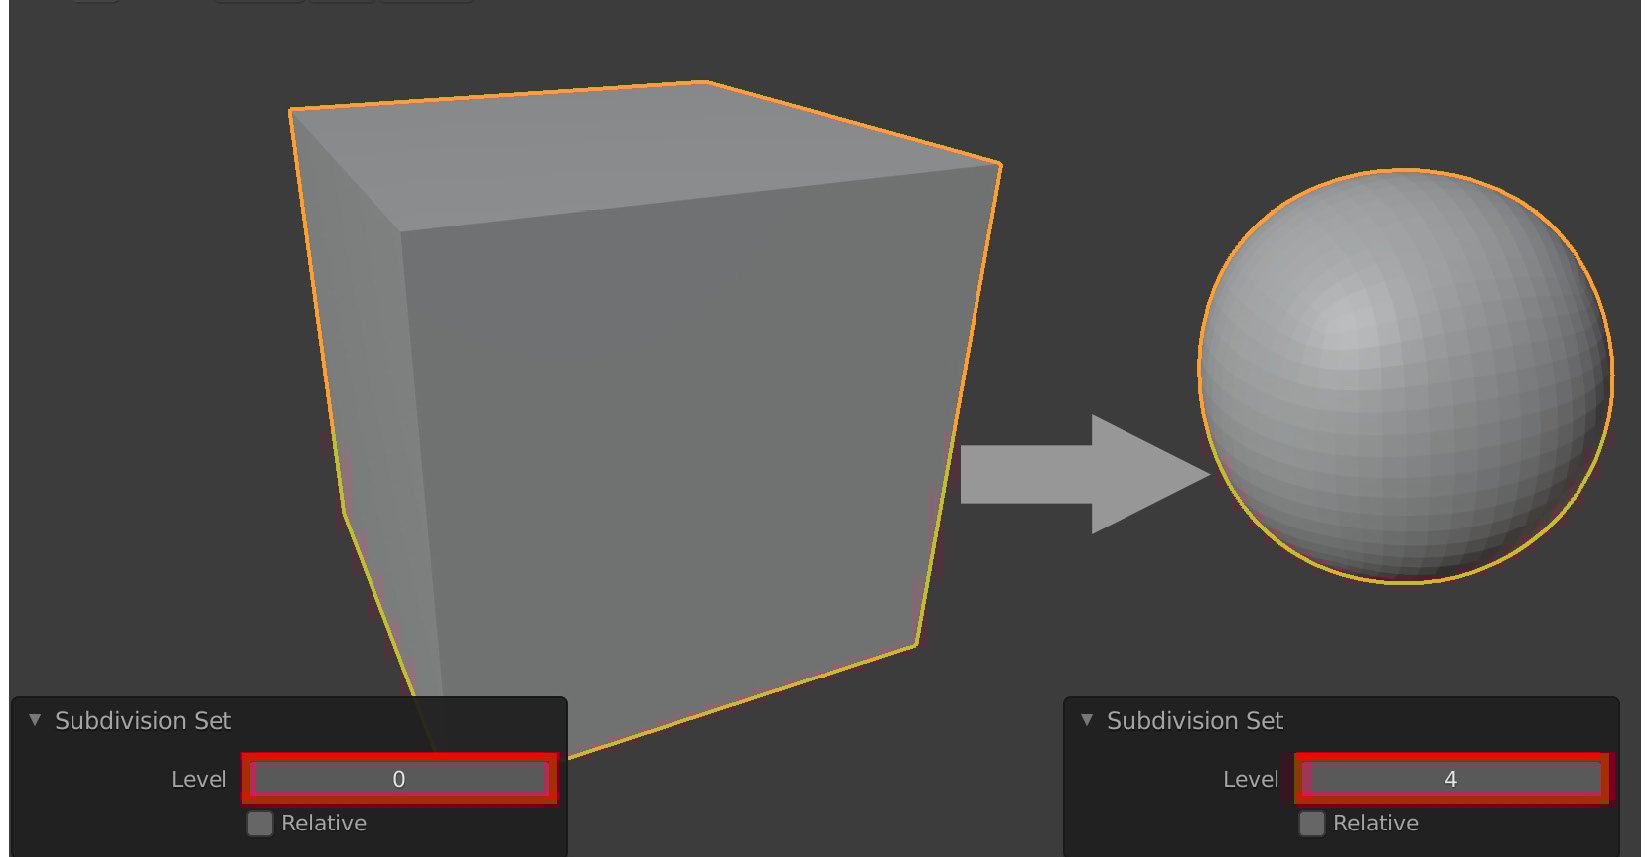
Figure 1.19 – Applying the Subdivision Surface modifier to a mesh
In the preceding screenshot, I used the Subdivision Surface modifier on a cube to turn the cube into a smooth-shaped sphere.
If you edit any of the original faces of the cube in Edit Mode (it will display as a Wireframe), the result of your mesh's edits will automatically be subdivided and smoothed by the Subdivision Surface modifier.
The keyboard shortcuts for this modifier are Ctrl + number (0 to 5).
The numbers 0 to 5 correspond to the subdivision level of the mesh in the modifier. You can switch between subdivision levels at any time.
The modifiers' Subdivision Set level can be found in the Operator panel, in the bottom left of the 3D Viewport. Using this menu is another way you can change the subdivision level of your mesh. To do so, click on the little arrows.
In this section, you learned how to use the Subdivision Surface modifier. With this, we have completed our introduction to the 3D modeling tools that are available in Blender.
In the next section, we will explore the other 3D asset creation method, known as 3D sculpting.