Reader small image

You're reading from  Final Cut Pro Efficient Editing - Second Edition

Product typeBook
Published inJul 2023
PublisherPackt
ISBN-139781837631674
Edition2nd Edition
Right arrow
Author (1)
Iain Anderson
Iain Anderson
author image
Iain Anderson

Iain Anderson is an author, editor, director, videographer, programmer, animator, and educator based in Brisbane, Australia. An Apple Certified Trainer who helped to create the new Apple Certified Final Cut Pro exams and training curriculum, Iain regularly presents at conferences, is a Lead Trainer for macProVideo, and creates educational video content for CoreMelt and many other organizations.
Read more about Iain Anderson

Right arrow

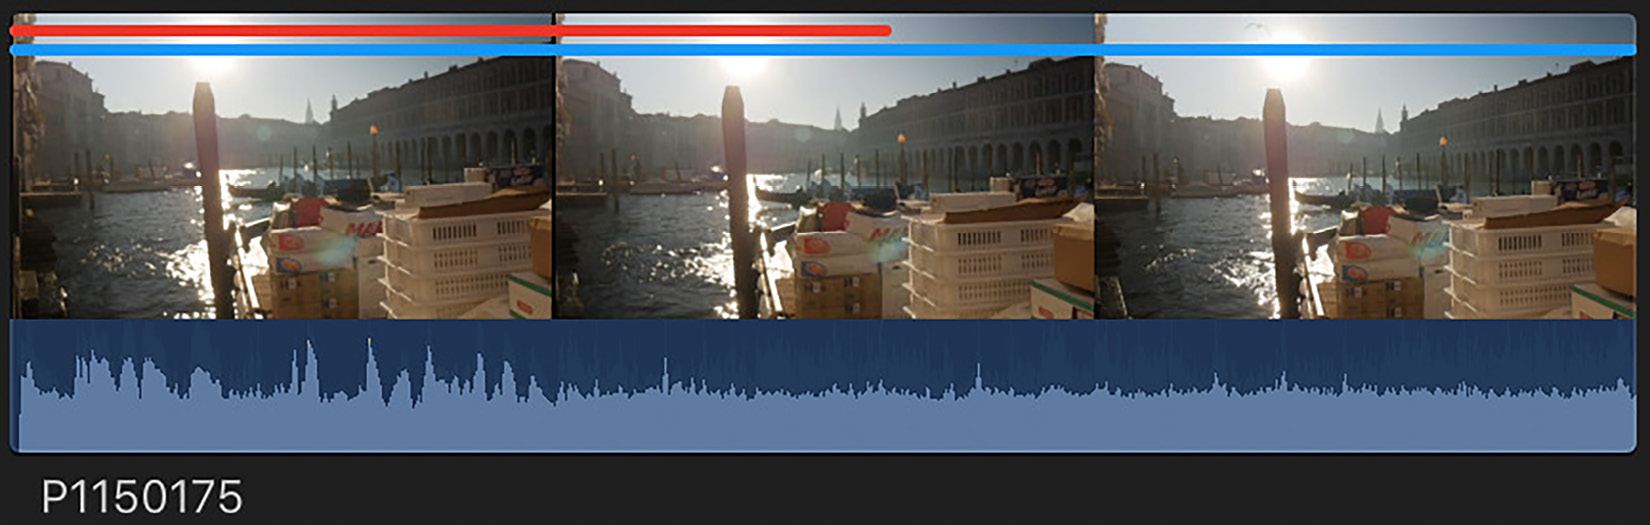
Selecting part of a clip

So far, we’ve been working with entire clips — whatever the camera recorded — but editing is about selecting just the best parts. The Browser is a great place to do that, because your choices will be automatically recorded. First, we’ll select ranges on clips, and next, we’ll rate them.

The selection process has a few subtleties, so make sure you’re working with clips that haven’t been partly selected already, and follow these steps carefully:

  1. Switch to Filmstrip view, not List view. (While these steps can mostly be performed in List view too, we’ll use Filmstrip view here.)
  2. Click on one of your clips, then type ⌘A, then ⌥X.
  3. This will remove any selections from your clips, which makes the next step simpler. To select part of a clip, it’s now easy to click and drag.
  4. Click on a blank, unselected area inside a clip, then drag forward to another point in that same...

Rating as a Favorite

Here, I’ll show you not only how to rate parts of clips as “good,” but also give you a few workflow tips that you can apply to your own content. Seeing this part of the process in action is one of the magic “wow” moments you’ll encounter as you learn FCP, so don’t skip it. This is simple stuff, but powerful.

A selection is temporary, so if you’ve selected the “good” part of a clip, you should then mark it as a Favorite so that your choice will be remembered and be easier to find later. This is done with just one key:

  • Press F to mark the selection as a Favorite.

On the thumbnail, a Favorite is shown as a green line, above the blue Keyword line. If you want to mark another part of the same clip as a Favorite, that’s fine — just repeat the same steps as before:

  1. Press I to set an In point at the current skimmer or playhead position.
  2. Press O to set an Out...

Rating as Rejected

So far, there are two levels of “good” — the Favorite parts and the rest. But how about the “bad” parts? If you’d like to approach your rating process from the other end, you’ll want to get into Rejecting, and that’s what you’ll learn here.

Marking part of a clip as Rejected is the opposite of marking part of a clip as a Favorite: you’re saying that the selection is bad or unusable. The workflow is very similar, too:

  1. With the keyboard or mouse, mark In and Out points on a clip.
  2. Press the delete key (not forward delete) to mark that selection as Rejected:
Figure 5.12: The camera was shaky at the start of this clip, so I Rejected that section

Figure 5.12: The camera was shaky at the start of this clip, so I Rejected that section

If your current Browser view is showing All Clips, then you’ll see a red line appear on that part of the clip. A range cannot be both a Favorite and Rejected at the same time; it’s one or the other...

Storing additional information

Marking a clip segment as good or bad is powerful, but what if you want to include more substantial notes about a clip? There are several ways to do this, and while it’s optional, on larger productions it’s a great idea. Selective Keywords? Sure. Changing clip names or adding notes? Absolutely. Adding Markers to note moments in time? Done.

Selective Keywords

One method is to add Keywords to specific parts of clips, rather than on entire clips. Keywords can have quite long names, and different Keywords can overlap. The process is predictable:

  1. With the keyboard or mouse, mark In and Out points on a clip.
  2. Use the Keywords window to apply a Keyword.

While this can be a handy workflow for longer, more complex clips, I usually find it’s not necessary for shorter ones. Personally, I prefer to use Keywords on entire clips, and in combination with a more targeted Favorite, it’s often all you need.

Adding...

Advanced searches

In a moderately sized project, you can click on a Keyword Collection to get you started, look at the Favorites, then visually scan to find the clip you remember. But on a big project, text organization is the only way to stay sane, and in this part of the book, I’ll show you how to dig into searching and filtering.

In Chapter 4, Sort it Out: Reviewing and Keywording, I showed you how to use the Filter window, accessible through the magnifying glass icon at the top right of the Browser. Now that you know how to add text to your clips, the Filter window will be even more useful. To start, do the following:

  1. Click on the magnifying glass icon in the top-right corner of the Browser to drop down a search field.
  2. In the search field, type a word that appears in the name of any clip or notes field, or a name that you’ve given to a Favorite range or any Marker:
Figure 5.21: The word “awesome” can be found in Notes, clip names, Favorite names, and Markers

Figure 5.21: The word “awesome” can be found...

Summary

While Keywords let you know roughly what you shot, you now know that Favorites lets you focus on the very best of what you shot. As you continue through the rest of the editing process, you’ll love being able to instantly locate the best shot for any situation simply by viewing only Favorites. A huge chunk of your job is done, you don’t need to repeatedly and manually search through all your clips, and you don’t need to build “stringouts” either. The traditional workflow of making throwaway timelines to gather “good” clips simply can’t compete with the efficiency of Keywords combined with Favorites.

For larger productions, you can see that changing clip names and adding notes, Markers, and range-based “selective” Keywords will help you (or your editorial team) to add less obvious and more subtle information to clips. The added metadata you now know how to add, along with searching, filtering, and Smart...

Review questions

  1. What keys can be used to mark the start and end of a range?
  2. What shortcut removes the selection from all selected clips?
  3. After rating some parts of your clips as Favorites, how do you see only those regions?
  4. What color line is shown on a clip if you Reject all or part of it?
  5. What can you use to add information to a particular frame rather than a region?
  6. What is the shortcut for Snapping?
  7. Where can you search through all text attached to a clip?
  8. How can you save the results of a search?
  9. Can part of a clip be marked as Rejected and Favorite at the same time?
  10. Can more than one Favorite range be applied to a clip?

Review answers

  1. I and O.
  2. ⌥X (Option-X).
  3. Choose Favorites from the Clip Filtering menu in the Browser.
  4. Red.
  5. A marker.
  6. N.
  7. The search field at the top right of the Browser, or the Filter window.
  8. Create a new Smart Collection in the Filter window.
  9. No.
  10. Yes, as many as you wish, though overlapping Favorite regions become a single region.
lock icon
The rest of the chapter is locked
You have been reading a chapter from
Final Cut Pro Efficient Editing - Second Edition
Published in: Jul 2023Publisher: PacktISBN-13: 9781837631674
Register for a free Packt account to unlock a world of extra content!
A free Packt account unlocks extra newsletters, articles, discounted offers, and much more. Start advancing your knowledge today.
undefined
Unlock this book and the full library FREE for 7 days
Get unlimited access to 7000+ expert-authored eBooks and videos courses covering every tech area you can think of
Renews at €14.99/month. Cancel anytime

Author (1)

author image
Iain Anderson

Iain Anderson is an author, editor, director, videographer, programmer, animator, and educator based in Brisbane, Australia. An Apple Certified Trainer who helped to create the new Apple Certified Final Cut Pro exams and training curriculum, Iain regularly presents at conferences, is a Lead Trainer for macProVideo, and creates educational video content for CoreMelt and many other organizations.
Read more about Iain Anderson