

In the previous chapter, you learned about Google Apps Script (GAS) and how to create a script project. In this chapter, you will learn how to create a clickable button, a custom menu, a message box, a sidebar and dialogs, as well as how to debug your script. We will use Sheets for the first two tasks and Docs for all the other tasks.

In the previous chapter, you learned how to open the script editor in Google Sheets. For this task, open the script editor in a newly created or any existing Google Sheet and follow these steps:
Select cell B3 or any other cell. Click on Insert and select Drawing..., as shown in the following screenshot:

A drawing editor window will open. Click on the Text box icon and then click anywhere within the canvas area. Type
Click Me. Resize the object to enclose the text only, as shown in the following screenshot:
Click on Save & Close to exit the drawing editor. Now, the Click Me image will be inserted into the active cell (B3), as shown in the following screenshot:

You can drag this image anywhere around the spreadsheet except in the menu bar.
Tip
In Google Sheets, images are not anchored to a particular cell, and they can be dragged or moved around.
If you click on the image, a drop-down arrow on the top-right corner will be visible:

Click on the Assign script… menu item. A script assignment window will open. Type
greetingor any other name you like, but remember the name as the same name will be used to create a function in the next steps. Click on OK: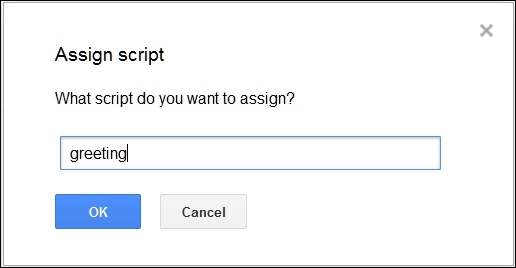
Now open the script editor in the same spreadsheet. When you open the script editor, a project selector dialog will open. You can close it or select Blank Project. A default function,
myFunction, will be there in the editor. Delete everything in the editor and insert the following code:function greeting() { Browser }When you type
.next toBrowser, the code completion hint will open as shown:
If you click on
msgBox(String title, String prompt, ButtonSet buttons):String, thenmsgBox(title, prompt, buttons)will be inserted automatically.Tip
In addition to the code hint feature, you can use the auto-indent feature. Ensure that the Indent icon, on the left side of the Save icon, is pressed. Select the few lines of code you would like to indent, then press the Tab key on your keyboard. Now you can see that these lines of code indented automatically.
In this code,
Browserdenotes that you are calling theBrowserclass from theBase(or basic) script services.msgBoxis theBrowserclass's method with three parameters. The names of the parameters are self-explanatory. Thetitleparameter denotes the title of the message box,promptdenotes your message to the user, andbuttonsdenotes what category or sets of buttons you would like to include in your message box.Now edit or replace the code with the following:
function greeting() {
  Browser.msgBox("Greeting", "Hello World!", Browser.Buttons.OK);
}
Click on the Save icon and enter a project name if asked. You have completed the coding of your
greetingfunction.Now, activate the spreadsheet tab/window and click on your Click Me button. An authorization window will open and you need to click Continue. In the successive Request for Permission window, click on Allow, as shown in the following screenshot:

You only need to do this once for this particular scope. The scopes will be shown in the concerned permission dialog/window. In this script, the scope is View and manage your spreadsheets in Google Drive. Above the scope, you can see the title Chapter 2 would like to:, which means your script project (project name Chapter 2) or application would like to get your permission for that particular scope.
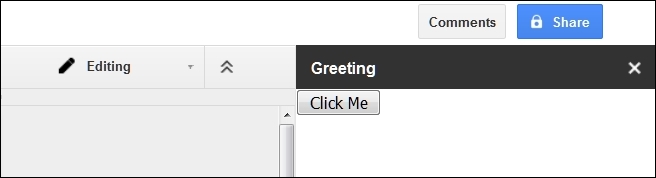
As soon as you click Allow, the permission dialog will close, and your actual greeting message box will open as shown here:

Click Ok to close the message box. Whenever you click on your button, this message box will open.
Congratulations! You have created a clickable button and associated a GAS function with it.
Toast appears as a popup window in the lower-right corner of the active spreadsheet with a title and message. To create a toast dialog, edit or replace the greeting function as follows:
function greeting() {
  SpreadsheetApp.getActiveSpreadsheet()
   .toast("Hello World!", "Greeting");
}
Now if you click the button, then a toast dialog will appear as shown in the following screenshot, and it disappears within 5 seconds (the default):

You can include a third argument, that is, timeout seconds, in the toast method. This means how long the toast will be visible for. Put a negative number if you want it to show up forever. For example, toast("Hello World!", "Greeting", -1).
A sidebar is a static dialog box and is included on the right-hand side of the document editor window. To create a sidebar, type the following code in the editor:
function onOpen() {
  var htmlOutput = HtmlService
  .createHtmlOutput('<button onclick="alert(\'Hello World!\');">Click Me</button>')
  .setTitle('My Sidebar');

  DocumentApp.getUi().showSidebar(htmlOutput);
}
In the preceding code, you are using HtmlService and invoking its method createHtmlOutput then consecutively invoking the setTitle method. To test this code, run the onOpen function or reload the document. The sidebar will open in the right-hand side of the document window as shown in the following screenshot. The sidebar layout size is a fixed one, which means you cannot change, alter, or resize it.
The button in the sidebar is an HTML element, not a GAS element, and if clicked, it opens the browser interface's alert box.
In the previous task, you included the HTML code inline as a string argument to the createHtmlOutput method. Alternatively, you can put this HTML snippet in a separate HTML file.
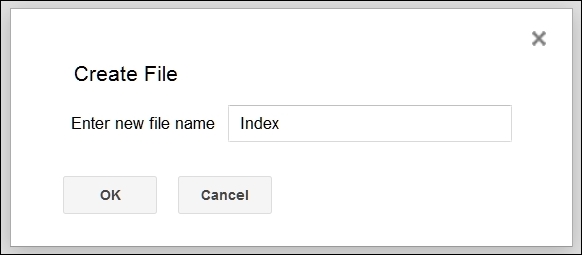
To create a new HTML file, in the script editor, go to File | New | Html file, as shown in the following screenshot:

Then in the
Create File box, enter your preferred name for the new HTML file. For this task, enter Index and click on the OK button. The .html extension will be added automatically.
A new Index.html file will be created with a few lines of default HTML code, as shown in the following screenshot:

Insert your button tags between the body tags as shown here:
<!DOCTYPE html>
<html>
  <head>
    <base target="_top">
  </head>
  <body>
    <button onclick="alert('Hello World!');">Click Me</button>
  </body>
</html>
Insert the code shown here in the Code.gs file:
function onOpen(){
  DocumentApp.getUi()
  .createAddonMenu()
...To create a modal dialog, which prevents the user from updating anything in the spreadsheet or document, update the code in the Code.gs file as shown here:
function onOpen(){
  DocumentApp.getUi()
  .createAddonMenu()
  .addItem("Show Dialog", "showDialog")
  .addToUi();
}

function showDialog() {
  var html = HtmlService
   .createHtmlOutputFromFile('Index');
  DocumentApp.getUi()
   .showModalDialog(html, 'Greeting');
}
Go to Add-ons | Chapter 2 | Show Dialog and a modal dialog will pop up:
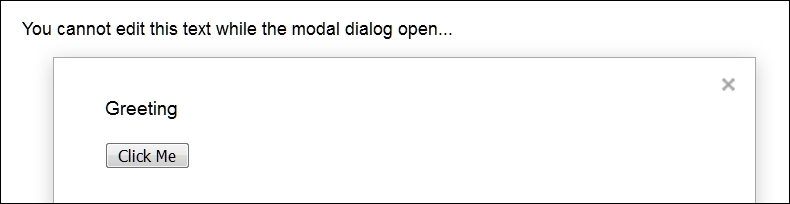
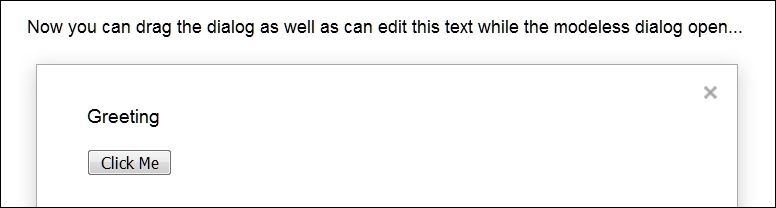
Now we will create a modeless dialog and see the difference between modal and modeless dialogs. Update the showDialog function as shown here:
function showDialog() {
  var html = HtmlService.createHtmlOutputFromFile('Index');
  DocumentApp.getUi()
  .showModelessDialog(html, 'Greeting');
}
Note that the showModalDialog method has been changed to showModelessDialog.
Modeless dialogs do not prevent you from doing other things, such as editing the document, and you can drag the dialog around as shown here:
Logging the values of variables at a few points is essential when testing and debugging your code. The Logger class is a helpful tool to do this and has a few methods that are essential to debug your code.
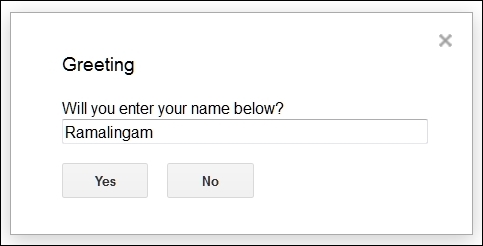
Update the showDialog function as shown here:
function showDialog() {
  var ui = DocumentApp.getUi();

  var response = ui.prompt(
      'Greeting', 'Will you enter your name below?', ui.ButtonSet.YES_NO
  );

  if (response.getSelectedButton() == ui.Button.YES) {
    Logger.log('Your name is %s.', response.getResponseText());
  } else if (response.getSelectedButton() == ui.Button.NO) {
    Logger.log('You clicked \'NO\' button');
  } else {
    Logger.log('You closed the dialog.');
  }
}
Run the showDialog function as usual from the Add-ons menu. Do anything, for example, enter your name and click on Yes or No or close the dialog.
Now within the script editor, press Ctrl + Enter (Windows) or Command + Enter (Mac) or from the View menu, select Logs, then you can see the...
In this chapter, you learned about many type of dialog and how to create and display them, you found out how to use the Logger class to log values, and you also saw how to debug your script. In the next chapter, you will learn about Gmail and Contacts.
Tip
Downloading the example code
You can download the example code files for this book from your account at http://www.packtpub.com. If you purchased this book elsewhere, you can visit http://www.packtpub.com/support and register to have the files e-mailed directly to you.
You can download the code files by following these steps:
Log in or register to our website using your e-mail address and password.
Hover the mouse pointer on the SUPPORT tab at the top.
Click on Code Downloads & Errata.
Enter the name of the book in the Search box.
Select the book for which you're looking to download the code files.
Choose from the drop-down menu where you purchased this book from.
Click on Code Download.
Once the file is downloaded, please make sure...
The rest of the chapter is locked
You have been reading a chapter from
Learning Google Apps ScriptPublished in: Mar 2016Publisher: ISBN-13: 9781785882517
Register for a free Packt account to unlock a world of extra content!
A free Packt account unlocks extra newsletters, articles, discounted offers, and much more. Start advancing your knowledge today.
undefined
Unlock this book and the full library FREE for 7 days
Get unlimited access to 7000+ expert-authored eBooks and videos courses covering every tech area you can think of
Renews at $15.99/month. Cancel anytime