

Apple Loops and the Loop Browser
The Loop Browser is where you will find a massive bunch of royalty-free Apple Loops that you may use in your musical projects. You probably have heard many of them already. If, for instance, you have heard Rihanna's big hit "Umbrella," you have heard Apple Loops on a commercial recording.
Apple loops have the virtue of adapting to any tempo or key. There are Audio loops, Software Instrument loops, Drummer loops, and 10.6 Pattern loops.
You can open the Loop Browser by clicking on the button that looks like a loop on the right-hand side of the Control bar, but heck, why not just press the letter O?
Logic defaults to a tempo of 120 beats per minute (bpm) and the key of C major. Loops are categorized by Instruments, Genre, Descriptors, and even Moods. You won't see Moods in the default Button view but if you click on the icon next to it, it changes to Column view, and then you do. You can also tag some as Favorites. You can sort them by name (the default) or the number of beats, or tempo, or key, just by clicking on any one of those above the loops list. There are also loop packs that you can access by holding the mouse or trackpad down where you see All Packs.
You can also view or hide specific types of loops from view:
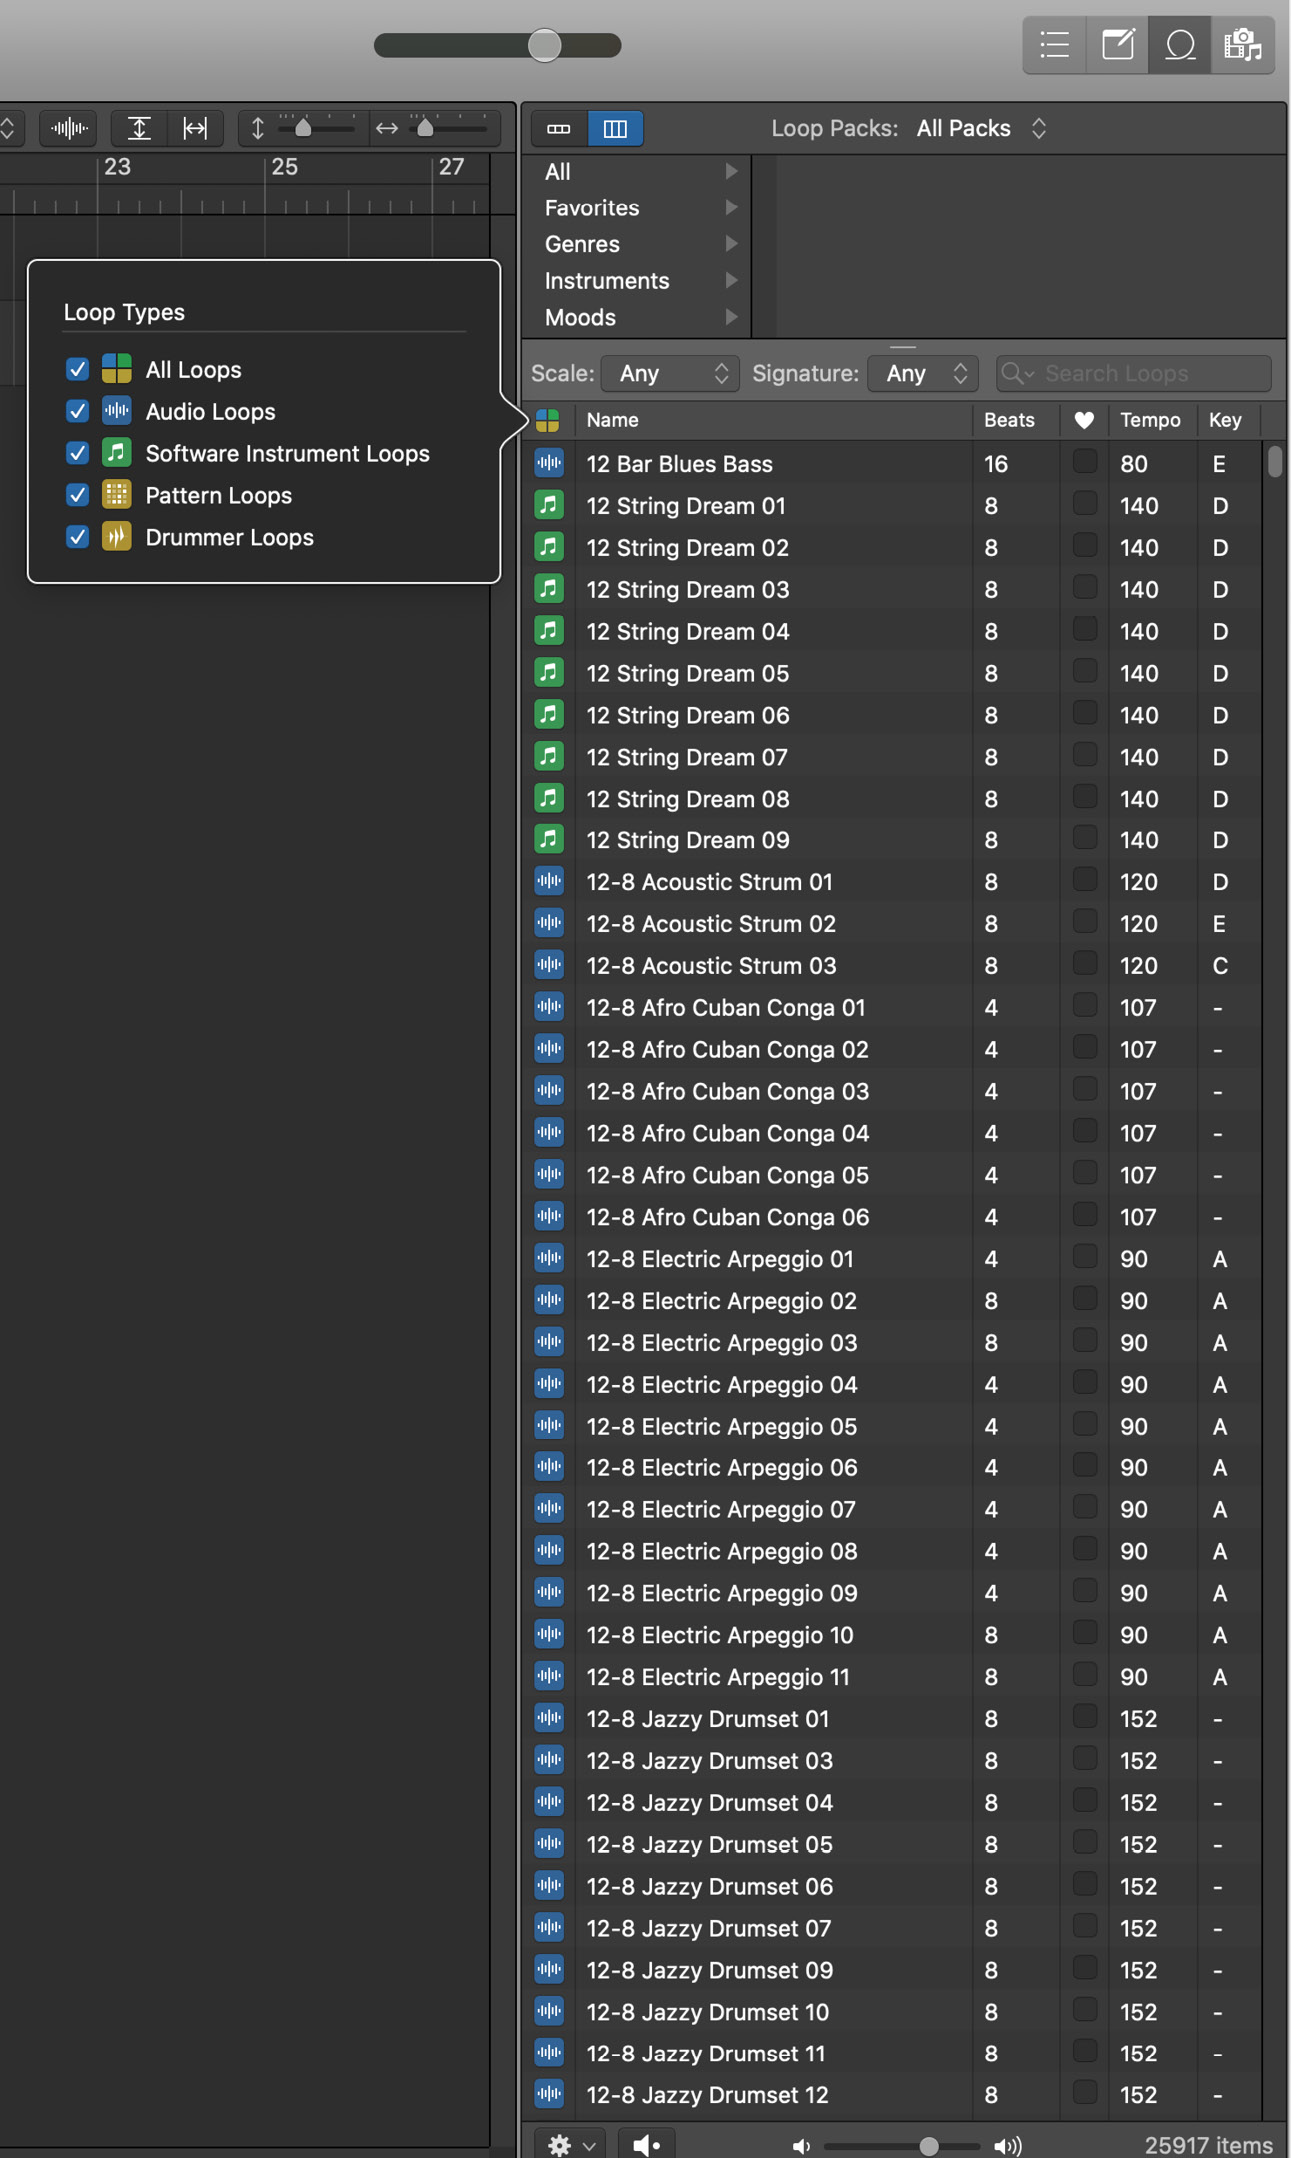
Figure 2.11 – Loop types in Logic Pro
Let's have some fun, shall we?
- Click on Instrument | All Drums.
- Click on Genre and choose Modern R&B.
- Click on Descriptors and choose Single, Processed, and Grooving.
We have narrowed down the choices a bit. You can listen to a loop to audition it just by clicking on it, and you will hear it at the tempo, and key if it is melodic or harmonic, of the Logic project. I kind of dig Light The Fuse Beat 01. I see that it is an Audio loop because of the blue wave symbol, that it is four measures long (16 beats), and that was originally at 140 bpm, but it sounds fine at 120.
If I drag it to the workspace below the two already existing tracks, it will create an audio track, but since we already have one, I will drag it to that. Look at what we see as we do so. The numbers tell us the position in the timeline we are dragging it to and its length. If we position it right at the beginning, it is at 1 1 1 1. What does that mean?
The first number is the bar. The second number is the beat (a quarter note in 4/4) and the third number is the sixteenth note in the quarter note. The last number is ticks. There are 240 ticks per sixteenth note. So, this is positioned at the first bar, first beat, the first sixteenth in the beat, and the first tick. The length is 4 0 0 0, four bars long. If it were 4 ½, it would read 4 2 0 0.
Notice that when we drag it in, it changes the Logic project tempo to 140 bpm. If we either pull down on 140 in the LCD, until we reach 120, or better yet, double-click on it and type 120, we are back to 120 bpm. Let's decide on 130 and, as you hear, the loop chases the tempo perfectly.
A good start, but now we want other loops to play with it. To audition them while hearing this one, we want to create a four-bar cycle. We can simply drag our mouse or trackpad in the bar ruler from bar 1 to bar 5 and create it, and when we hit play, it will continuously repeat those four bars, with the Playhead never advancing past bar 5. But that is not as easy as simply selecting the region and pressing the U key to set the cycle by the region locators.
Now let's add bass with the following steps:
- In the Loop Browser, click the X to reset it.
- Choose Instrument, Bass, then Genre Modern R&B, and Descriptors Single, Processed, and Grooving.
- Either press the Play button in the Transport in the Control bar or press the spacebar on the computer keyboard, and it begins to play the beat loop over and over.
- Select Loops in the Loop Browser to hear how they sound with the beat loop until you hear a loop you like.
Flip The Switch Bass works for me. Try to drag it to the Software Instrument track that already exists, and you get a warning that it isn't an Audio track and that green Apple loops, not blue Apple loops, work on those. No problem – just drag it into the workspace below the other two tracks and it creates a track for you.
Play and listen, and it's already pretty cool.
Maybe we now want an electric guitar, but when we use the same genre and descriptors, we may conclude that we are not finding any that work with the existing material to our satisfaction. But we are creative people, so go to the Loop Pack called Chillwave, and select Guitars and audition some, and sure enough, there is one that I like, called Digital Riff Guitar. It was originally in the key of D major and we are in C major – not very far from the original, which means that it should sound pretty good, and I think it does. (If you don't, choose another.)
Into the workspace, below the others, it goes. It is, however, only 8 beats long, not 16 like the others. So now we'll learn about looping, which is different than cycling.
Let's explore looping techniques:
- Press C to turn off the cycle.
- Drag over all three loops with the mouse or trackpad (this is known as rubber-banding) or press Command + A, which in most Apple applications is Select All and all the regions are selected.
- In the Region Inspector, you will see 3 selected and if you check the Loop checkbox, they will all loop for the length of the project. Alternatively, when they are selected, just press L.
In this manner, I can continue to add Apple loops to my heart's content.
At this point, you may well have decided that this project is a keeper and you don't want to run the risk of losing your work. The most important thing in creating music on a computer is… saving your project!
Saving your project
Press Command + S, or go to the File menu and choose Save As. You can save your project either as a GarageBand style package, where any of the files you save with it are embedded, or as a Folder, which will have separate sub-folders. Normally, I prefer the latter, but because I don't need to check any of those as we are only using Loop Browser loops, I will choose Package with all those unchecked.
Whew, glad we did that! Now let's work some more with what we have. It's time to learn about our Main Window tools.
The Left-click and Command-click tools
The Left-click tool is the primary tool and it defaults to the Pointer tool, but as you can see in this screenshot, it can be assigned to any of a number of different tools:
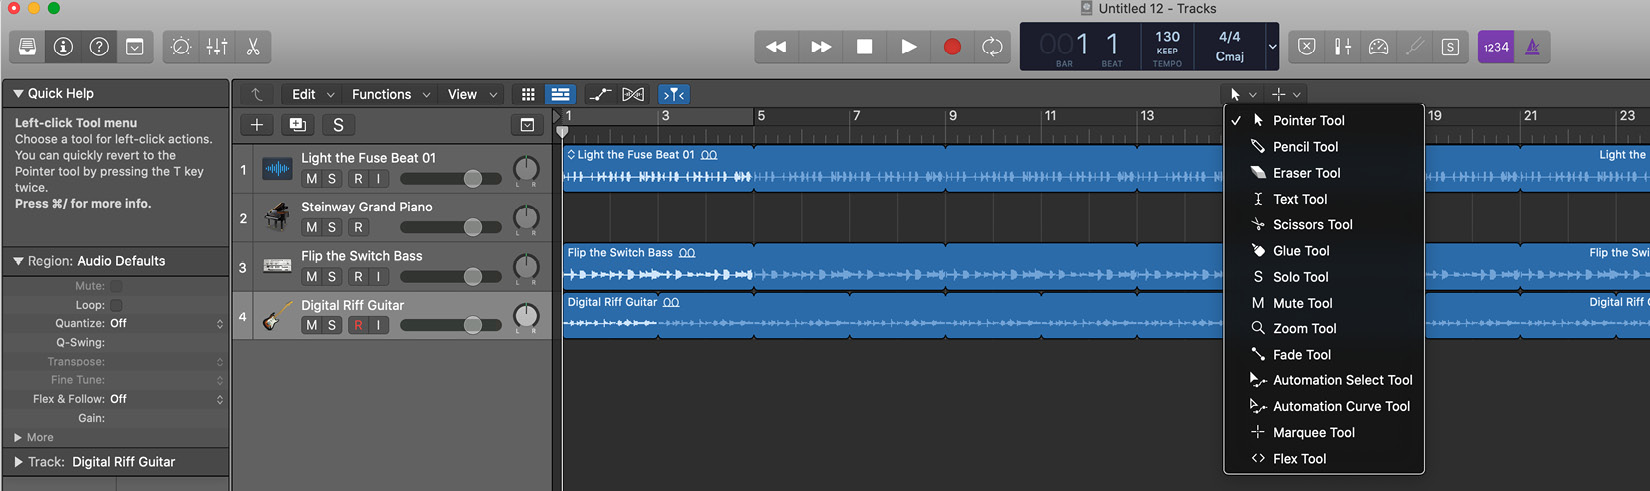
Figure 2.12: The Left-click Tool
The Pointer tool can behave differently depending on where in the region you position it.
Here are some examples that will illustrate the behaviors:
- Select the Steinway Grand Piano track and press delete or hold the Track Header, and it turns into a hand, and to the left and it goes – poof!
- Select the three regions and press L to turn off looping.
- Select the bass and guitar regions, and while keeping an eye on the help tag, drag them to begin at bar 3.
- Select all three again and if you position the Pointer tool in the upper-right corner of the regions, it turns into the Loop tool. You can then drag them to the right to end at bar 15.
- But the bass was longer than the guitar, so it extends an extra two bars. No problem. Click in an empty area of the workspace to deselect the regions.
- Position the Pointer on the bass region at bar 15, where it turns into the Loop tool, and just press down.
I'm loving it, but I think I would like to have the bass play the last three notes of the loop to lead into its entrance. This is where we can use the Command-click tool.
It defaults to the Marquee tool, but like the Left-click tool, it can be assigned to any one of the others.
This is the most useful tool for moving or copying sections of a region. Let's see how it can work for us:
- With the bass region selected, press L to turn off the loop.
- Press Z for zoom to fit selection and then press S to solo it, or press the S in the track header.
- Hold the Command key and notice that the Pointer tool turns into the Marquee tool. Now drag it over the last three notes of the bass region and press the spacebar to hear it.
That will work great. If I press down with the mouse, it splits the region so that the last three notes are now a separate region. I want to copy it to the right place, but I want to be precise, and the Snap menu can be set to help me.
Snap
If I hold down on the Snap menu, I have a lot of choices as to the behavior when I copy a region:
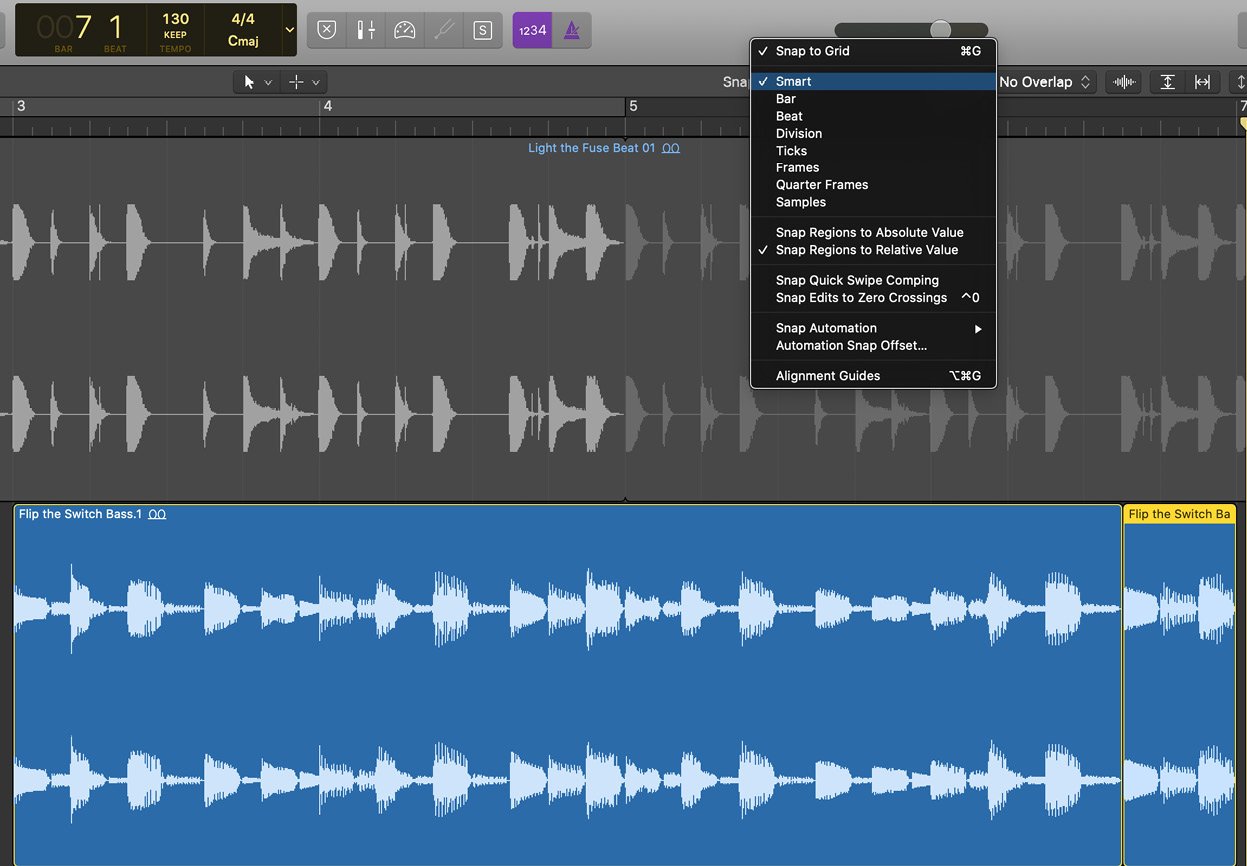
Figure 2.13 – Snap settings
My newly created region is at 6 3 3 1, so exactly at the third beat and third sixteenth note of the beat. So, if we want to snap to a division, an eighth note in this instance, and exactly on the division, an absolute value is the right choice. Follow these steps to achieve this:
- Press S to turn off Solo.
- Set the Snap settings to those I described.
- While holding the Option key, drag the new bass region to 2 3 3 1, remembering to first release the mouse or trackpad before releasing the Option key. Otherwise, you will move it, rather than copying it.
- You now have three bass regions. Select the last two and press Command + J to merge them.
- Select the merged region and position the Pointer tool so that it becomes the Loop tool and loop until bar 15 again.
Play it and wow – it's really getting somewhere. But I want to hear the bass more clearly when it enters. Again, the Marquee tool is my friend and it's time to introduce you to my favorite key command!
If you press the forward slash key next to the right Shift key, it opens up the Go To Position dialog box. To go to the place in the timeline where the bass now enters, type 2, press the spacebar, type 3, press the spacebar, and either type 1 or leave it alone since it defaults to 1 tick. Press OK, or the Return key and the Playhead advances to that position. This is my favorite way to go precisely to any place in my project.
Now that the Playhead is exactly where we want it, we can use the Marquee tool to delete or mute part of the region:
- Hold the Command key so that the Marquee tool appears and drag it over the beat region from 2 3 3 1 to 3 1 1 1.
- Either press delete or Control + M to mute it – your choice.
Press Command + S to save your work.
Changing the key and transposing regions
I am singing along with this, improvising, and it feels just a little low to me. I wish it were in Db major rather than C major.
These are Apple loops, so no problem, right? In the top right of the Control bar, the first button opens the List Editors. Or, I can simply press D. I want the Signature tab.
Sure enough, I see that it is in 4/4 and the key of C major, as expected. I hold down the mouse or trackpad and change it to Db major and voila – when I hit play, it's in the key I want.
Maybe though I want to start in C and modulate up to Db. To achieve this, you can follow these steps:
- In the Signature list editor, I go back to C Major and exit the Signature list editor.
- Using the Go To Position key command, I set the Playhead to bar 7.
- With the bass and guitar regions selected, I either go to the Edit menu in the main menus and choose Split | Regions at Playhead or better yet, press Command + T.
- With the two newly created regions that begin at bar 7 selected, in the Region Inspector next to the word Transpose, I either drag up or double-click and type +1.
When I play my project back, sure enough, I hear the regions playing in the key of C and then at bar 7, modulating up a half step to Db major.
Remember to save your project now!