


Customizing basic style sheets
In the previous recipe, you learned how to apply a style sheet to a widget with Qt Designer. Let’s go crazy and push things further by creating a few other types of widgets and changing their style properties to something bizarre for the sake of learning.
This time, however, we will not apply the style to every single widget one by one; instead, we will learn to apply the style sheet to the main window and let it inherit down the hierarchy to all the other widgets so that the style sheet is easier to manage and maintain in the long run.
How to do it...
In the following example, we will format different types of widgets on the canvas and add some code to the style sheet to change its appearance:
- Remove the style sheet from
PushButtonby selecting it and clicking the small arrow button beside the styleSheet property. This button will revert the property to its default value, which in this case is the empty style sheet. - Add a few more widgets to the UI by dragging them one by one from the Widget Box area to the form editor. I’ve added a line edit, combo box, horizontal slider, radio button, and a check box.
- For the sake of simplicity, delete menuBar, mainToolBar, and statusBar from your UI by selecting them in the Object Inspector area, right-clicking, and choosing Remove. Now, your UI should look similar to this:
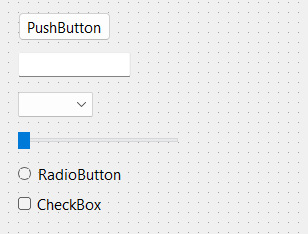
Figure 1.2 – Dragging and dropping some widgets onto the form editor
- Select the main window from either the form editor or the Object Inspector area, then right-click and choose Change styleSheet... to open the Edit Style Sheet window. Insert the following into the style sheet:
border: 2px solid gray;
border-radius: 10px;
padding: 0 8px;
background: yellow;
- You will see a bizarre-looking UI with everything covered in yellow with a thick border. This is because the preceding style sheet does not have a selector, which means the style will apply to the children widgets of the main window down the hierarchy. To change that, let’s try something different:
QPushButton { border: 2px solid gray; border-radius: 10px; padding: 0 8px; background: yellow; } - This time, only PushButton will get the style described in the preceding code, and all the other widgets will return to the default styling. You can try to add a few more push buttons to your UI; they will all look the same:
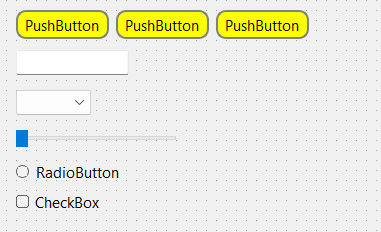
Figure 1.3 – Changing the push buttons to yellow
- This happens because we specifically tell the selector to apply the style to all the widgets with the
QPushButtonclass. We can also apply the style to just one of the push buttons by mentioning its name in the style sheet, as shown in the following code:QPushButton#pushButton_3 { border: 2px solid gray; border-radius: 10px; padding: 0 8px; background: yellow; } - Once you understand this method, we can add the following code to the style sheet:
QPushButton { color: red; border: 0px; padding: 0 8px; background: white; } QPushButton#pushButton_2 { border: 1px solid red; border-radius: 10px; } - This code changes the style of all the push buttons, as well as some properties of the
pushButton_2button. We keep the style sheet ofpushButton_3as-is. Now, the buttons will look like this:
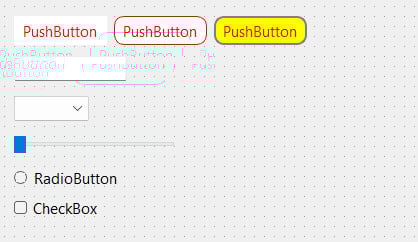
Figure 1.4 – Applying a different style to each button
- The first set of style sheets will change all widgets of the
QPushButtontype to a white rectangular button with no border and red text. The second set of style sheets only changes the border of a specificQPushButtonwidget calledpushButton_2. Notice that the background color and text color ofpushButton_2remain white and red, respectively, because we didn’t override them in the second set of style sheets, hence it will return to the style described in the first set of style sheets since it applies to all theQPushButtonwidgets. The text of the third button has also changed to red because we didn’t describe the Color property in the third set of style sheets. - Create another set of style sheets that use the universal selector by using the following code:
* { background: qradialgradient(cx: 0.3, cy: -0.4, fx: 0.3, fy: -0.4, radius: 1.35, stop: 0 #fff, stop: 1 #888); color: rgb(255, 255, 255); border: 1px solid #ffffff; } - The universal selector will affect all the widgets, regardless of their type. Therefore, the preceding style sheet will apply a nice gradient color to all the widgets’ backgrounds and set their text to white with a one-pixel solid outline that is also white. Instead of writing the name of the color (that is, white), we can use the
rgbfunction (rgb(255, 255, 255)) or hex code (#ffffff) to describe the color value. - As before, the preceding style sheet will not affect the push buttons because we have already given them their own styles, which will override the general style described in the universal selector. Just remember that in Qt, the more specific style will ultimately be used when there is more than one style with an influence on a widget. This is how the UI will look now:
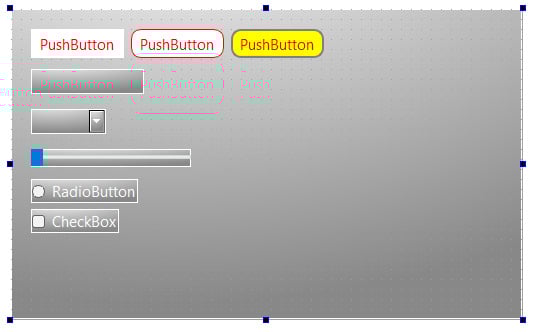
Figure 1.5 – Applying a gradient background to all the other widgets
How it works…
If you are ever involved in web development using HTML and CSS, Qt’s style sheets work the same way as CSS. Style sheets provide the definitions to describe the presentation of the widgets – what the colors are for each element in the widget group, how thick the border should be, and so on. If you specify the name of the widget to the style sheet, it will change the style of the particular PushButton widget with the name you provide. None of the other widgets will be affected and will remain as the default style.
To change the name of a widget, select the widget from either the form editor or the Object Inspector area and change the objectName property in the property window. If you used the ID selector previously to change the style of the widget, changing its object name will break the style sheet and lose the style. To fix this problem, simply change the object name in the style sheet as well.