Reader small image

You're reading from  Unity 2022 Mobile Game Development - Third Edition

Product typeBook
Published inJun 2023
Reading LevelIntermediate
PublisherPackt
ISBN-139781804613726
Edition3rd Edition
Languages
Tools
Right arrow
Author (1)
John P. Doran
John P. Doran
author image
John P. Doran

John P. Doran is a passionate and seasoned Technical Game Designer, Software Engineer, and Author who is based in Incheon, South Korea. His passion for game development began at an early age. He later graduated from DigiPen Institute of Technology with a Bachelor of Science in Game Design. For over a decade, John has gained extensive hands-on expertise in game development working in various roles ranging from game designer to lead UI programmer working in teams consisting of just himself to over 70 people in student, mod, and professional game projects including working at LucasArts on Star Wars: 1313. Additionally, John has worked in game development education teaching in Singapore, South Korea, and the United States. To date, he has authored over 10 books pertaining to game development. John is currently a Technical Game Design Instructor at George Mason University Korea. Prior to his present ventures, he was an award-winning videographer.
Read more about John P. Doran

Right arrow

Project Setup for Android and iOS Development

We now have a project to start with, but currently, it’s built with playing on a PC in mind. However, since this book is about mobile development, it’s very important to have the game working on the device itself before we get much further.

In this chapter, we will go through all of the setups we need to perform to deploy the project in its current state to our mobile devices. At the time of writing this book, mobile development is typically done either for Android or iOS, so we will cover those two platforms.

This chapter will be split into a number of topics. The chapter itself will be a simple step-by-step process from beginning to end. The following is a list of the tasks we will perform:

  • Introducing the Build Settings menu
  • Building a project for a PC
  • Exporting your project to Android
  • Running the Android APK with an emulator
  • Putting the project on your Android device
  • Unity iOS installation...

Technical requirements

This book utilizes Unity 2022.1.0b16 and Unity Hub 3.3.1, but the steps should work with minimal changes in future versions of the editor. If you would like to download the exact version used in this book, and there is a new version out, you can visit Unity’s download archive at https://unity3d.com/get-unity/download/archive. You can also find the system requirements for Unity at https://docs.unity3d.com/2022.1/Documentation/Manual/system-requirements.html in the Unity Editor system requirements section.

If you wish to deploy to an Android device, you can use macOS, Linux, or Windows, and depending on the features you wish to use, it is possible to export your game in such a way as to run apps on Android 5.1 Lollipop and above.

Note

For more information on the different types of Android versions that are supported, check out https://docs.unity3d.com/ScriptReference/AndroidSdkVersions.html.

To develop for an iOS device, in addition to the device...

Introducing the Build Settings menu

There are times during development when you may want to see what your game looks like outside of the editor. It can give you a sense of accomplishment. I know I felt that way the first time I pushed a build to a console devkit. Whether it’s for PC, Macintosh, Linux, web player, mobile, or console, we have to go through the same menu – the Build Settings menu:

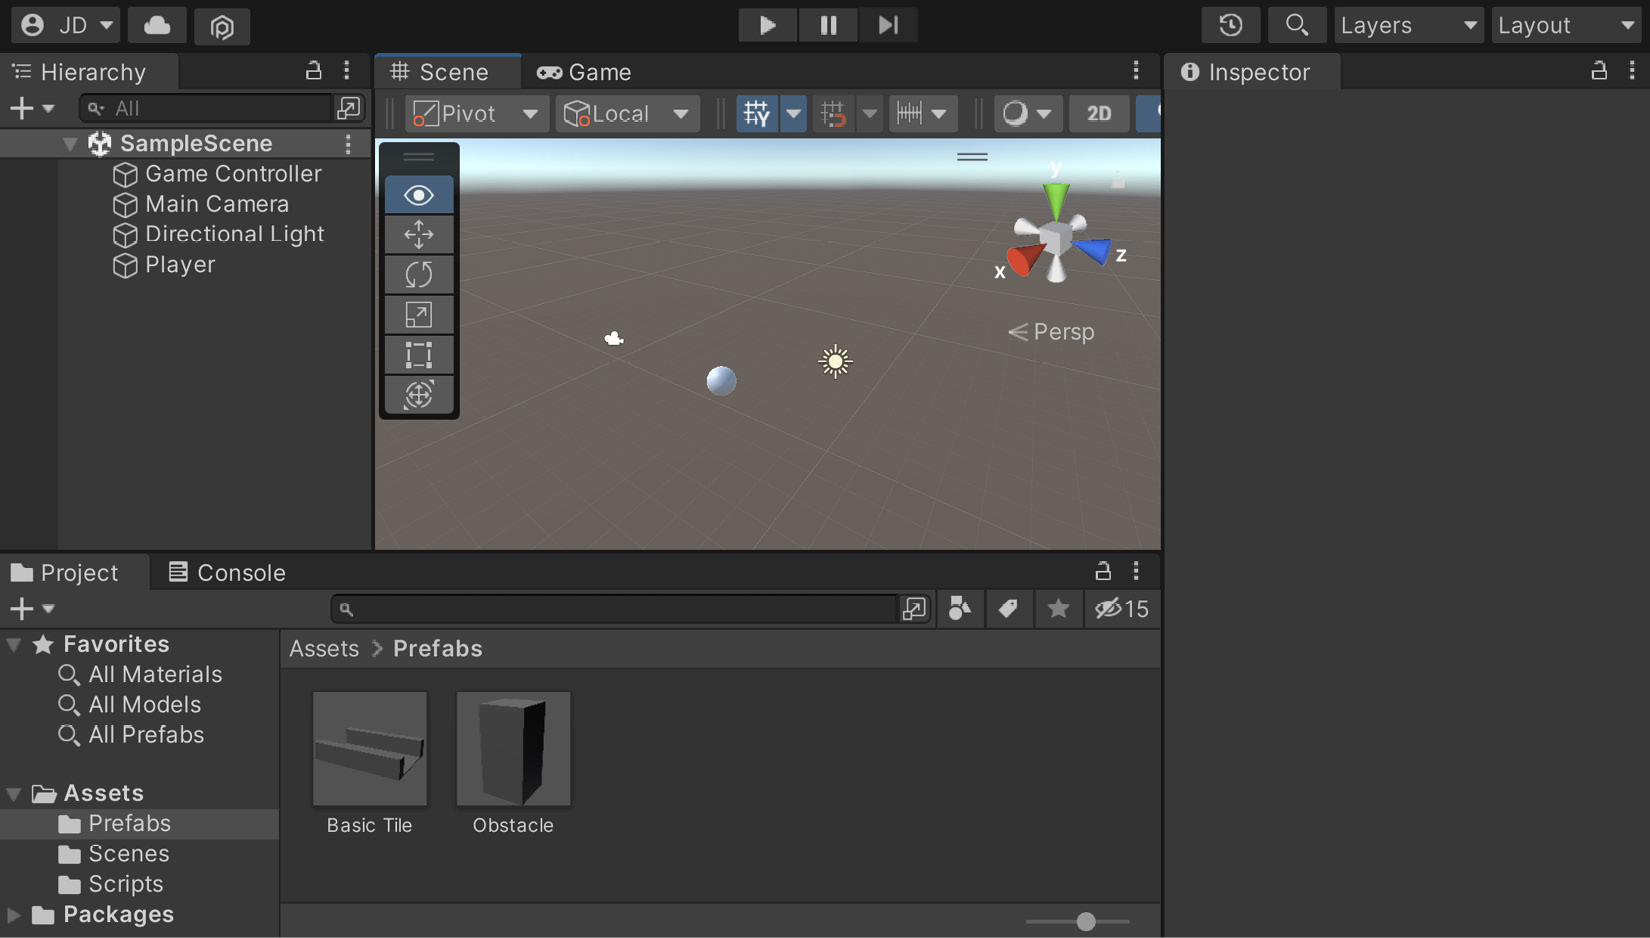
  1. Start off by opening up the project we created in Chapter 1, Building Your Game. In addition, open the scene we created (SampleScene.unity, which is inside the Scenes folder):
Figure 2.1 –The SampleScene file

Figure 2.1 –The SampleScene file

  1. Since the scene is our gameplay, let’s rename the file by first opening the Scenes folder in the Project window, right-clicking on the SampleScene object, and selecting Rename. Rename the file to Gameplay and then press the Enter key to submit the change. Unity will ask whether you want to reload the scene. Do so...

Building a project for a PC

By default, our platform is set to Windows, Mac, Linux. Just to verify that everything is working correctly, let’s go ahead and get the game working on our own platform before moving to mobile:

  1. To get started, we will select the Build option. In my case, I’ll be exporting the project to Windows, but the process is similar for macOS and Linux.
  2. Once this is done, a window will pop up asking for a name and a location to put the game in. I’m going to create a new Export folder located in the same folder that contains Assets and Library, so it won’t show up in the Project window, but it will be in the same folder as my project:
Figure 2.4 – The Export folder

Figure 2.4 – The Export folder

  1. Click on Select Folder and wait for it to finish. Once it’s done, a window should appear as follows:
Figure 2.5 – Folder created

Figure 2.5 – Folder created

We have the executable, but we also have a...

Exporting a project for Android

Now that we have all of the setup done, we can open Unity with our project and export it for Android devices. In this section, we will first check whether we have Android Build Support installed, and then we will update the build and player settings to export our project. So, let’s get started.

Installing Android Build Support for Unity

First of all, if you haven’t done so already, you’ll need to select to add Android Build Support as an option when you install Unity. If you have installed it, you can skip this section. If you did not install it when doing the initial installation, we will cover the installation in the following steps:

  1. Close the Unity Editor and open the Unity Hub and select the Installs section.
  2. From there, click on the gear icon to the right of your current version of Unity and select the Add modules option:
Figure 2.7 – Selecting the Add Modules option

Figure 2.7 – Selecting the Add Modules option

...

Running the Android APK with an emulator

While the best way to test an Android game is on an actual Android device, it is also possible to test the game out on an emulator, which is a medium through which we can have our computer run software that was created for Android devices. There are several Android emulators available for Windows at the time of writing, but the one that I’ve had the most success with is one called LDPlayer, a lightweight and fast Android emulator; however, it does contain ads due to it being free. For those on an Intel-powered Macintosh, you can use BlueStacks (https://www.bluestacks.com/download.html), but at the time of writing, there are no Android emulators available on Apple silicon-powered Macintoshes. This section is completely optional; if you’d rather test on an actual device, skip ahead to the Putting the project on your Android device or the Unity for iOS setup and Xcode installation section.

To test the game on an emulator, follow...

Putting the project on your Android device

The following steps may be different for you depending on your Android version and your specific phone, but here is a general set of steps to be able to sideload our Android app to our device:

  1. On your Android device, you’ll need to go to your Settings app. From there select the Apps section:
Figure 2.21 – The Settings | Apps location

Figure 2.21 – The Settings | Apps location

  1. From there, scroll down till you get to the Special app access section or similar, and then tap on it to go into the menu:
Figure 2.22 – The Special app access option

Figure 2.22 – The Special app access option

  1. Inside there, you’ll see a section called Install unknown apps. Enter this option:
Figure 2.23 – The Install unknown apps option

Figure 2.23 – The Install unknown apps option

  1. We will be uploading our app to the device’s files, so we will want to enable Install unknown apps from the Files app. Select it and then enable it from the...

Unity for iOS setup and Xcode installation

With Android, there’s a lot of setup effort required, but building and getting a game onto your device is less work, whereas, with iOS, there’s less work to do on the setup and more involvement with getting the game actually onto the device.

Previously, you had to have a paid Apple Developer license to get your game onto an iOS device. Although that’s still required to get the game on the App Store, you are no longer required to get it for testing. Note that the free option doesn’t have everything available to you, most notably in-app purchases (IAPs) and the Game Center; however, the game should work just fine on your device. We will go over how to adjust your project to reflect being in the Apple Developer portal in Chapter 13, Building a Release Copy of Our Game, when we cover putting our project on the App Store.

To develop for an iOS device, in addition to the device itself running iOS 12 or later, you...

Building a project for iOS

While there are some similarities to working with Android, some differences are very important to note, so keep that in mind while reading this section. Let’s build our project for the iOS device using the following steps:

  1. At this point, we will dive into Unity (switching Target to MacStandalone if needed) and then move into our Build Settings menu once again by going to File | Build Settings.
  2. Click on the iOS option from the Platform list and then click on the Switch Platform button to make the change:
Figure 2.39 – Selecting the iOS option from the Platform list

Figure 2.39 – Selecting the iOS option from the Platform list

Note that this will make Unity reimport all of the assets in our game, which may be time-consuming as you build larger and larger projects. This now also means that when we build our project, it will create an Xcode project instead of just an app, which we will need to open and work with once it’s built.

  1. If we didn’...

Running the project via the iOS simulator

Much like how we were able to use an Android emulator on the PC to play a simulated version of our game project, it is also possible to do the same exact thing on iOS by using the iOS simulator:

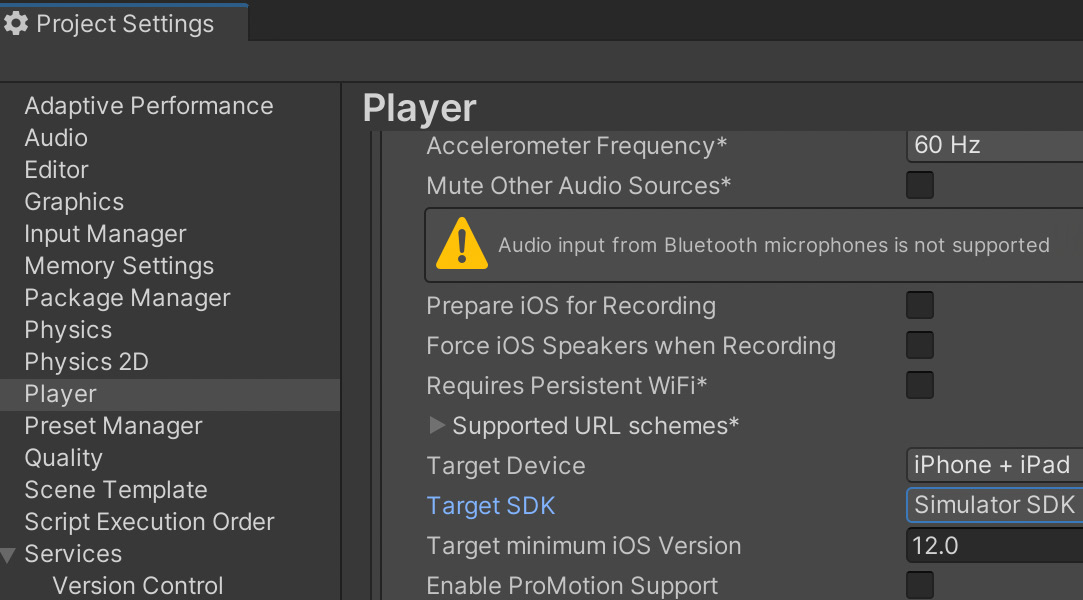
  1. Back in the Unity Editor, go to the Player settings. From there, go to the Other Settings section and change the Target SDK property from Device SDK to Simulator SDK:
Figure 2.47 – Setting Target SDK to Simulator SDK

Figure 2.47 – Setting Target SDK to Simulator SDK

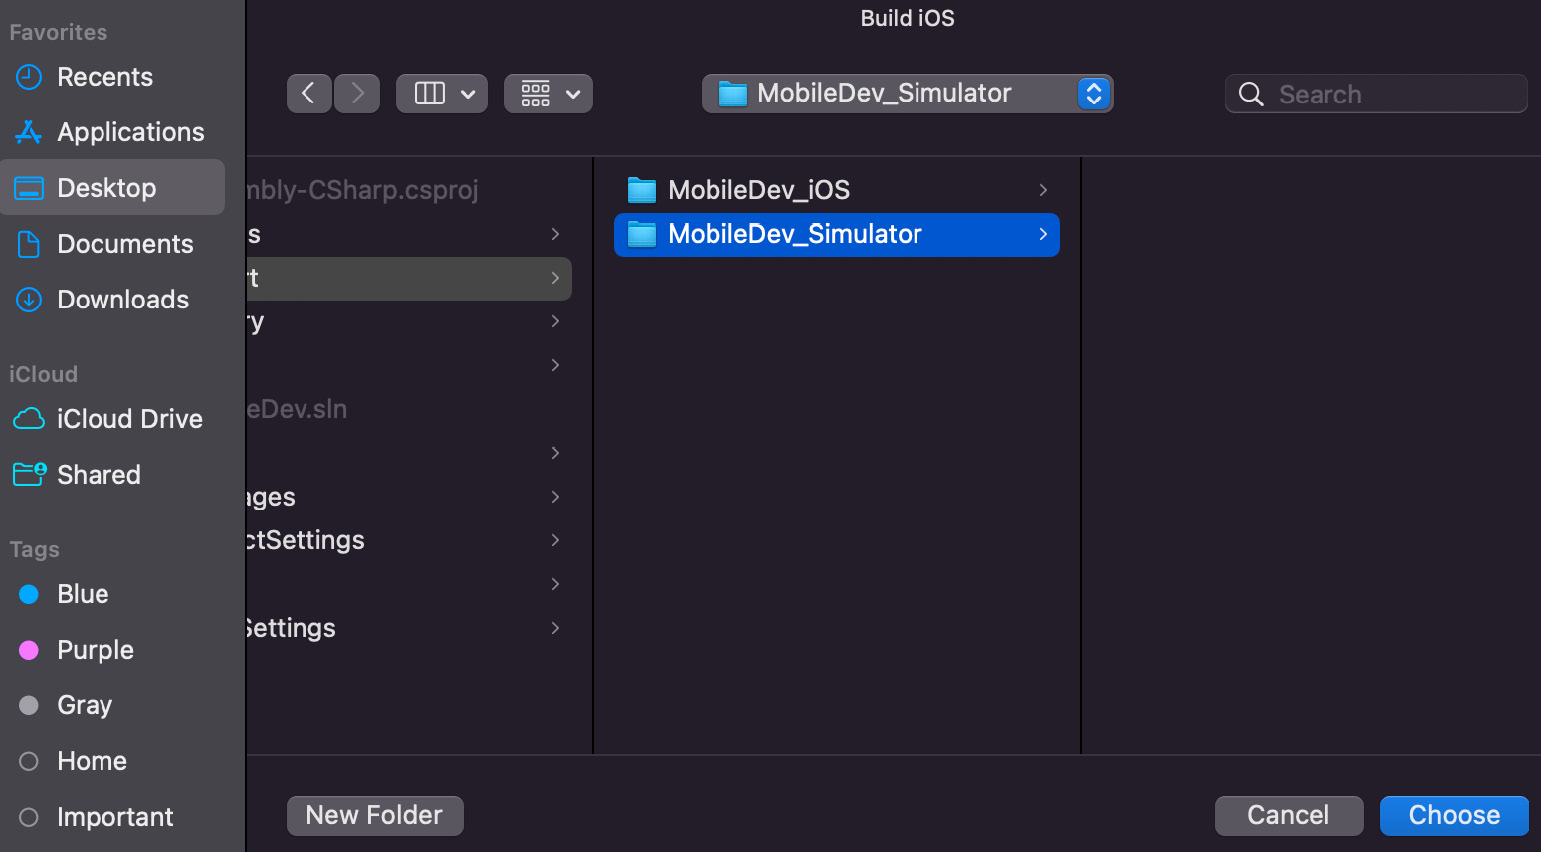
  1. Rebuild the project. This time I created a new folder to specify that this build was meant for the iOS simulator:
Figure 2.48 – Select a build folder

Figure 2.48 – Select a build folder

  1. Open the new project, and from there, in the top section, you’ll now see a simulator device selected instead of the Any iOS device option given in the previous build. You can also click on the option to open a drop-down list where you can select a particular device you’d like to...

Summary

We now have our game running on Android and iOS devices, and we have learned the steps we’ll need to take each time we want to deploy our games on these devices.

While I will not be writing about exporting to both kinds of devices again until we get to Chapter 13, Building a Release Copy of Our Game, it’s a good idea for you to see how the changes that we will make will work with both platforms and keep testing on each platform to make sure that your project works correctly and at a frame rate that you are okay with.

This is especially important to note, as running the project on your PC via the editor or an emulator will not always accurately represent how the game will run on a different device. As a result, you may find that certain aspects of your game that run fine on your mobile device will cause your computer to be choppy instead. The thing is, you won’t know unless you are always checking the games on devices, so I highly advise that you do...

lock icon
The rest of the chapter is locked
You have been reading a chapter from
Unity 2022 Mobile Game Development - Third Edition
Published in: Jun 2023Publisher: PacktISBN-13: 9781804613726
Register for a free Packt account to unlock a world of extra content!
A free Packt account unlocks extra newsletters, articles, discounted offers, and much more. Start advancing your knowledge today.
undefined
Unlock this book and the full library FREE for 7 days
Get unlimited access to 7000+ expert-authored eBooks and videos courses covering every tech area you can think of
Renews at €14.99/month. Cancel anytime

Author (1)

author image
John P. Doran

John P. Doran is a passionate and seasoned Technical Game Designer, Software Engineer, and Author who is based in Incheon, South Korea. His passion for game development began at an early age. He later graduated from DigiPen Institute of Technology with a Bachelor of Science in Game Design. For over a decade, John has gained extensive hands-on expertise in game development working in various roles ranging from game designer to lead UI programmer working in teams consisting of just himself to over 70 people in student, mod, and professional game projects including working at LucasArts on Star Wars: 1313. Additionally, John has worked in game development education teaching in Singapore, South Korea, and the United States. To date, he has authored over 10 books pertaining to game development. John is currently a Technical Game Design Instructor at George Mason University Korea. Prior to his present ventures, he was an award-winning videographer.
Read more about John P. Doran