Reader small image

You're reading from  JIRA 7 Essentials - Fourth Edition

Product typeBook
Published inNov 2016
Reading LevelBeginner
PublisherPackt
ISBN-139781786462510
Edition4th Edition
Languages
Tools
Right arrow
Author (1)
Patrick Li
Patrick Li
author image
Patrick Li

Patrick Li is the cofounder of AppFusions and works as a senior engineer there, specializing in integration solutions with many enterprise applications and platforms, including IBM Connections, Jive, Google Apps, and more. He has worked in the Atlassian ecosystem for over 10 years, developing products and solutions for the Atlassian platform and providing expert consulting services. He has authored many books and video courses covering Jira. He has extensive experience in designing and deploying Atlassian solutions from the ground up and customizing existing deployments for clients across verticals such as healthcare, software engineering, financial services, and government agencies.
Read more about Patrick Li

Right arrow

Chapter 7.  Workflow and Business Process

In the previous chapters, you learned some of the basics of JIRA and how to customize its data capture and presentation with custom fields and screens. In this chapter, we will dive in and take a look at workflows, one of the core and most powerful features in JIRA.

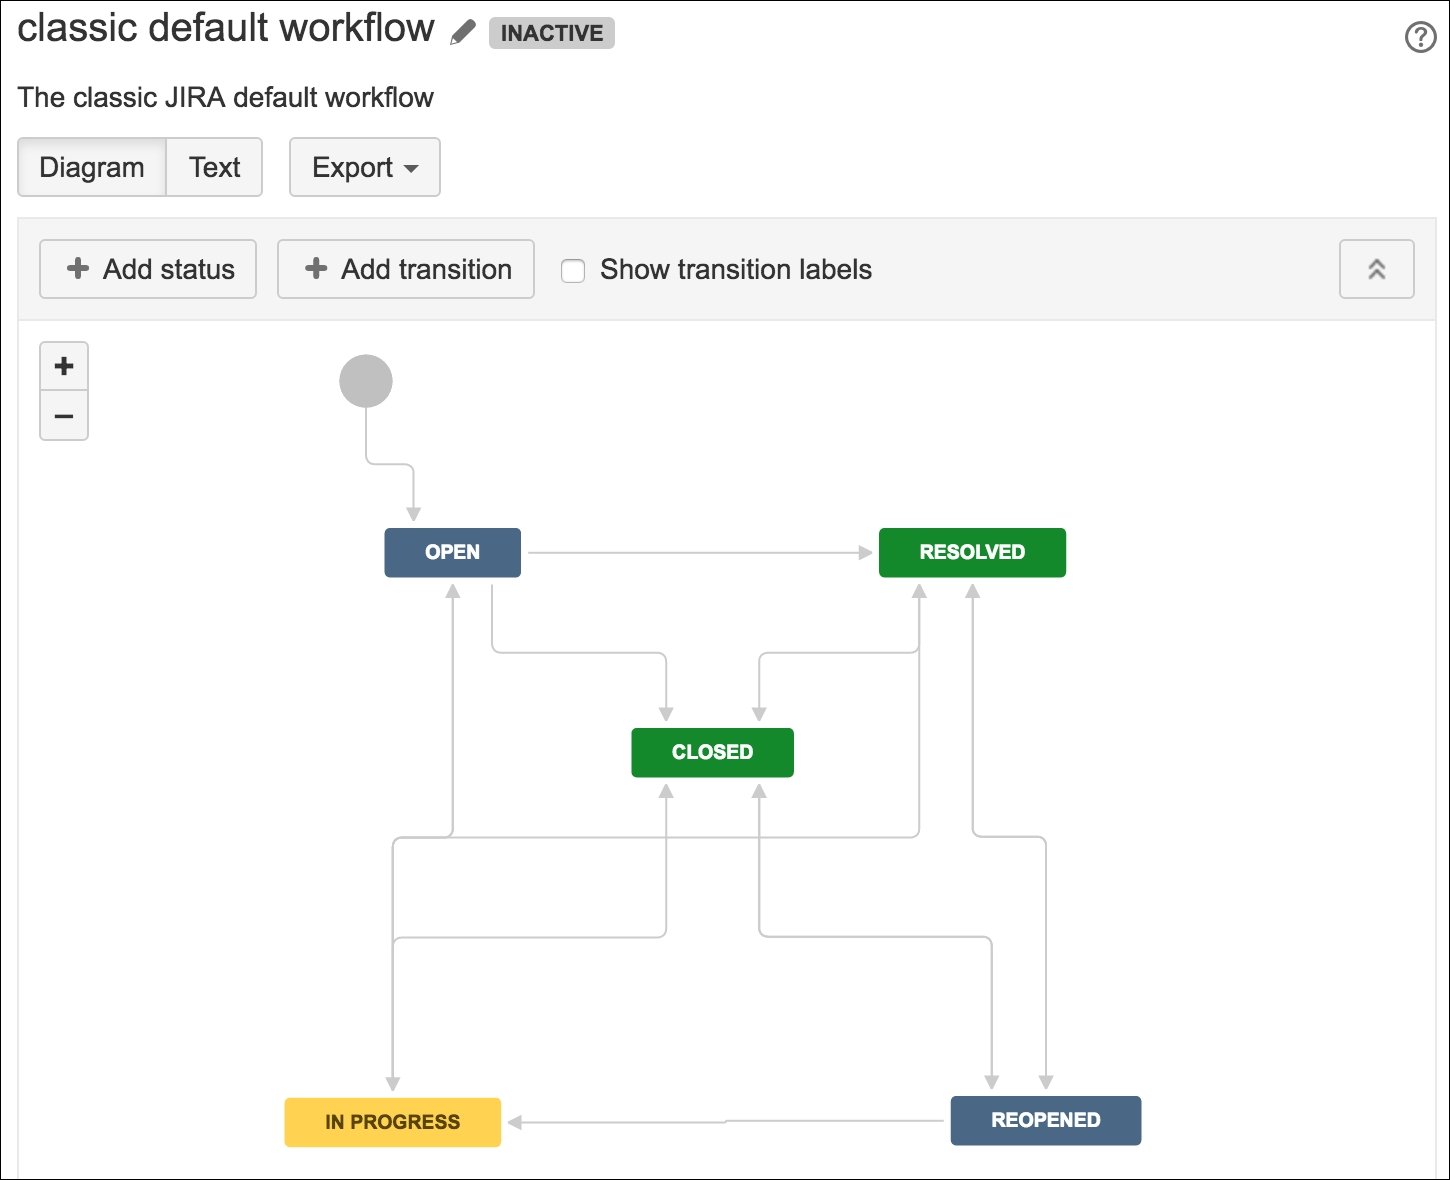
A workflow controls how issues in JIRA move from one status to another, as they are being worked on, often passing from one assignee to another. Unlike many other systems, JIRA allows you to create your own workflows to resemble your processes.

By the end of this chapter, you will have learned the following:

  • What a workflow is and what it consists of

  • About the relationship between workflows and screens

  • What are statuses, transitions, conditions, validators, and post functions

  • How to create your own workflow with the workflow designer

  • How to associate a workflow with projects

Mapping business processes


It is often said that a good software system is one that adapts to your business and not one that requires your business to adapt to the software. JIRA is an excellent example of the former. The power of JIRA is that you can easily configure it to model your existing business processes through the use of workflows.

A business process flow can often be represented as a flow chart. For example, a typical document approval flow may include tasks such as document preparation, document review, and document submission, where the user needs to follow these tasks in a sequential order. You can easily implement this as a JIRA workflow. Each task will be represented as a workflow status with transitions guiding you on how you can move from one status to the next. In fact, when working with workflows, it is often a good approach to first draft out the logical flow of the process as a flow chart and then implement this as a workflow. As we will see, JIRA provides many tools...

Understanding workflows


A workflow is what JIRA uses to model business processes. It is a flow of statuses (steps) that issues go through one by one with paths between them (transitions). All issues in JIRA have a workflow applied based on their issue type and project. Issues move through workflows from one status (for example, OPEN) to another (for example, CLOSED). JIRA lets you visualize and design workflows as a diagram, as shown in the following diagram:

The preceding diagram shows a simple workflow in JIRA. The rectangles represent the statuses, and the arrow lines represent transitions that link statuses together. As you can see, this looks a lot like a normal flow chart depicting the flow of a process.

Also notice that statuses have different colors. The color of a status is determined by the category it belongs to. There are three categories, To Do (blue), In Progress (yellow), and Done (green). Categories help you to easily identify where along the workflow an issue is at, by using...

Managing workflows


Workflows are controlled and managed centrally from the JIRA administration console, so you need to be an administrator to create and configure workflows. To manage workflows, perform the following steps:

  1. Log in to JIRA as a JIRA administrator.

  2. Browse to the JIRA administration console.

  3. Select the Issues tab and then the Workflows option. This will bring up the View Workflows page:

From the View Workflows page, you will be able to see a list of all the available workflows. You can also create new workflows and manage existing ones. The page is divided into two sections, Active and Inactive. Active workflows are being used by projects, and inactive ones are not. By default, the Inactive section is collapsed, so the page will only display active workflows. The preceding screenshot shows the Inactive section being expanded.

JIRA comes with a default read-only workflow called jira. This workflow is applied to projects that do not have any specific workflow applied. For this reason...

Using the workflow designer


JIRA comes with a simple to use, drag and drop tool called the workflow designer. This helps you create and configure workflows. If you are familiar with diagramming tools such as Microsoft Visio, you will feel right at home. There is also another older option, called the Text mode, available. However, since the designer is easier and has more features, we will focus on using the designer in this book.

Tip

As your workflow becomes more complicated, the Text mode can be a better option to manage statuses and transitions in the workflow.

The workflow designer is shown in the following screenshot. You have the workflow layout in the main panel and a few controls on top, namely the Add status and Add transition buttons. Note that the Diagram option is selected. If you click on the Text option, JIRA will change to the old authoring tool:

From the workflow designer, you can drag and rearrange the statuses and transitions. Clicking on each will open up its property window...

Authoring a workflow


So, let's take a look at how to create and set up a new workflow in JIRA. To create a new workflow, all you need is a name and description:

  1. Browse to the View Workflows page.

  2. Click on the Add Workflow button.

  3. Enter a name and description for the new workflow in the Add Workflow dialog.

  4. Click on the Add button to create the workflow.

The newly created workflow will only contain the default create and open status, so you will need to configure it by adding new statuses and transitions to make it useful. Let's start with adding new statuses to the workflow using the following steps:

  1. Click on the Add status button.

  2. Select an existing status from the drop-down list. If the status you need does not exist, you can create a new status by entering its name and pressing the  Enter key on your keyboard.

  3. Check the Allow all statuses to transition to this one option if you want users to be able to move the issue into this status regardless of its current status. This will create a global...

Updating an existing workflow


JIRA lets you make changes to both active and inactive workflows. However, with active workflows, there are several restrictions:

  • Existing workflow steps cannot be deleted

  • The associated status for an existing step cannot be edited

  • If an existing step has no outgoing transitions, it cannot have any new outgoing transitions added

If you need to make these changes, you will have to either deactivate the workflow by removing the associations of the workflow with all projects or create a copy of the workflow.

Tip

You can always make a copy of the active workflow, make your changes, and then swap the original with the copied workflow in your workflow scheme.

When editing an active workflow, you are actually making changes to a draft copy of the workflow created by JIRA. All the changes you make will not be applied until you publish your draft.

Note

Do not forget to publish your draft after you have made your changes.

Publishing a draft is a very simple process. All you have...

Workflow schemes


While workflows define and model business processes, there still needs to be a way to tell JIRA the situations in which to apply the workflows. As with other configurations in JIRA, this is achieved through the use of schemes. As we have seen in the previous chapters, schemes act as self-contained, reusable configuration units that associate specific configuration options with projects and, optionally, issue types.

A workflow scheme establishes the association between workflows and issue types. The scheme can then be applied to multiple projects. Once applied, the workflows within the scheme become active.

To view and manage workflow schemes, perform the following steps:

  1. Log in as a JIRA administrator user.

  2. Browse to the JIRA administration console.

  3. Select the Issues tab and then the Workflow Schemes option. This will bring up the Workflow Schemes page, as shown in the following screenshot:

The Workflow Schemes page shows each scheme's workflow association. For example, in the...

Applying a workflow scheme to projects


Workflow schemes are inactive by default after they are created. This means there are no projects in JIRA using the workflow scheme. To activate a workflow scheme, you need to select the scheme and apply it to the project.

When assigning a workflow scheme to a project, you need to follow the three basic steps:

  1. Browse to the project administration page for the project you want to apply the workflow scheme to.

  2. Select the Workflows option from the left panel.

  3. Click on the Switch Scheme button.

  4. Select the new workflow scheme to use and click on the Associate button.

On the confirmation page, depending on the differences between the current and new workflow, you will be prompted to make migration decisions for existing issues. For example, if the current workflow has a status called Resolved and the new workflow does not (or it has something equivalent but with a different ID), you need to specify the new status to place the issues that are currently in the Resolved...

Extending workflow with workflow add-ons


There are a number of very useful add-ons that will provide additional components such as conditions, validators, and post functions. The following list presents some of the most popular workflow-related plugins.

JIRA Suite Utilities

You can find a number of very useful conditions, validators, and post functions with this add-on. For example, the Update Issue Field post function that ships with JIRA allows you to update any issue fields such as priority and assignee when a workflow transition completes. The JIRA Suite Utilities plugin complements this by providing a very similar Update Issue Custom Field post function, which handles custom fields. There are many other useful components such as the Copy Value From Other Field post function, which will allow you to implement some amazing logic with your workflow. A must-have add-on for any JIRA. You can find out more at  https://marketplace.atlassian.com/plugins/com.googlecode.jira-suite-utilities.

JIRA...

The HR project


We have seen the power of workflows and how we can enhance the usefulness of JIRA by adapting to everyday business processes. With our HR project, we have already defined two issue types to represent the onboarding and dismissing of an employee, both of these use the same default workflow with two steps, To Do and Done. So, we will now customize the workflow to represent a real-world HR process.

Our requirements for the business process would then include the following:

  • The New Employee and Termination issue types will use customized workflow, while the Task issue type will continue to use the existing one.

  • For Termination issue type, we will add two additional steps, one to conduct an exit interview, and one to ensure that all necessary company assets are returned.

  • Ensure that only authorized personnel can transition the issue through the various statuses of the workflow.

The easiest way to implement these requirements would be to create a new workflow and add the additional process...

Summary


In this chapter, we looked at how JIRA can be customized to adapt to your organization. At the heart of this powerful feature is a robust workflow system that allows you to model JIRA workflows based on existing business processes. We also looked at the various components within a workflow, how to perform validations, and how post-processing provides a level of process automation.

In the next chapter, we will look at how we can combine the power of workflow and its event-driven system to facilitate communication through JIRA notifications and the e-mail system.

lock icon
The rest of the chapter is locked
You have been reading a chapter from
JIRA 7 Essentials - Fourth Edition
Published in: Nov 2016Publisher: PacktISBN-13: 9781786462510
Register for a free Packt account to unlock a world of extra content!
A free Packt account unlocks extra newsletters, articles, discounted offers, and much more. Start advancing your knowledge today.
undefined
Unlock this book and the full library FREE for 7 days
Get unlimited access to 7000+ expert-authored eBooks and videos courses covering every tech area you can think of
Renews at $15.99/month. Cancel anytime

Author (1)

author image
Patrick Li

Patrick Li is the cofounder of AppFusions and works as a senior engineer there, specializing in integration solutions with many enterprise applications and platforms, including IBM Connections, Jive, Google Apps, and more. He has worked in the Atlassian ecosystem for over 10 years, developing products and solutions for the Atlassian platform and providing expert consulting services. He has authored many books and video courses covering Jira. He has extensive experience in designing and deploying Atlassian solutions from the ground up and customizing existing deployments for clients across verticals such as healthcare, software engineering, financial services, and government agencies.
Read more about Patrick Li